Strawberry Danish
Whenever I think of indulging in a delicious Strawberry Danish, I’m instantly transported to my childhood kitchen where the scent of baked goods wafted through the air. It was a weekend ritual, my grandmother and I would gather in her cozy space as she guided me through the art of pastry-making. The buttery, flaky layers of puff pastry would always mesmerize me, and the vibrant strawberries combined with a sweet cream cheese filling felt like pure magic. Each bite was a blend of sweet and tangy, a perfect way to celebrate any occasion or simply enjoy a lazy afternoon. Now, I want to share this delightful experience with you, so let’s dive into creating your very own Strawberry Danish that will surely become a beloved staple in your home.
Recipe Snapshot
26 mins
8 mins
18 mins
Medium
220 kcal
3 g
Gluten-Free, Low FODMAP
10 g
Mixing Bowl, Chef’s Knife, Baking Sheet, Oven
What Makes This Strawberry Danish Special
There are countless reasons to fall head over heels for this Strawberry Danish. Here are just a few:
1. Versatile Delight
This pastry is perfect for any occasion! Whether it’s a sunny brunch, an afternoon tea, or a sweet treat after dinner, the Strawberry Danish fits right in. You can serve it warm or cold, and it always steals the show.
2. Family Tradition
Making Strawberry Danish can turn into a cherished family tradition. Involving kids or loved ones in the process not only makes for fun memories but also allows everyone to enjoy the delicious results together.
3. Stunning Presentation
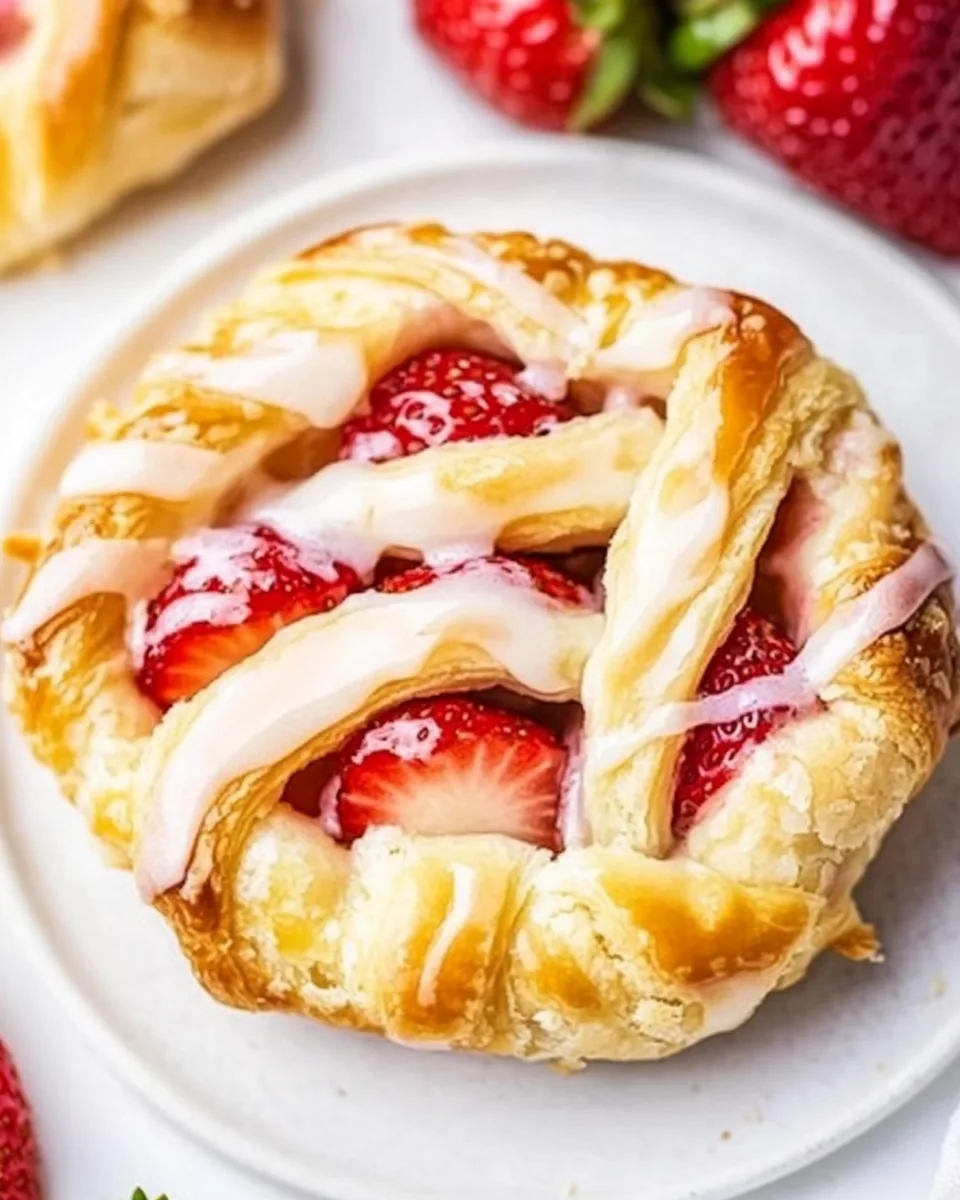
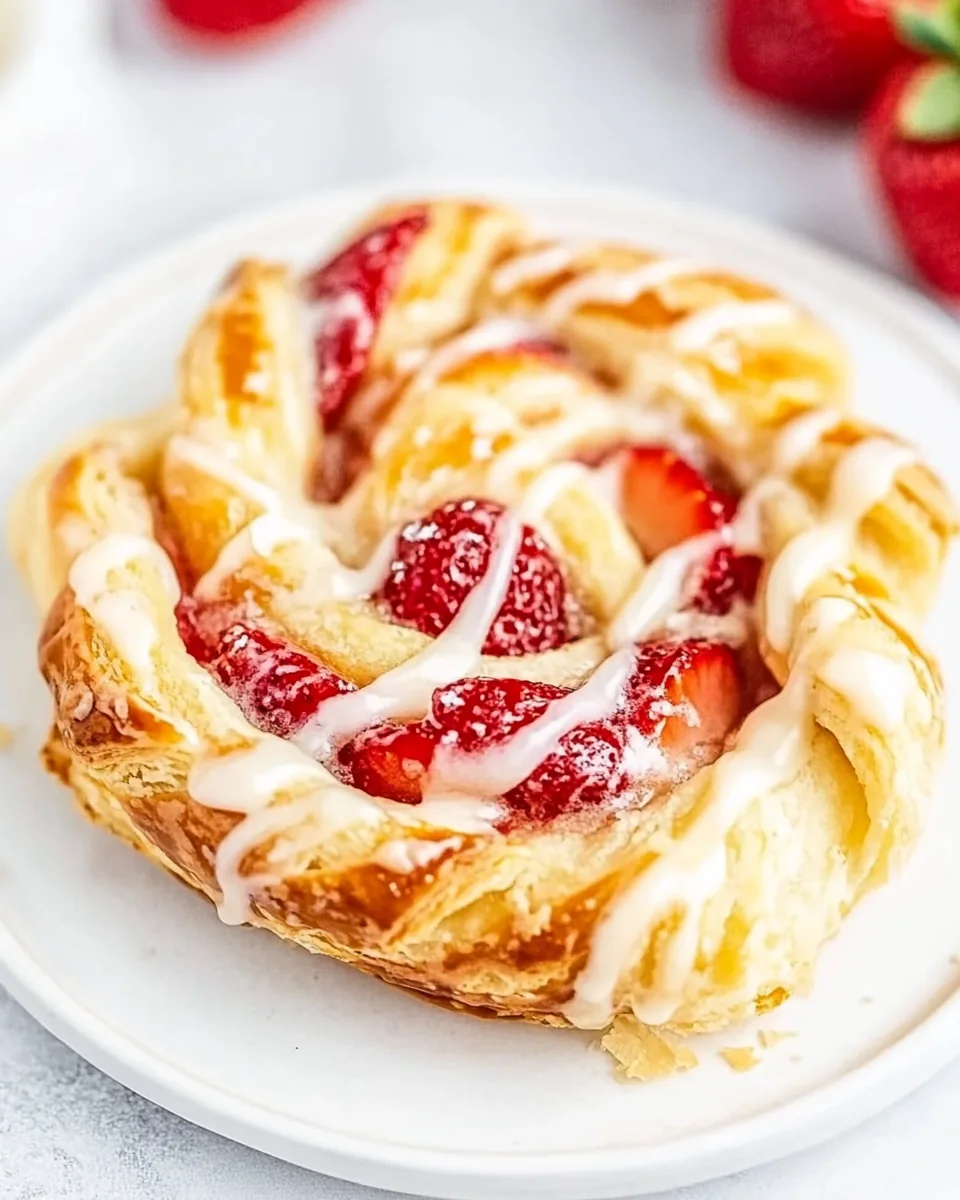
Nothing quite compares to the sight of these golden, flaky pastries topped with fresh strawberries and a sweet glaze. It’s a visual treat that can impress guests or family with minimal effort.
4. Easy to Customize
Feel free to get creative with the filling! While strawberries are a classic, you can substitute with raspberries, blueberries, or even peaches, depending on what’s in season or what you prefer.
5. Perfect for Make-Ahead
This recipe can easily be prepped ahead of time. Shape the pastries and keep them in the fridge for up to twenty-four hours before baking. It’s an excellent way to save time when entertaining!
6. Satisfies Every Sweet Tooth
The combination of sweet cream cheese and fresh strawberries balanced by a hint of tanginess ensures that every bite is a heavenly experience. It’s a dessert that can satisfy the sweetest cravings.
Recipe Ingredients for Strawberry Danish

Every great dish begins with quality ingredients, and the Strawberry Danish is no exception. The harmonious blend of textures and flavors come from a few key players that transform into the perfect pastry. The cream cheese offers a luscious base, while the strawberry jam adds a vibrant sweetness. Using puff pastry makes this recipe simple yet indulgent, providing the quintessential flaky crust that we all crave.
- 8 ounces cream cheese at room temperature – This creamy cheese serves as the heart of the filling, providing a rich and smooth texture.
- 3 tablespoons granulated sugar – Sweetening the cream cheese filling, this sugar brings balance to the tanginess.
- lemon zest of one lemon – A hint of citrus brightness that elevates the overall flavor.
- 1 teaspoon vanilla extract – Adds warmth and depth to the filling.
- 17.25 ounces puff pastry, thawed – The star of the show, providing that flaky, buttery texture we all love.
- 1 large egg beaten (for egg wash) – Ensures a golden-brown crust that’s visually appealing.
- 16 teaspoons strawberry jam divided – Adds a sweet and fruity flavor that perfectly complements the cream cheese.
- 1 cup powdered sugar – Used for the glaze, creating a sweet finishing touch.
- 2 tablespoons milk or heavy cream – Helps in achieving the desired glaze consistency.
- ½ teaspoon vanilla extract – Enhancing the glaze with a lovely vanilla flavor.
- 16 strawberries sliced – Fresh berries that not only add flavor but also a pop of color.
Putting Together Strawberry Danish
Making a Strawberry Danish is a joyous experience that invites creativity. Let’s roll up our sleeves and bring this delicious pastry to life! Follow these detailed steps to create a beautiful batch that you’ll be proud to serve.
To begin, grab a large mixing bowl and add 8 ounces of cream cheese, 3 tablespoons of granulated sugar, the zest of one lemon, and 1 teaspoon of vanilla extract. Using a hand mixer or a whisk, beat the mixture until it’s completely combined and smooth. This creamy filling serves as the heart of the pastry, so ensure it’s well mixed. Set it aside for later.
Next, take your thawed puff pastry and lay out a sheet on a clean surface. Gently roll it out with a rolling pin to remove any creases, ensuring it’s nice and smooth. Cut the sheet lengthways into strips about one inch thick. Repeat this process with the second sheet until you have ample strips ready for twisting.
Now, pick up a strip of pastry with one end in each hand. Twist the ends in opposite directions to form a loose ribbon. Once you’ve twisted each strip, place one end of the strip down on your work surface to act as the center point of your pastry. Lightly coil the twisted strip around this center point to create a round shape. Repeat this process with the remaining strips of pastry, forming delightful twirls.
Transfer the coiled pastry rounds onto two baking sheets, making sure to leave a small amount of space between each one. These will puff up while baking, so allow for expansion. Once placed, cover the pastries with a clean cloth and put them in the refrigerator for about fifteen minutes. This step helps retain their shape during baking.
While the pastries chill, preheat your oven to 400°F. This temperature is crucial for ensuring a perfectly golden and flaky pastry. After the fifteen minutes are up, remove the chilled pastry from the refrigerator.
Using your thumb, gently press a groove into the center of each pastry, then use a fork to prick it lightly all around. This technique prevents the pastry from puffing up too much in the center while allowing the edges to rise beautifully.
Prepare an egg wash by beating 1 large egg. Brush the outside of the pastry with the egg wash, but avoid applying it to the very center where the filling will go. This will create a nice golden-brown finish on the edges.
Add 16 teaspoons of strawberry jam to the center of each pastry. Just half a teaspoon will do, ensuring you don’t overfill it. This jam will serve as the sweet surprise that you will taste with every bite.
Next, take a scant tablespoon of the cream cheese mixture you prepared earlier and dollop it on top of the jam in each pastry. Then, add another half teaspoon of jam on top for extra sweetness and flavor.
It’s time to bake! Place the baking sheets in the preheated oven and let them bake for about eighteen minutes. Keep an eye on them; you want them to puff up and turn a beautiful golden brown. When they are ready, remove them from the oven and allow them to cool slightly on the baking sheets.
While the pastries are cooling, prepare the glaze. In a large mixing bowl, combine 1 cup of powdered sugar, 2 tablespoons of milk or heavy cream, and ½ teaspoon of vanilla extract. Beat until completely smooth. The glaze should be runny enough to pour, so adjust with more milk or powdered sugar as necessary.
Finally, top each danish with the remaining 16 strawberries sliced to add freshness. Drizzle the sweet glaze generously over the top, and your Strawberry Danish is ready to be enjoyed!
Things Worth Knowing
- For Best Results: Ensure your cream cheese is at room temperature to achieve a smooth filling without lumps.
- Keep an Eye on Baking: Ovens vary, so check the pastries a minute or two early to prevent over-baking.
- Chill Before Baking: Chilling the pastry before baking helps maintain its shape and ensures a flaky texture.
- Use Fresh Ingredients: Opt for fresh strawberries for the best flavor and presentation.
Pro Tips and Tweaks
Here are some extra tips to enhance your Strawberry Danish experience. These suggestions will help you make the most of your baking adventure!
- Storage: Store any leftover pastries in an airtight container at room temperature for one day or in the fridge for up to three days. They taste best when fresh but can still be enjoyed later.
- Freezing: If you want to make these pastries ahead of time, freeze unbaked pastries on a baking sheet, then transfer them to a freezer bag. Bake straight from frozen, adding a couple of extra minutes to the baking time.
- Variations: Feel free to experiment with different jams or fillings like raspberry or blueberry for a unique twist on the classic flavor.
- Serving Suggestions: Serve your Strawberry Danish warm, dusted with powdered sugar, or alongside a scoop of vanilla ice cream for an extra indulgent treat.
- Perfect Pairings: This pastry pairs beautifully with coffee or tea, making it an ideal choice for brunch or afternoon gatherings.
- Garnish Ideas: Add a sprig of mint on top for a pop of color and a refreshing touch.
Side Dish Ideas for Strawberry Danish
The Strawberry Danish is a versatile treat that can be enjoyed in many settings. Here are some fantastic side dish ideas and serving suggestions:
- Fresh Fruit Salad: A light and refreshing fruit salad complements the sweet pastry beautifully, offering a healthy balance.
- Creamy Yogurt: Serve with a dollop of yogurt on the side for a creamy contrast that enhances the flavor profile.
- Whipped Cream: A side of whipped cream can elevate your Strawberry Danish even more, providing a luscious topping.
- Seasonal Beverages: Pair it with iced tea or lemonade during warmer months, or enjoy it with a hot beverage like coffee or tea.
- Brunch Spread: Include the Strawberry Danish in a brunch spread featuring pastries, quiches, and savory items for a delightful assortment.
- Picnic Treat: Pack these pastries in a picnic basket to enjoy outdoors, where their sweet and flaky nature can be fully appreciated.
- Holiday Gathering: Make them a part of your holiday dessert table for a delightful touch that everyone will love.
FAQ
Conclusion
The Strawberry Danish is truly a special treat that brings warmth and joy to any occasion. With its flaky pastry, creamy filling, and fresh strawberries, it’s sure to become a family favorite. I encourage you to give this recipe a try; you won’t be disappointed!

Strawberry Danish
Ingredients
Equipment
Method
- To begin, grab a large mixing bowl and add 8 ounces of cream cheese, 3 tablespoons of granulated sugar, the zest of one lemon, and 1 teaspoon of vanilla extract. Using a hand mixer or a whisk, beat the mixture until it’s completely combined and smooth. This creamy filling serves as the heart of the pastry, so ensure it’s well mixed. Set it aside for later.
- Next, take your thawed puff pastry and lay out a sheet on a clean surface. Gently roll it out with a rolling pin to remove any creases, ensuring it’s nice and smooth. Cut the sheet lengthways into strips about one inch thick. Repeat this process with the second sheet until you have ample strips ready for twisting.
- Now, pick up a strip of pastry with one end in each hand. Twist the ends in opposite directions to form a loose ribbon. Once you’ve twisted each strip, place one end of the strip down on your work surface to act as the center point of your pastry. Lightly coil the twisted strip around this center point to create a round shape. Repeat this process with the remaining strips of pastry, forming delightful twirls.
- Transfer the coiled pastry rounds onto two baking sheets, making sure to leave a small amount of space between each one. These will puff up while baking, so allow for expansion. Once placed, cover the pastries with a clean cloth and put them in the refrigerator for about fifteen minutes. This step helps retain their shape during baking.
- While the pastries chill, preheat your oven to 400°F. This temperature is crucial for ensuring a perfectly golden and flaky pastry. After the fifteen minutes are up, remove the chilled pastry from the refrigerator.
- Using your thumb, gently press a groove into the center of each pastry, then use a fork to prick it lightly all around. This technique prevents the pastry from puffing up too much in the center while allowing the edges to rise beautifully.
- Prepare an egg wash by beating 1 large egg. Brush the outside of the pastry with the egg wash, but avoid applying it to the very center where the filling will go. This will create a nice golden-brown finish on the edges.
- Add 16 teaspoons of strawberry jam to the center of each pastry. Just half a teaspoon will do, ensuring you don’t overfill it. This jam will serve as the sweet surprise that you will taste with every bite.
- Next, take a scant tablespoon of the cream cheese mixture you prepared earlier and dollop it on top of the jam in each pastry. Then, add another half teaspoon of jam on top for extra sweetness and flavor.
- It’s time to bake! Place the baking sheets in the preheated oven and let them bake for about eighteen minutes. Keep an eye on them; you want them to puff up and turn a beautiful golden brown. When they are ready, remove them from the oven and allow them to cool slightly on the baking sheets.
- While the pastries are cooling, prepare the glaze. In a large mixing bowl, combine 1 cup of powdered sugar, 2 tablespoons of milk or heavy cream, and ½ teaspoon of vanilla extract. Beat until completely smooth. The glaze should be runny enough to pour, so adjust with more milk or powdered sugar as necessary.
- Finally, top each danish with the remaining 16 strawberries sliced to add freshness. Drizzle the sweet glaze generously over the top, and your Strawberry Danish is ready to be enjoyed!
Notes
- Make ahead: You can shape the pastries and store them (unbaked) in the fridge, covered, for up to 24 hours.
- Storage: Store leftovers in an airtight container at room temperature for 1 day or in the fridge for up to 3 days.
- Freezing: Freeze unbaked pastries on a baking sheet, then transfer them to a freezer bag. Bake straight from frozen, adding a couple of extra minutes.