Decorated Christmas Sugar Cookie Bars
The holiday season brings countless cherished traditions, but one of my absolute favorites is baking Decorated Christmas Sugar Cookie Bars with my family. Each year, we gather in the kitchen, the air fragrant with the sweet aroma of baked goods and the sound of laughter filling the room. The best part? It’s not just about baking; it’s about creating magical memories together. From rolling out the dough to decorating the cookie bars with vibrant icing and colorful sprinkles, it’s an experience that sparks joy and brings us closer. These cookie bars are not just any dessert; they are a canvas for our creativity and a way to express our holiday spirit. Each decorated cookie carries a story, whether it’s Santa with his festive hat or Rudolph with his red nose. I look forward to this tradition every year, as it allows us to celebrate the beauty of togetherness and the joy of giving homemade treats to loved ones.
Recipe Snapshot
55 mins
35 mins
20 mins
Hard
150 kcal
1g g
Vegan, Gluten-Free, AIP
7g g
Wooden Spoon, Baking Sheet, Frying Pan, Oven
So, if you’re looking for a sweet addition to your holiday festivities, let me tell you why these Decorated Christmas Sugar Cookie Bars are sure to be a hit. First off, they are incredibly easy to make, and you don’t need any fancy skills to create something beautiful and delicious. Plus, they can be customized to fit any theme or occasion, making them perfect for cookie exchanges or holiday parties. Don’t be surprised if they become a staple in your holiday traditions too!
What We Adore About This Decorated Christmas Sugar Cookie Bars
Joy of Baking Together
One of the key reasons I love making Decorated Christmas Sugar Cookie Bars is the joy it brings to my family. Baking together is more than just preparing food; it’s about sharing laughter, stories, and creating lasting memories. The kitchen transforms into a hub of creativity where everyone contributes, making it a delightful experience.
Endless Customization
Another aspect I adore is the endless customization options. From vibrant decorating icing to various sprinkles, the possibilities are limitless. You can create Santa, Rudolph, Christmas trees, and even snowmen, allowing everyone to unleash their artistic flair while decorating the bars. This makes them not just tasty but visually appealing too.
Perfect for Gifting
These cookie bars are also perfect for gifting during the holiday season. Who wouldn’t appreciate a batch of beautifully decorated cookies? They are ideal for cookie exchanges, and friends and family will love receiving a box of homemade treats during the festive season. It’s a heartfelt way to spread joy and share the love of baking.
Balance of Texture and Flavor
The texture of these cookie bars is another highlight. They are soft and chewy on the inside while having a slight crisp on the edges, creating a delightful contrast. Pairing this with the sweet, creamy frosting makes every bite heavenly. The flavors meld perfectly, creating a treat that’s hard to resist.
Festive Spirit
Lastly, making Decorated Christmas Sugar Cookie Bars truly embodies the festive spirit. The colors, the decorations, and the love that goes into baking them bring everyone into the holiday mood. It’s more than just food; it’s a celebration of tradition, family, and the joy of giving.
Essential Ingredients for Decorated Christmas Sugar Cookie Bars

Creating the perfect Decorated Christmas Sugar Cookie Bars starts with selecting high-quality ingredients. Each ingredient plays a crucial role, contributing to the flavor, texture, and overall success of the dish. From the foundational flour to the sweet toppings, every element works in harmony to create these delightful treats.
- 3 cups all-purpose flour: The backbone of the cookie, providing structure and chewiness.
- 2 tsp baking powder: Helps the cookies rise and achieve a fluffy texture.
- 1 cup granulated sugar: Adds sweetness and contributes to browning.
- 1 cup butter (2 sticks, cold & cut into chunks): Gives the cookies a rich flavor and tender texture.
- 1 egg: Binds the ingredients together and adds moisture.
- 3/4 tsp vanilla extract: Imparts a lovely flavor, enhancing the sweetness.
- 1/2 tsp almond extract: Adds a unique nutty flavor that complements the vanilla.
- 2 (16 oz.) cans vanilla frosting: A creamy and sweet layer for the cookie bars.
- 1 (16 oz.) can chocolate frosting: Offers a delicious contrast to the vanilla.
- 1 (8 oz.) can green decorating icing (Wilton Brand): For the festive decorations.
- 1 (8 oz.) can red decorating icing (Wilton Brand): Adds vibrant color to the cookies.
- Mini M&M’s: Perfect for decorating, adding pops of color and sweetness.
- Regular sized M&M’s: Great for larger decorations or adding fun touches.
- Red & green holiday sprinkles: Enhance the festive look of the cookies.
- Pretzel rods: Used for creating fun shapes like antlers on Rudolph.
- Small red sprinkles: For adding detail and festive flair.
- Small black sprinkles: Great for eyes on your cookie designs.
- Coarse granulated sugar sprinkles: Adds sparkle and texture to the decorations.
- Edible snowflake decorations: For a whimsical touch to your holiday cookies.
Directions for Decorated Christmas Sugar Cookie Bars
Making Decorated Christmas Sugar Cookie Bars is a fun and rewarding process! Follow these steps to create your holiday masterpiece. You’ll be delighted by how easy it is to transform simple ingredients into festive treats.
- Preheat your oven to 350° F. This ensures the cookie bars bake evenly and turn out perfectly.
- In a small bowl, stir together 3 cups of all-purpose flour and 2 tsp of baking powder to combine. Set this mixture aside for later.
- In a large mixing bowl, cream together 1 cup of butter and 1 cup of granulated sugar until the mixture is light and fluffy. This step is crucial for getting that perfect texture.
- Once creamed, stir in 1 egg, 3/4 tsp of vanilla extract, and 1/2 tsp of almond extract. Mix well until all ingredients are incorporated.
- Slowly incorporate the dry flour mixture into the wet ingredients. You can do this in batches, mixing just until combined to avoid overworking the dough.
- Press the dough into a lightly greased half sheet pan (18×13) to create an even layer. Make sure to spread it out evenly for consistent baking.
- Bake for 15 to 20 minutes or until the edges are lightly golden brown. Keep an eye on them to prevent overbaking; they should be soft when you remove them from the oven.
- Once baked, allow the cookie bars to cool completely in the pan. This is important for easy handling during decoration.
- Using one can of vanilla frosting, cover the top of the cookie bars with a thin layer. You want to create a smooth base for your decorations.
- Score the top of the frosting to create 25 rectangles (5×5) to help with decorating. This will make it easier to cut later.
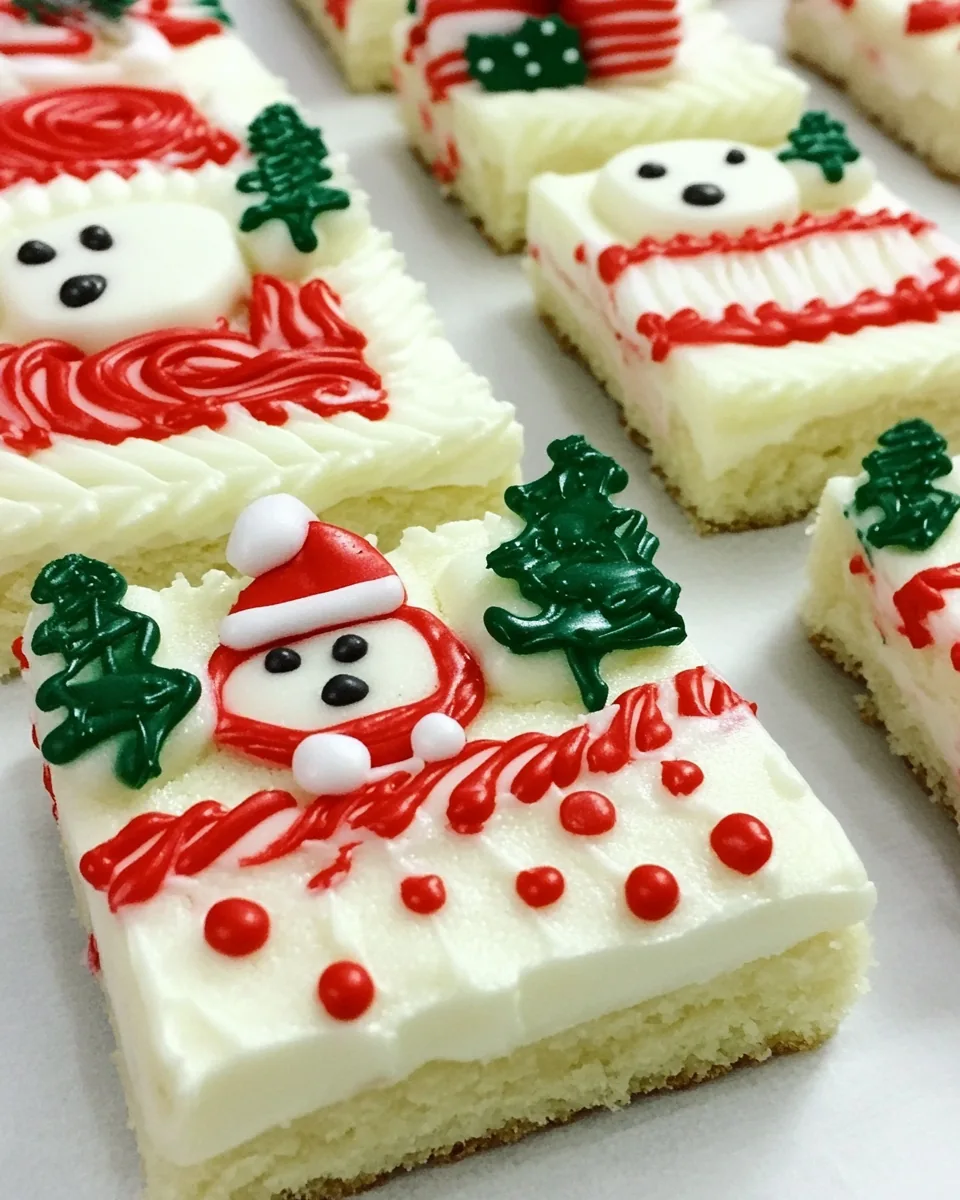
- For Santa, use the red decorating icing to pipe the red portion of Santa’s hat, creating wide upside-down U shapes. Then fill a disposable icing bag with vanilla frosting and cut off the tip. Pipe white icing along the red hat border to create Santa’s curly white hair, and pipe along the bottom edge for his beard and mustaches.
- Add a red sprinkle or red mini M&M for Santa’s nose and two black sprinkles for his eyes. Sprinkle some coarse granulated sugar over the hair for a sparkling effect.
- For Rudolph, fill a disposable icing bag with chocolate frosting and pipe upside-down U shapes onto each rectangle, spreading the frosting with a butter knife to create a smooth finish. For the eyes, use either two brown mini M&Ms or black sprinkles, with red M&Ms for the nose. Break apart pretzel rods to create antlers.
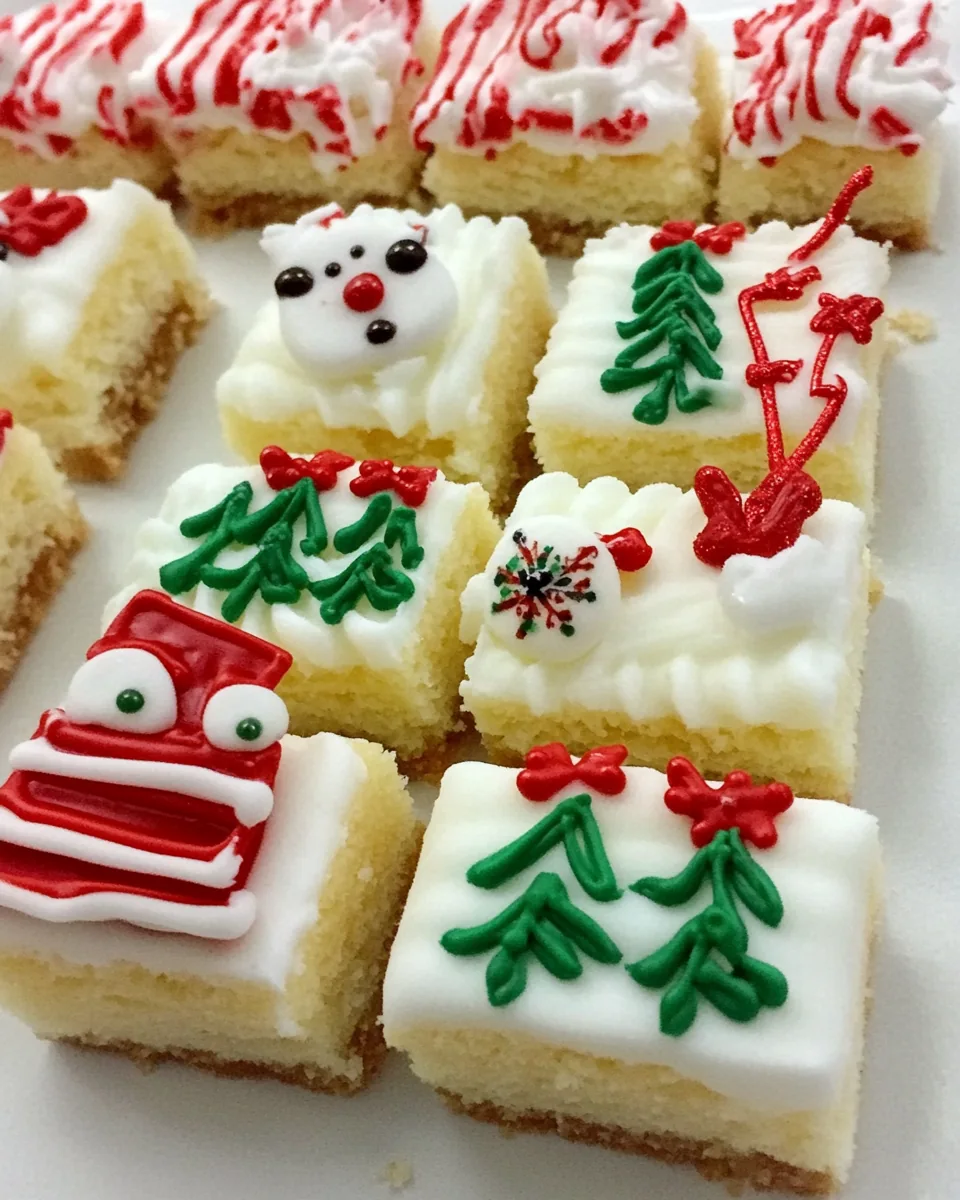
- For Christmas trees, pipe green frosting into triangles and fill in; then sprinkle with red & green holiday sprinkles or mini M&Ms, and add a yellow mini M&M on top for a star. Use broken pretzel rods to create tree stumps.
- For snowmen, pipe figure eights using the white frosting, filling them in completely. Create a red scarf with the red frosting, using either a round or star tip, and add two black sprinkles for the eyes and an orange mini M&M for the nose. Optionally, decorate with three black sprinkles or two brown mini M&Ms for buttons, edible snowflakes, and coarse granulated sugar sprinkles as snow.
- Once all your decorations are complete, take a large sharp knife or a pizza cutter and carefully cut along the scored lines to make individual cookie bars. Serve and enjoy your festive creations!
Change It Up

Making Decorated Christmas Sugar Cookie Bars is a delightful experience, and there are countless ways to customize them! Here are some tips to help you adapt the recipe to your liking or occasion.
- Add flavors: Consider infusing the frosting with different flavors like lemon or orange zest for a unique twist.
- Use different shapes: Instead of rectangular bars, try using cookie cutters to create festive shapes.
- Decorate with themes: Change the color scheme of frosting and toppings to match various holidays or events throughout the year.
- Experiment with fillings: You could add a layer of jam or chocolate ganache between the cookie dough and frosting for an extra surprise.
- Make it gluten-free: Substitute the all-purpose flour with a gluten-free blend to cater to those with dietary restrictions.
Serving Ideas for Decorated Christmas Sugar Cookie Bars
When it comes to serving your Decorated Christmas Sugar Cookie Bars, the presentation can really elevate the overall experience. Here are some creative ideas on how to serve them:
- Plate them beautifully: Arrange the bars on a festive platter with colorful decorations or holiday-themed napkins to create an inviting display.
- Pair with warm beverages: Serve alongside hot cocoa, coffee, or tea for a cozy treat during winter gatherings.
- Great for parties: These bars make excellent finger foods, perfect for holiday parties, cookie exchanges, or festive get-togethers.
- Gift them: Package a selection of decorated bars in a decorative box or tin to give as gifts to friends, family, or neighbors.
- Perfect for kids: These cookie bars are a hit with children and can be a fun activity for them to help decorate.
- Seasonal events: Use them for Christmas celebrations, but also consider them for other occasions like birthdays or school events with appropriate decorations.
- Storage solutions: If you have leftovers, store them in an airtight container to maintain their freshness for a longer time.
Things Worth Knowing
- Make sure to let the cookie bars cool completely before frosting; this helps the frosting set better and prevents melting.
- Use different decorating tips for various effects when piping icing on the cookies.
- For an even bake, rotate the pan halfway through the baking time to ensure even heat distribution.
- Consider chilling the dough for an hour before pressing it into the pan for a firmer texture.
- Experiment with different types of sprinkles and toppings to keep things exciting every time you make them.
FAQ
Conclusion
In conclusion, Decorated Christmas Sugar Cookie Bars are not just a delightful treat, but a wonderful way to spend time with loved ones during the holiday season. They bring together the joy of baking, decorating, and sharing, making them a perfect addition to any festive gathering. I encourage you to try making these cookie bars and let your creativity shine. It’s an experience filled with laughter, joy, and deliciousness!
Decorated Christmas Sugar Cookie Bars
Ingredients
Equipment
Method
- Preheat your oven to 350° F. This ensures the cookie bars bake evenly and turn out perfectly.
- In a small bowl, stir together 3 cups of all-purpose flour and 2 tsp of baking powder to combine. Set this mixture aside for later.
- In a large mixing bowl, cream together 1 cup of butter and 1 cup of granulated sugar until the mixture is light and fluffy. This step is crucial for getting that perfect texture.
- Once creamed, stir in 1 egg, 3/4 tsp of vanilla extract, and 1/2 tsp of almond extract. Mix well until all ingredients are incorporated.
- Slowly incorporate the dry flour mixture into the wet ingredients. You can do this in batches, mixing just until combined to avoid overworking the dough.
- Press the dough into a lightly greased half sheet pan (18×13) to create an even layer. Make sure to spread it out evenly for consistent baking.
- Bake for 15 to 20 minutes or until the edges are lightly golden brown. Keep an eye on them to prevent overbaking; they should be soft when you remove them from the oven.
- Once baked, allow the cookie bars to cool completely in the pan. This is important for easy handling during decoration.
- Using one can of vanilla frosting, cover the top of the cookie bars with a thin layer. You want to create a smooth base for your decorations.
- Score the top of the frosting to create 25 rectangles (5×5) to help with decorating. This will make it easier to cut later.
- For Santa, use the red decorating icing to pipe the red portion of Santa's hat, creating wide upside-down U shapes. Then fill a disposable icing bag with vanilla frosting and cut off the tip. Pipe white icing along the red hat border to create Santa's curly white hair, and pipe along the bottom edge for his beard and mustaches.
- Add a red sprinkle or red mini M&M for Santa's nose and two black sprinkles for his eyes. Sprinkle some coarse granulated sugar over the hair for a sparkling effect.
- For Rudolph, fill a disposable icing bag with chocolate frosting and pipe upside-down U shapes onto each rectangle, spreading the frosting with a butter knife to create a smooth finish. For the eyes, use either two brown mini M&Ms or black sprinkles, with red M&Ms for the nose. Break apart pretzel rods to create antlers.
- For Christmas trees, pipe green frosting into triangles and fill in; then sprinkle with red & green holiday sprinkles or mini M&Ms, and add a yellow mini M&M on top for a star. Use broken pretzel rods to create tree stumps.
- For snowmen, pipe figure eights using the white frosting, filling them in completely. Create a red scarf with the red frosting, using either a round or star tip, and add two black sprinkles for the eyes and an orange mini M&M for the nose. Optionally, decorate with three black sprinkles or two brown mini M&Ms for buttons, edible snowflakes, and coarse granulated sugar sprinkles as snow.
- Once all your decorations are complete, take a large sharp knife or a pizza cutter and carefully cut along the scored lines to make individual cookie bars. Serve and enjoy your festive creations!
Notes
- Storage: Store leftover cookie bars in an airtight container to maintain freshness.
- Freezing: You can freeze decorated cookie bars for up to three months. Just place them in a single layer in an airtight container.
- Variations: Experiment with different shapes, flavors, and decorations to make each batch unique.
- Gifting: Package the bars in decorative boxes for a charming gift idea during the holiday season.
- Customizations: Feel free to adapt the icing colors and decorations to fit different themes or holidays throughout the year.