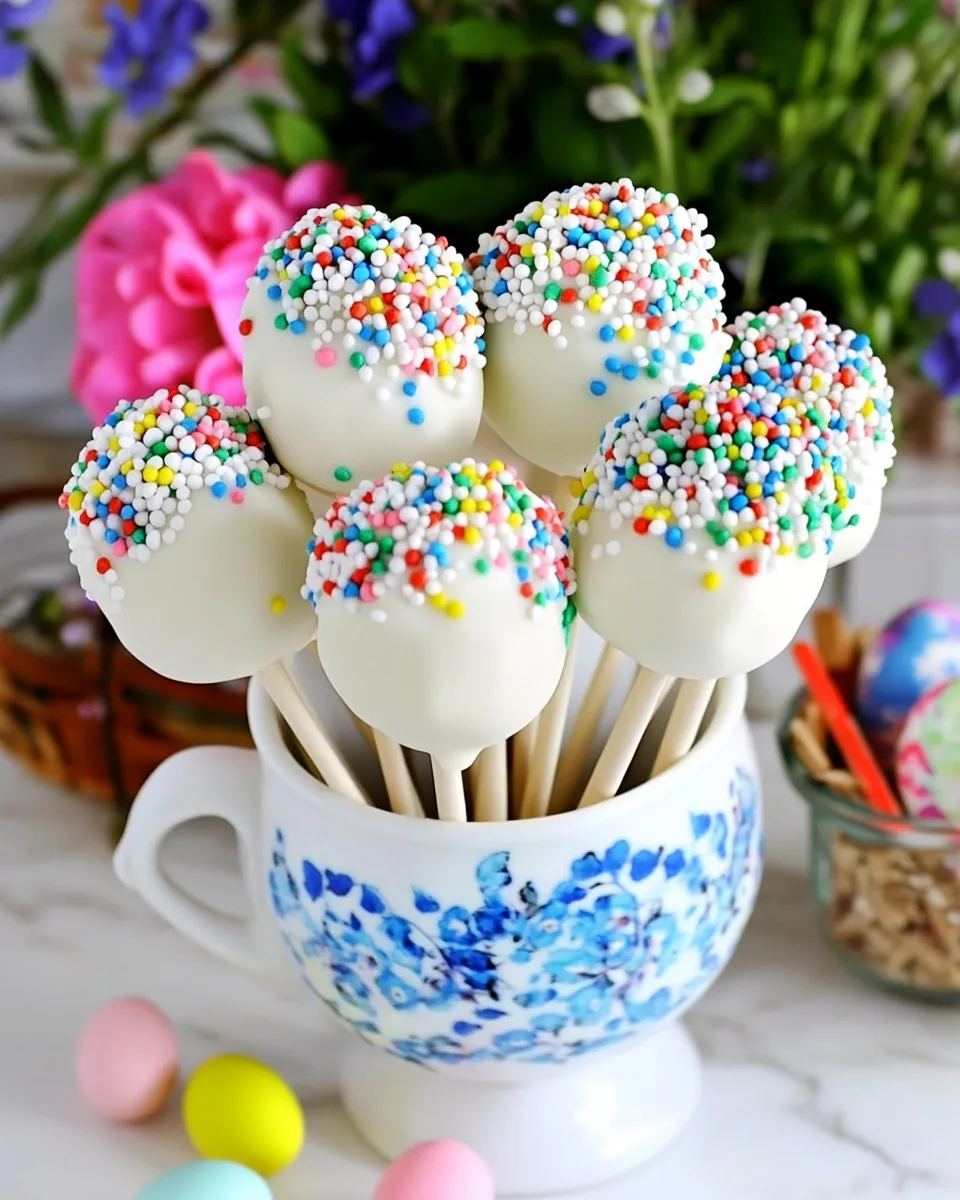
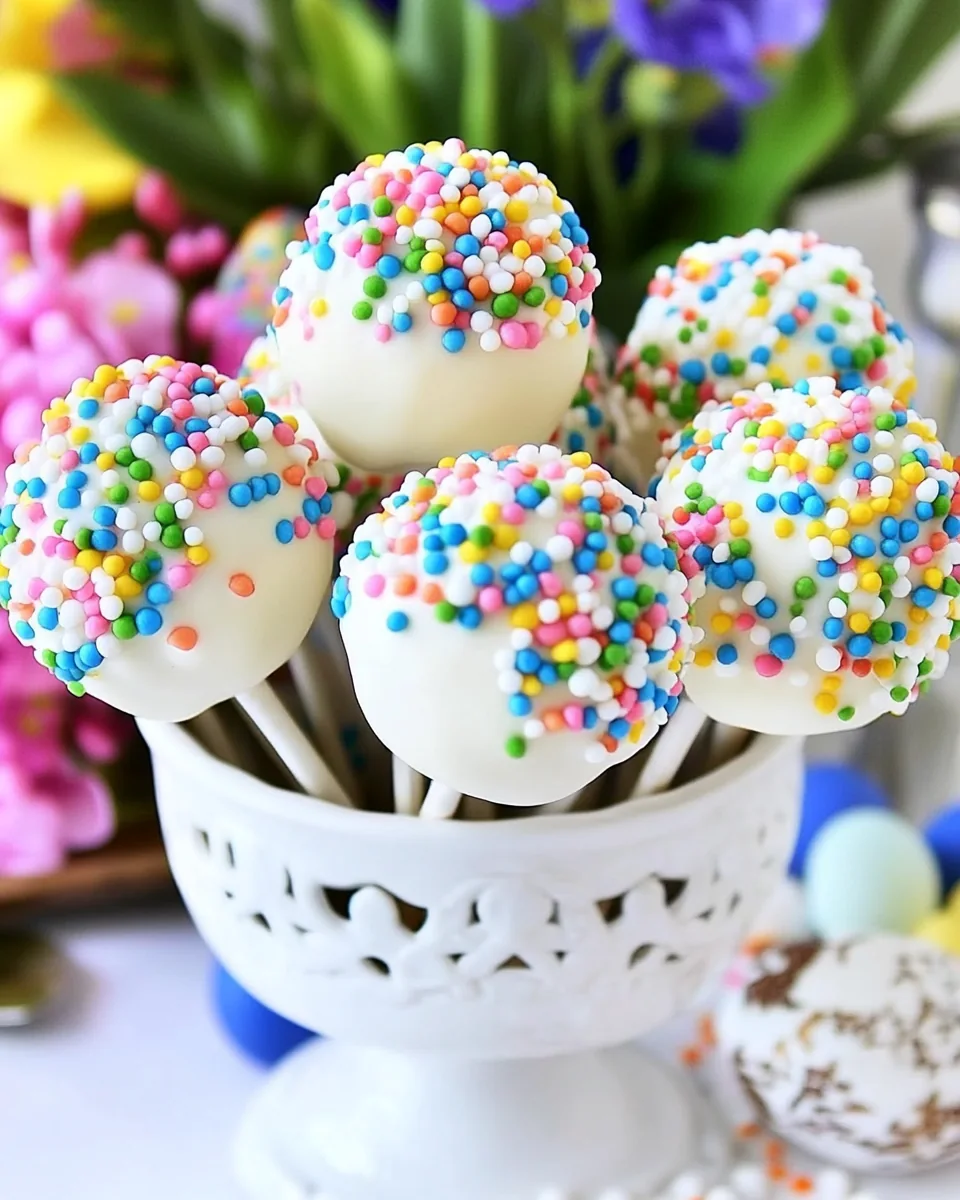
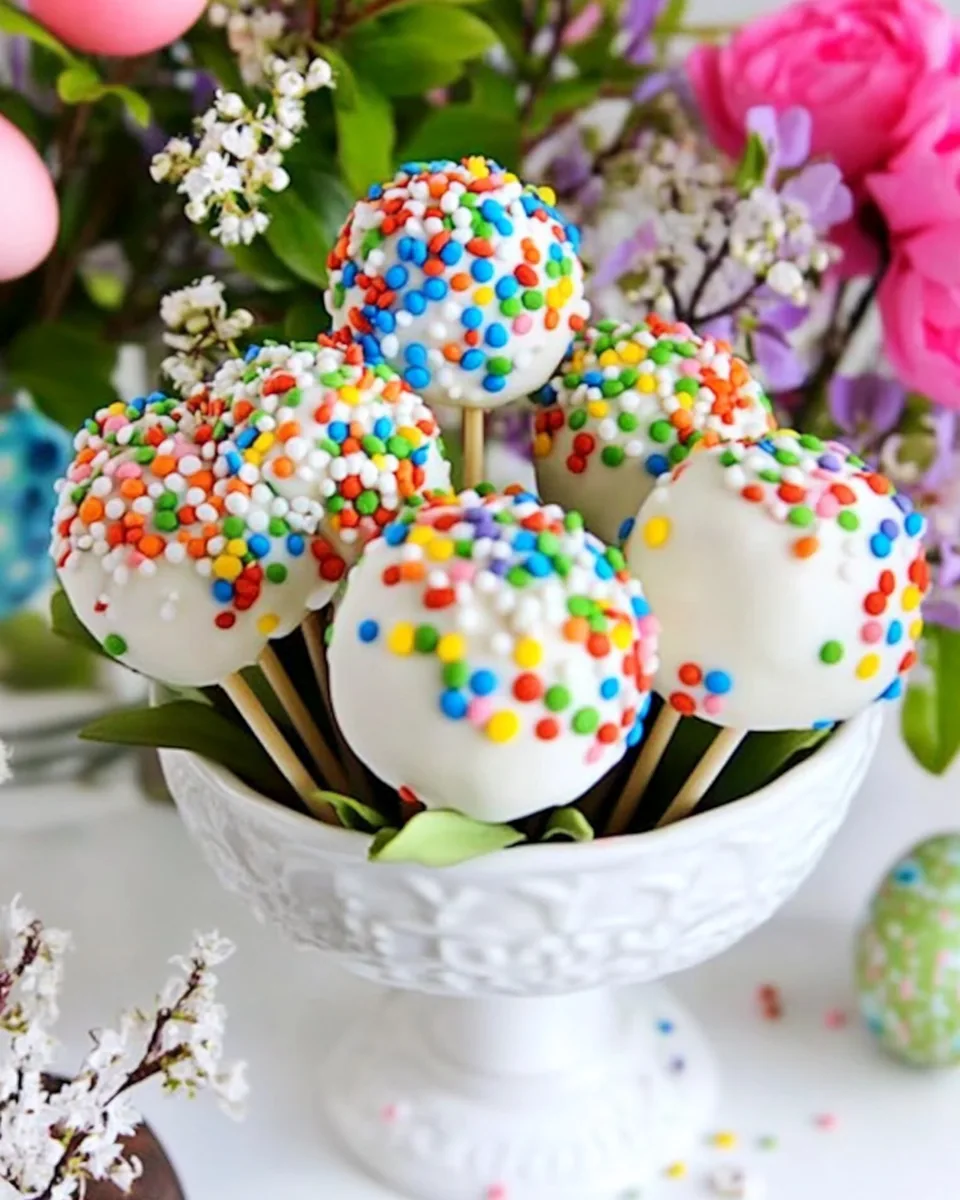
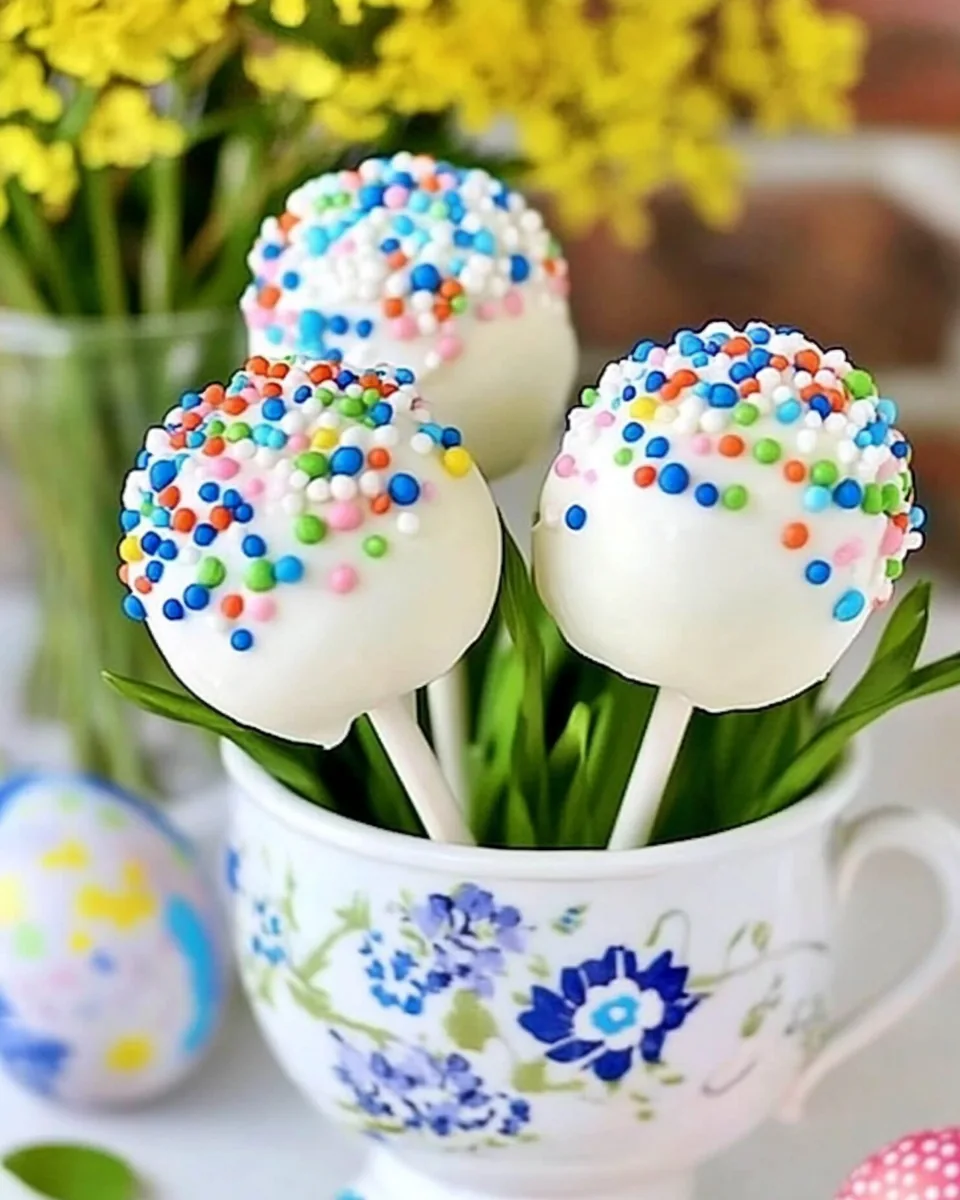
Easter Cake Pops
There’s something truly magical about creating Easter Cake Pops that brings a smile to everyone’s face. I remember the first time I made these delightful treats; it was a sunny spring afternoon, and I was preparing for an Easter gathering. The excitement of transforming a simple cake mix into adorable cake pops filled with vibrant colors and sprinkles was infectious! As the chocolate melted and the kitchen filled with sweet aromas, I felt like a kid again, eagerly anticipating the joy these little bites would bring to my family. Every time we take a bite, it’s not just about flavor; it’s about the memories we create together during festive occasions. Making Easter Cake Pops is not just a recipe; it’s a cherished tradition that adds sweetness to our celebrations.
Recipe Snapshot
50 mins
20 mins
30 mins
Medium
150 kcal
1 g
Keto, Gluten-Free, Low FODMAP
7 g
Mixing Bowl, Baking Sheet, Wooden Spoon
What Sets This Easter Cake Pops Apart
1. They’re Fun to Make!
One of the best things about Easter Cake Pops is how interactive they are. You can involve the kids in rolling the cake balls and dipping them in chocolate. It’s a wonderful way to bond, laugh, and create memories in the kitchen. Plus, they’ll love decorating their own pops!
2. Customization Galore!
With Easter Cake Pops, the possibilities are endless. You can choose different cake flavors, frosting, and dip chocolates. Want to try a rich chocolate cake with vanilla frosting? Go for it! Feeling adventurous? Experiment with flavors or color combinations to match your theme.
3. Perfect for Any Occasion
While they are ideal for Easter, Easter Cake Pops are versatile treats that can be made for birthdays, holidays, or any special gathering. Their bite-sized nature makes them easy to serve and share, ensuring everyone gets a taste!
4. A Feast for the Eyes
Let’s face it, we eat with our eyes first. The vibrant colors and sprinkles make these pops not only delicious but visually stunning. You can set up a display that will wow your guests and make your dessert table pop!
5. Great for Gifting
If you’re looking to spread some joy, Easter Cake Pops make fantastic gifts. Wrap them in clear bags tied with a ribbon, and you’ve got an adorable, homemade treat that anyone would appreciate. It’s a sweet way to show someone you care!
Shopping List for Easter Cake Pops
When it comes to making Easter Cake Pops, the ingredients are simple yet essential for creating that perfect treat. The combination of flavors and textures makes them truly delightful. Here’s what you’ll need:
- Cake Mix: Choose your favorite flavor for the base. It provides the foundation of your cake pops.
- Cake Icing: I suggest using cream cheese icing for its richness, which pairs beautifully with the cake.
- Melting Chocolates: This will be the outer layer. Choose different colors to match your theme. They melt easily and add a lovely finish.
- Candy Sprinkles: The finishing touch! They add color and fun, making your cake pops festive.
Recipe Steps for Easter Cake Pops
Making Easter Cake Pops is a step-by-step process that’s easier than you might think! Let’s dive into the delightful world of cake pop making.
- Start with your cake mix. A day before you plan to serve these sweet treats, prepare the cake as per the box instructions. Once it’s baked, allow it to cool completely.
- Next, crumble the cooled cake into a large bowl. You want it to be fine crumbs, almost like sand. This is the base of your Easter Cake Pops.
- Incorporate the cream cheese icing into the crumbled cake. Mix well until the cake is fully coated and forms a dough-like consistency. You want it to be moist but not sticky.
- Cover the mixture and refrigerate for a couple of hours—or even overnight if time allows. This step is crucial as it helps firm up the mixture, making it easier to shape.
- Once the mixture is chilled, remove it from the refrigerator. Using a small scoop or your hands, form the mixture into golf ball-sized pieces. Make sure they are uniform in size for even baking.
- Take your sucker sticks and gently insert them halfway into each ball. This will be the handle for your Easter Cake Pops.
- Now, let’s melt the melting chocolates. Microwave them in a safe bowl, stirring every 30 seconds until smooth. Be patient, as you want them nicely melted but not overcooked.
- Prepare your workspace by laying down wax paper or parchment paper; this is where the coated pops will set. You want to avoid chocolate drips on your counter.
- Dip each cake pop into the melted chocolate, ensuring it’s coated thoroughly. Lift it out and let the excess drip back into the bowl.
- Before the chocolate hardens, sprinkle with your choice of candy sprinkles. It’s the little details that make these cake pops special!
- For drying, if you have a cake pop holder, use it. If not, turn an egg carton upside down and poke the sticks through the styrofoam to hold them while they cool completely.
- Once the chocolate has set, you might want to wrap each Easter Cake Pop in a cellophane bag or a plastic sandwich bag, tying it with a cute ribbon for an extra festive touch.
- Finally, enjoy your creations! These are perfect for sharing with family and friends or as personal treats.
Things Worth Knowing
- Chilling is Key: Always refrigerate the cake and icing mixture. This helps firm it up, making it easier to roll into balls.
- Uniform Sizing: Use a small scoop to ensure all cake balls are evenly sized for even baking.
- Stick Alternatives: If you don’t have sucker sticks, BBQ skewers can be cut to size as a substitute.
- Chocolate Choices: If you can’t find melting chocolates, quick-melt chocolate is a great alternative.
Change It Up
Ready to get creative with your Easter Cake Pops? Here are some fun tips to consider:
- Storage: Store your cake pops in an airtight container in the fridge to maintain freshness.
- Freezing: You can freeze uncoated cake balls for later use. Just thaw them before dipping in chocolate.
- Pairing: Serve with fruit or a light dessert to balance the sweetness.
- Flavor Variations: Experiment with different frosting flavors like chocolate or vanilla.
- Theme Your Pops: Use themed decorations for holidays beyond Easter, like Halloween or birthdays!
Serving This Easter Cake Pops
Serving Easter Cake Pops can be just as fun as making them. Here are some ideas to elevate your dessert experience:
- Display: Arrange your cake pops on a decorative platter or in a cake pop stand for an eye-catching centerpiece.
- Occasions: Perfect for spring celebrations, birthday parties, or any casual get-together.
- Pair with Drinks: Serve alongside milk, hot cocoa, or even lemonade for a refreshing twist.
- Gifting: Package them in clear bags tied with ribbons to share with neighbors or friends.
- Seasonal Touches: Customize toppings and colors to match the season or celebration theme.
FAQ
Conclusion
Easter Cake Pops are not just a treat; they’re a celebration of creativity and joy. They capture the essence of spring with their cheerful colors and flavors, making them a perfect addition to any gathering. I encourage you to try making these delightful bites yourself. Not only will you enjoy the process, but you’ll also create sweet memories to cherish for years to come.
Easter Cake Pops
Ingredients
Equipment
Method
- 24 Hours before you plan to make the cake pops, bake the cake per box instructions. Once baked, crumble and mix well with the cake icing. Refrigerate until ready to make the cake pops.
- Remove the cake mixture from the refrigerator when ready to make the cake pops. Using a small food scoop or cake pop mold, roll the cake pops into golf ball size pieces.
- Place a sucker stick in the bottom of each ball, sticking it about halfway through the ball. Set these aside.
- Melt the chocolates in a microwave-safe bowl on high temp, stirring every 30 seconds until completely melted.
- At this point, you will want to put something down under where the cake pops will set up. The chocolate is drippy and sticks to surfaces. Wax paper, parchment paper, or newspaper underneath will work.
- Dip the cake pops into the melted chocolate to cover well. Sprinkle with the sprinkles of your choice and allow to cool.
- If you have the cake pop holder that holds each cake pop separately, then do that. If not, turn an egg carton upside down and poke the sucker sticks through the styrofoam to hold them till dried.
- Once dried, you will want to cover the cake pop with a cover like a cellophane bag or plastic sandwich bag, tying with a cute ribbon.
Notes
- Refrigeration: Be sure to refrigerate the cake and icing mixture. This firms up the mixture and makes it easier to roll into balls.
- Equal Sizing: Use a small scoop to dip out the icing to ensure equal-sized balls.
- Stick Alternatives: If you don't have sucker sticks, you can improvise with BBQ skewers.
- Melting Options: If you can't find the candy melts, instead use the quick melt chocolate!
- Bon Bons: Don't want to use a stick? That's fine! These are the cutest little Easter Bon Bons without a stick!