Baked Teriyaki Chicken
The first time I made Baked Teriyaki Chicken, I was enchanted by the rich aroma wafting through my kitchen. It felt like a magical moment; the vibrant flavors of the soy sauce mingled with the warmth of ginger and garlic, creating a symphony of taste that made my mouth water. This dish quickly became a family favorite, especially on busy weeknights when I craved something comforting yet easy to prepare. The combination of juicy, tender chicken with a sweet and savory teriyaki glaze is simply irresistible. I love how the simplicity of this recipe allows the ingredients to shine without overwhelming fuss. Plus, it’s a fantastic way to enjoy a homemade meal without spending hours in the kitchen. Whether it’s a casual dinner or a festive gathering, Baked Teriyaki Chicken never fails to impress and satisfy. So, gather your ingredients, and let’s embark on a culinary adventure that’s bound to make your taste buds dance with joy!
Recipe Snapshot
60 mins
0 mins
0 mins
Medium
320 kcal
30 g
Keto
12 g
Saucepan, Grater, Frying Pan, Cutting Board, Food Processor, Skillet, Oven, Chef’s Knife, Baking Sheet
What We Adore About This Baked Teriyaki Chicken
Flavorful and Simple.
There’s something undeniably delightful about the harmony of flavors in Baked Teriyaki Chicken. The blend of sweet, savory, and umami notes creates a deliciously complex dish without requiring complicated techniques. It’s the kind of meal that fills your home with warmth and comfort.
Healthy Yet Satisfying.
This dish allows you to indulge without the guilt. By using Golden Monkfruit Sweetener, you can enjoy a sugar-free teriyaki sauce that doesn’t compromise on flavor, making it a great option for health-conscious food lovers.
Perfect for Meal Prep.
Another reason I adore Baked Teriyaki Chicken is its adaptability for meal prep. You can make a large batch ahead of time and store it in the fridge for easy lunches or dinners throughout the week. The flavors only get better as they meld together over time!
Kid-Approved.
Kids are often the toughest critics, but this dish has consistently won over even the pickiest eaters. The sweet glaze makes the chicken appealing to children while still being wholesome for the entire family. It’s a win-win!
A Crowd-Pleaser.
Planning a gathering? Baked Teriyaki Chicken is a sure way to impress your guests. It’s fancy enough to serve at a dinner party yet simple enough for a cozy family meal. Just add a side of steamed vegetables or fluffy rice, and you have a show-stopping meal.
Customizable.
This recipe can easily be adapted to suit your taste preferences or dietary needs. Feel free to experiment with different vegetables or add spices for an extra kick. The versatility of this dish makes it exciting to prepare each time!
What You’ll Need for Baked Teriyaki Chicken
When it comes to cooking, I believe that quality ingredients make all the difference. The magic of Baked Teriyaki Chicken lies in its simple yet effective ingredient list. Each component plays a vital role in creating a harmonious dish that’s bursting with flavor. Here’s a look at the key players in this delightful recipe:
- 4 skinless, boneless chicken breasts: Tender and juicy, these are the stars of the show.
- 1/2 cup soy sauce: This adds the essential umami flavor to the teriyaki sauce; opt for gluten-free if needed.
- 2/3 cup water: Balances the intensity of the soy sauce.
- 1/4 cup Golden Monkfruit Sweetener: A sugar-free alternative that sweetens the sauce beautifully.
- 1 tablespoon minced ginger: Provides a warm, spicy note.
- 1 tablespoon minced garlic: Adds depth and aroma.
- 2 tablespoons peanut oil: Used for browning the chicken, it adds a lovely richness.
- Thinly-sliced green onions: Optional garnish that adds freshness and crunch.
Making Baked Teriyaki Chicken
Creating Baked Teriyaki Chicken is a straightforward process that’s perfect for both novice cooks and seasoned chefs. Let’s dive into the delicious journey of preparing this flavorful dish!
Preheat your oven to 375°F (190°C). This is the perfect temperature for baking the chicken and helping the glaze caramelize beautifully. Ensuring your oven is at the right temperature before starting is key to perfect results.
Next, puree the minced garlic and ginger together using a mortar and pestle, a magic bullet, or a food processor. You want to achieve a smooth consistency that will blend seamlessly into your sauce.
In a small saucepan, combine soy sauce, water, Golden Monkfruit Sweetener, ginger puree, and garlic puree. Place it over low heat and bring to a simmer. Stir occasionally and taste to adjust the sweetness to your liking. The goal is to reduce this mixture by about one-third, concentrating the flavors.
While your sauce simmers, prepare the chicken. Trim away any visible fat and undesirable parts. If some pieces are particularly thick, consider trimming them down to ensure even cooking. This also allows for more flavorful leftovers if you decide to use those trimmings for homemade stock!
Heat peanut oil in a large non-stick frying pan over medium-high heat. Once hot, carefully add the chicken breasts and brown them for about 3 to 4 minutes on each side. You want them to develop a lovely golden crust but not cook them through just yet.
After browning, cut the chicken into four equal-lengthwise strips. This not only helps with presentation but also ensures even cooking when you bake the chicken.
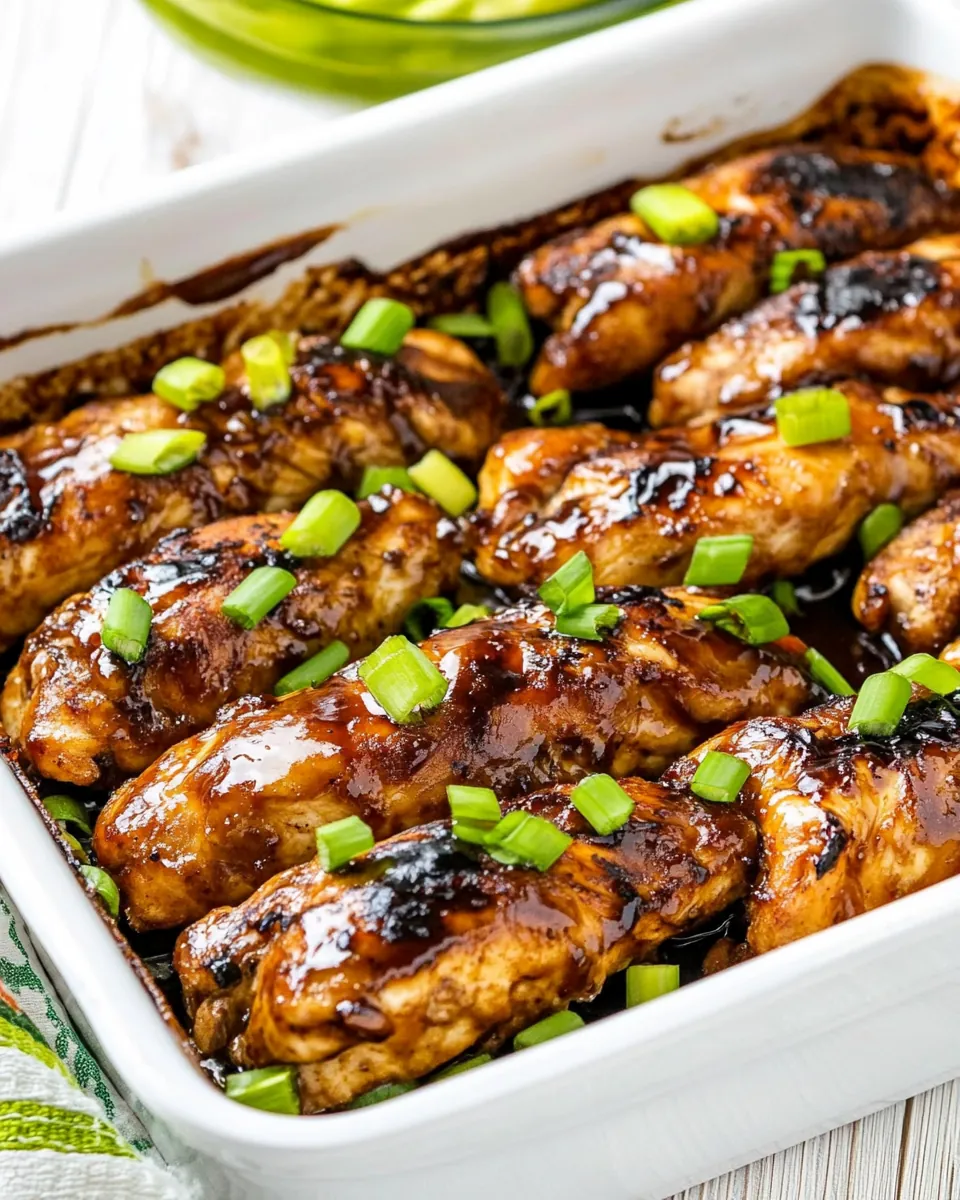
Select a casserole dish that can fit all the chicken in a single layer. Arrange the strips neatly inside, then brush about half of the reduced teriyaki sauce generously over the top. This ensures each piece is coated and flavorful from the start.
Pop the dish into the preheated oven and bake for 5 minutes. After this time, take it out and brush on more teriyaki sauce. This step adds layers of flavor!
Return the chicken to the oven and bake for another 5 minutes. Afterward, pull it out once more and give it a final brush with sauce. The chicken should be glistening by now!
Continue baking for an additional 2 to 5 minutes. Use an instant-read meat thermometer to check the thickest part of the chicken; it should read 165°F (90°C) when fully cooked. This ensures your chicken is safe to eat and perfectly juicy.
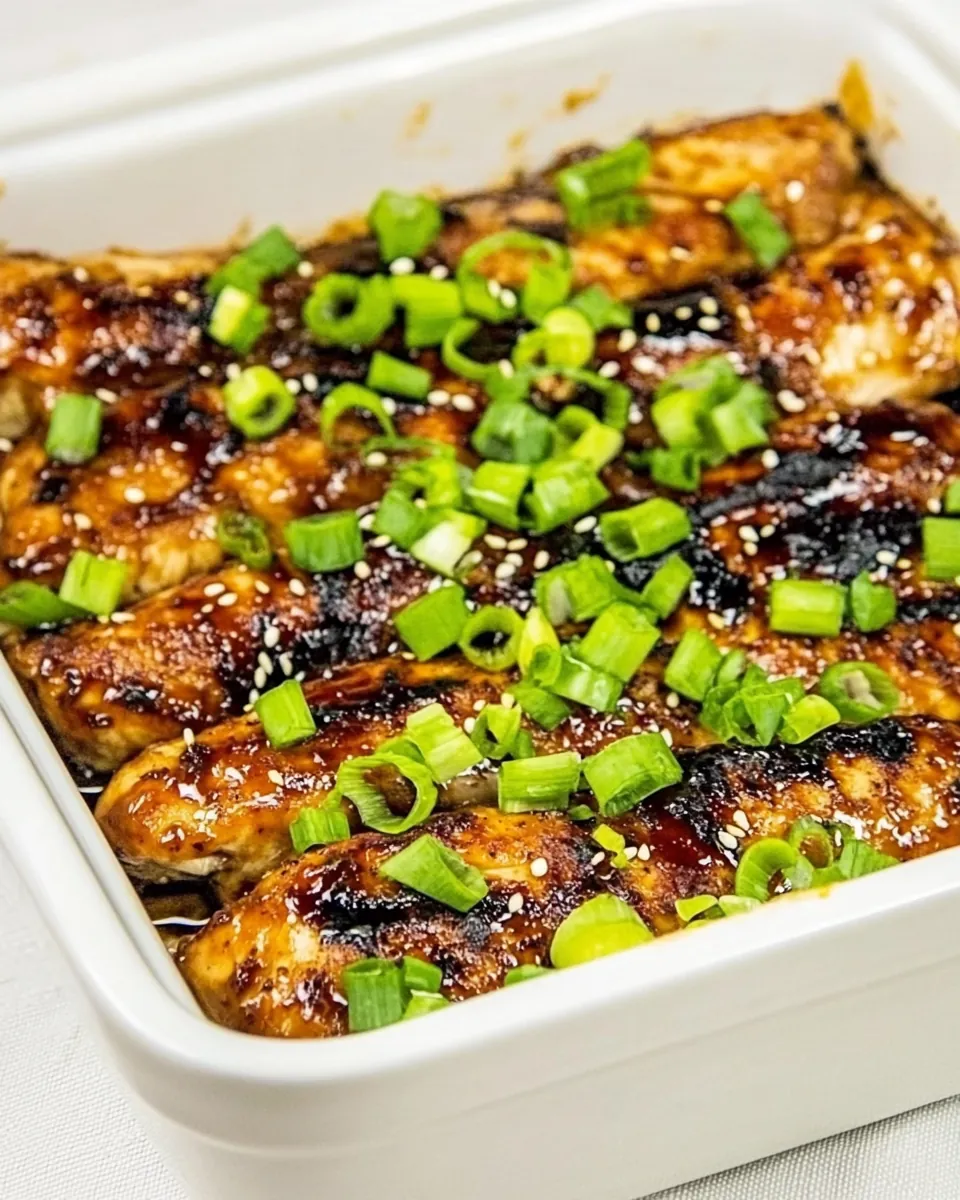
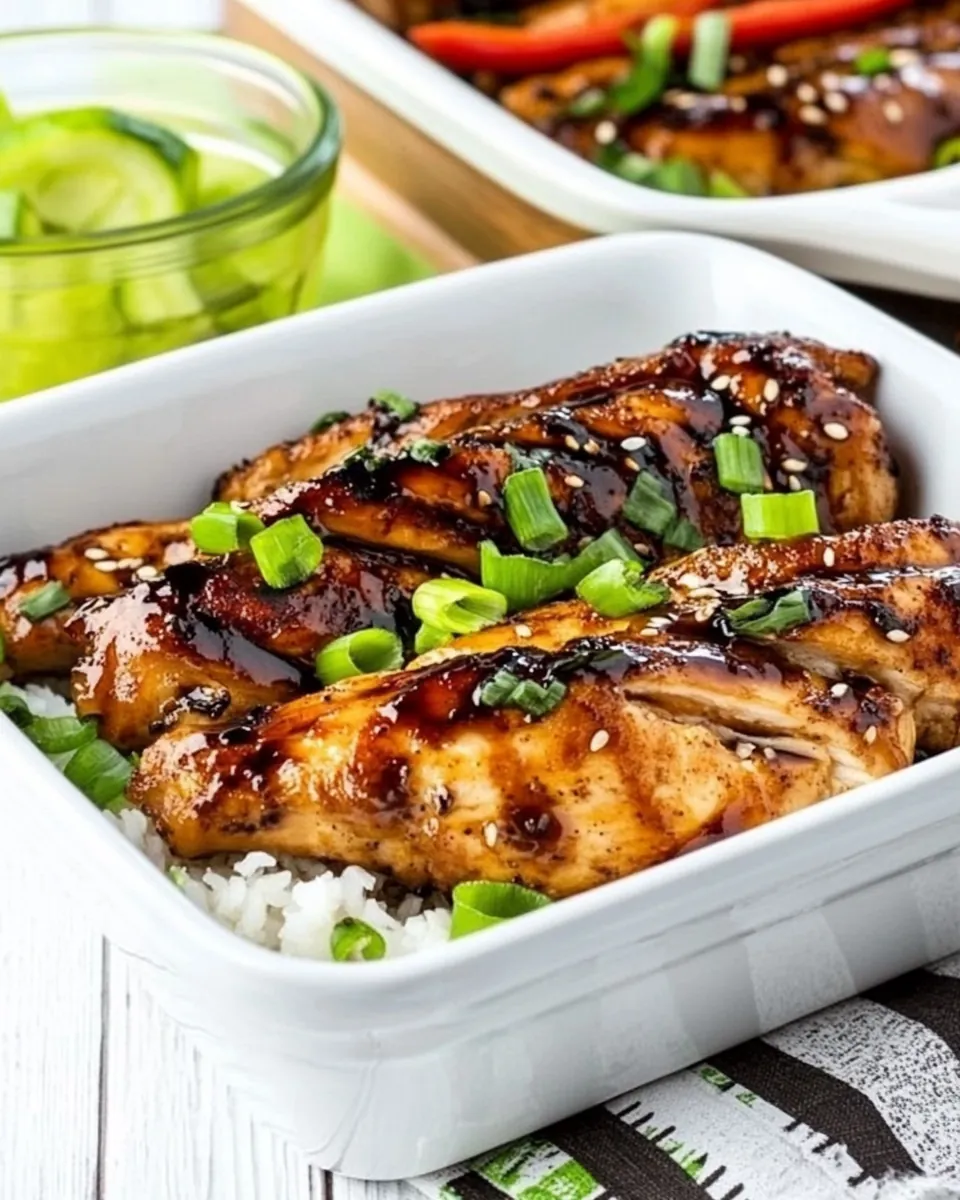
When the chicken is done, remove it from the oven and let it rest for a few minutes. This allows the juices to redistribute for the best texture. Serve hot, garnished with sliced green onions if you desire. If you have any extra sauce, feel free to reheat it and serve it over the chicken for an added burst of flavor!
Things Worth Knowing
- Cooking Temperature: Make sure to preheat your oven properly; an evenly heated oven helps in cooking the chicken uniformly.
- Sauce Consistency: Reducing the sauce not only intensifies the flavors but also helps it adhere better to the chicken.
- Resting Time: Allowing the chicken to rest after baking ensures it retains moisture, resulting in a more succulent bite.
- Garnishing: Always add garnishes like green onions just before serving for the freshest flavor and crunch.
Helpful Notes about Baked Teriyaki Chicken
Cooking is always a journey of discovery. Here are some notes that can help you make the most of your Baked Teriyaki Chicken experience:
- Storage: Leftovers can be stored in an airtight container in the refrigerator for up to 3 days.
- Freezing: Yes, you can freeze the chicken! Make sure it’s properly cooled and then tightly wrapped or placed in a freezer-safe bag for up to 3 months.
- Pairing: This dish pairs wonderfully with steamed rice, sautéed vegetables, or a fresh salad. You can also serve it in a wrap or on a bed of greens.
- Marinating: For an extra depth of flavor, consider marinating the chicken in the teriyaki sauce for a few hours or overnight before cooking.
- Variations: You can easily change the protein or add vegetables like bell peppers or broccoli for a colorful twist on the classic.
Great Combinations for Baked Teriyaki Chicken
Serving Baked Teriyaki Chicken can be as creative as you want! Here are some suggestions to elevate your meal:
- Steamed Rice: The classic pairing! Fluffy white rice, brown rice, or even cauliflower rice makes a great base.
- Stir-Fried Vegetables: A colorful mix of bell peppers, snap peas, and carrots in a light soy sauce makes for a healthy side.
- Salads: A crunchy Asian-style salad with sesame dressing complements the savory chicken beautifully.
- Wraps: Shred leftover chicken and toss it in a wrap with fresh veggies and additional teriyaki sauce for a quick lunch.
- Occasions: This dish is perfect for family dinners, potlucks, or even meal prep for a busy week ahead!
- Storage Tips: Store leftovers in an airtight container for up to three days, keeping the flavors intact.
FAQ
Conclusion
In conclusion, Baked Teriyaki Chicken is a simple yet incredibly flavorful dish that brings joy to any table. Its combination of tender chicken and a sweet, savory glaze makes it a favorite for both family dinners and special occasions. So why not give it a try? I promise it will quickly become a staple in your home just like it did in mine!

Baked Teriyaki Chicken
Ingredients
Equipment
Method
- Preheat your oven to 375°F (190°C). This is the perfect temperature for baking the chicken and helping the glaze caramelize beautifully. Ensuring your oven is at the right temperature before starting is key to perfect results.
- Next, puree the minced garlic and ginger together using a mortar and pestle, a magic bullet, or a food processor. You want to achieve a smooth consistency that will blend seamlessly into your sauce.
- In a small saucepan, combine soy sauce, water, Golden Monkfruit Sweetener, ginger puree, and garlic puree. Place it over low heat and bring to a simmer. Stir occasionally and taste to adjust the sweetness to your liking. The goal is to reduce this mixture by about one-third, concentrating the flavors.
- While your sauce simmers, prepare the chicken. Trim away any visible fat and undesirable parts. If some pieces are particularly thick, consider trimming them down to ensure even cooking. This also allows for more flavorful leftovers if you decide to use those trimmings for homemade stock!
- Heat peanut oil in a large non-stick frying pan over medium-high heat. Once hot, carefully add the chicken breasts and brown them for about 3 to 4 minutes on each side. You want them to develop a lovely golden crust but not cook them through just yet.
- After browning, cut the chicken into four equal-lengthwise strips. This not only helps with presentation but also ensures even cooking when you bake the chicken.
- Select a casserole dish that can fit all the chicken in a single layer. Arrange the strips neatly inside, then brush about half of the reduced teriyaki sauce generously over the top. This ensures each piece is coated and flavorful from the start.
- Pop the dish into the preheated oven and bake for 5 minutes. After this time, take it out and brush on more teriyaki sauce. This step adds layers of flavor!
- Return the chicken to the oven and bake for another 5 minutes. Afterward, pull it out once more and give it a final brush with sauce. The chicken should be glistening by now!
- Continue baking for an additional 2 to 5 minutes. Use an instant-read meat thermometer to check the thickest part of the chicken; it should read 165°F (90°C) when fully cooked. This ensures your chicken is safe to eat and perfectly juicy.
- When the chicken is done, remove it from the oven and let it rest for a few minutes. This allows the juices to redistribute for the best texture. Serve hot, garnished with sliced green onions if you desire. If you have any extra sauce, feel free to reheat it and serve it over the chicken for an added burst of flavor!
Notes
- Storage: Leftovers can be stored in an airtight container in the refrigerator for up to 3 days.
- Freezing: Yes, you can freeze the chicken! Make sure it’s properly cooled and then tightly wrapped or placed in a freezer-safe bag for up to 3 months.
- Pairing: This dish pairs wonderfully with steamed rice, sautéed vegetables, or a fresh salad. You can also serve it in a wrap or on a bed of greens.
- Marinating: For an extra depth of flavor, consider marinating the chicken in the teriyaki sauce for a few hours or overnight before cooking.
- Variations: You can easily change the protein or add vegetables like bell peppers or broccoli for a colorful twist on the classic.