Small Batch Chocolate Cinnamon Rolls
There’s something magical about the aroma of freshly baked goods wafting through the house, isn’t there? It’s like a warm hug for the soul. Today, I’m excited to share my favorite treat: Small Batch Chocolate Cinnamon Rolls. Picture a cozy morning, perhaps a lazy Sunday, and you’re greeted by the smell of cinnamon and chocolate mingling in the air. These rolls are not just any rolls; they’re soft, gooey, and bursting with flavor, perfect for a small gathering or just a special treat for yourself. I often find myself whipping these up on a whim, adding a little espresso glaze to elevate the experience. It feels indulgent without being overwhelming, making it a delightful weekend ritual. Whether you enjoy them for breakfast or as an afternoon snack with a cup of coffee, these rolls will undoubtedly bring a smile to your face.
Recipe Snapshot
60 mins
0 mins
0 mins
Medium
270 kcal
4 g
Gluten-Free, Low FODMAP
10 g
Oven, Mixing Bowl, Baking Sheet, Wooden Spoon, Whisk
Why This Small Batch Chocolate Cinnamon Rolls Is a Winner
1. Perfectly Sized for Small Gatherings
One of the standout features of my Small Batch Chocolate Cinnamon Rolls is their size. With just enough to satisfy your cravings without overwhelming you with leftovers, they’re perfect for intimate gatherings. They’re ideally portioned for two to four people, ensuring that everyone can have a taste without feeling guilty about excess.
2. Deliciously Soft and Fluffy Texture
These rolls are a labor of love, and the result is worth every minute. The dough is soft and fluffy, creating that perfect pull-apart texture. When you take that first bite, the gooey chocolate and warm cinnamon filling meld together beautifully, making it hard to stop at just one. It’s that satisfying balance of sweetness and spice that keeps you coming back for more.
3. Espresso Glaze for an Extra Kick
The addition of the espresso glaze is what takes these rolls to the next level. The rich coffee flavor complements the chocolate and cinnamon perfectly, adding a depth that you didn’t know you needed. It’s a simple glaze to whip up, but it elevates the entire experience and makes these rolls feel like a gourmet treat.
4. Simple Ingredients You Already Have
You don’t need to hunt for exotic ingredients to make these rolls. Most of the items required are pantry staples, making them accessible for any home cook. With just flour, sugar, chocolate chips, and a few other essentials, you can easily whip up a batch. This simplicity allows for spontaneity; when the craving strikes, you can answer it without a trip to the store.
5. A Fun Activity to Share
Baking these rolls can be a delightful activity to share with friends or family. Kneading the dough, rolling it out, and watching it rise can be an entertaining process. Plus, there’s something incredibly rewarding about creating something delicious from scratch together!
6. Versatile for Any Time of Day
These rolls aren’t just for breakfast; they make a wonderful snack or dessert as well. Serve them warm with coffee in the morning, or indulge in one with a scoop of ice cream for dessert. Their versatility means they can fit into any time of day, making them a go-to recipe for various occasions.
Key Ingredients for Small Batch Chocolate Cinnamon Rolls
The magic of Small Batch Chocolate Cinnamon Rolls lies in the carefully selected ingredients that work together to create something truly special. Each component plays a critical role in achieving the perfect texture and flavor.
- 6 to 7-inch baking dish: Essential for the perfect size, this baking dish helps achieve the right amount of heat for a golden finish.
- 1/3 cup milk: Provides moisture and richness; it can be any percentage based on your preference.
- 2 teaspoons active dry yeast: The key to fluffy rolls, activating the yeast allows the dough to rise beautifully.
- 2 tablespoons melted butter: Adds flavor and a tender crumb to the dough.
- 1 tablespoon granulated sugar: A touch of sweetness that aids in the yeast activation.
- 1 large egg yolk: Enriches the dough and contributes to a lovely golden color.
- 1/4 teaspoon salt: Balances all the flavors and enhances the sweetness.
- 1 1/4 cups all-purpose flour: The backbone of the recipe, providing structure and absorbency.
- 2 tablespoons softened butter: Used for spreading on the dough before adding the filling, making it rich and flavorful.
- 1/4 cup packed brown sugar: Adds depth and moisture to the filling.
- 3/4 teaspoon cinnamon: The cozy spice that defines the flavor of these rolls.
- 1/3 cup semi-sweet chocolate chips: The gooey goodness that melts into the rolls.
- 3/4 cup powdered sugar: For the delicious espresso glaze that tops the rolls.
- 1/4 teaspoon espresso powder: Enhances the flavor profile of the glaze.
- 2 tablespoons milk: To achieve the right consistency for the glaze.
- 1/4 teaspoon vanilla extract: A hint of vanilla rounds out the flavors in the glaze.
- Pinch of salt: Elevates the sweetness of the glaze.
Step by Step Guide for Small Batch Chocolate Cinnamon Rolls
Let’s dive into the fun part—making your own Small Batch Chocolate Cinnamon Rolls. With just a few simple steps, you’ll have a batch of warm, gooey rolls to enjoy. Ready? Let’s get started!
- In a microwave-safe mug, warm milk for about 20 seconds until it’s lukewarm, not hot (aim for about 105 to 115 degrees Fahrenheit). Stir in the active dry yeast and allow it to sit for 10 to 15 minutes until the top of the mixture is foamy. This shows that your yeast is active and ready to work its magic.
- In a medium bowl, whisk together the foamy yeast mixture, melted butter, granulated sugar, egg yolk, and salt. Ensure everything is mixed well before moving to the next step.
- Add the all-purpose flour a third at a time, mixing with a spoon until you form a thick and sticky dough. Don’t worry if it seems a bit rough; it will come together shortly.
- Dump the mixture onto a well-floured work surface. Knead the dough gently until it’s no longer sticky and forms a ball, which should take about 10 gentle folds. This process develops the gluten, making your rolls fluffy.
- Place the dough into a greased bowl, cover it with a towel, and let it rise in a warm place for about an hour, or until it has doubled in size.
- While the dough rises, lightly grease your 6 to 7-inch baking dish. Once the dough has risen, turn it out onto a lightly floured surface, gently squish and stretch it into an oblong shape.
- Using a floured rolling pin, roll the dough out to about 5 by 15 inches, making sure to keep it as rectangular as possible for even filling distribution.
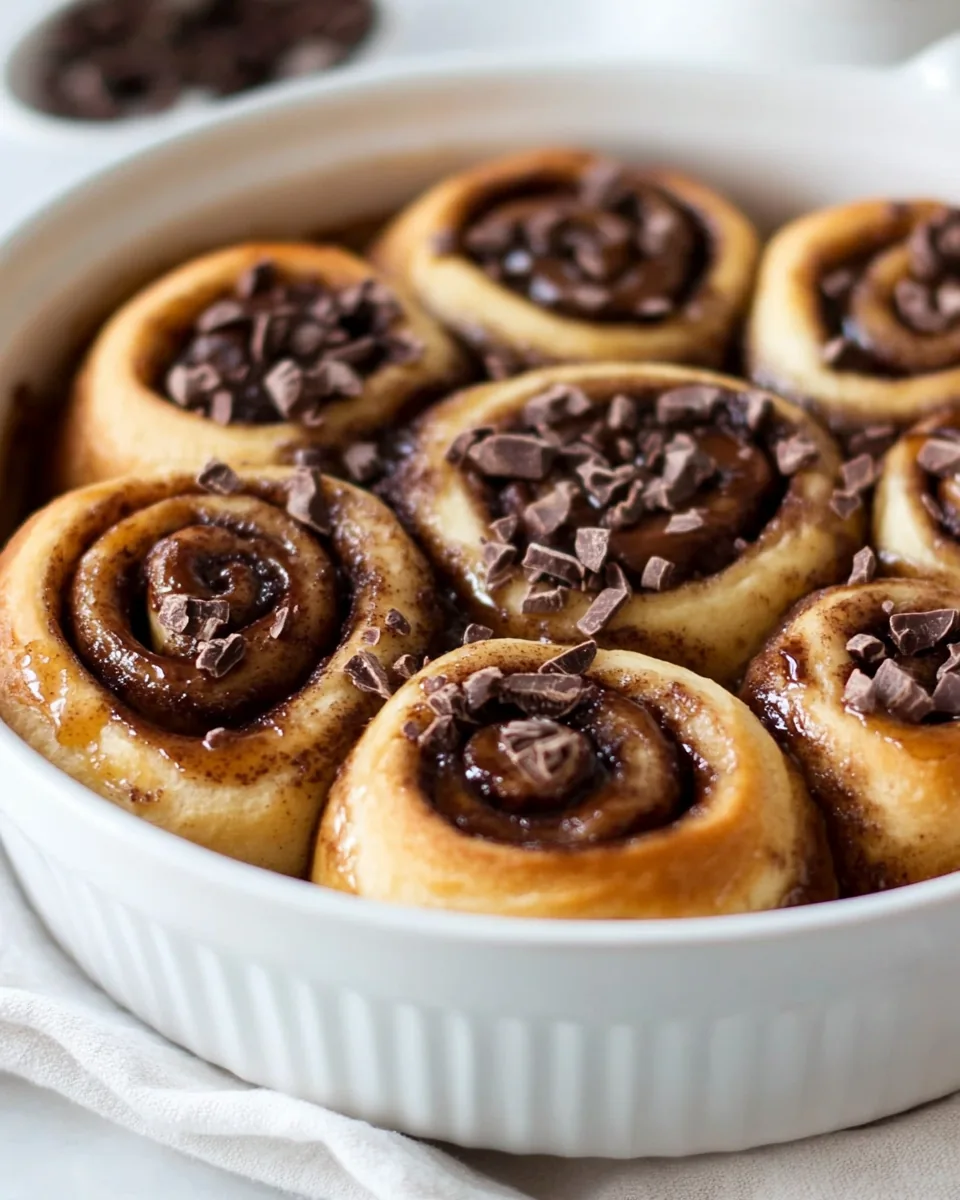
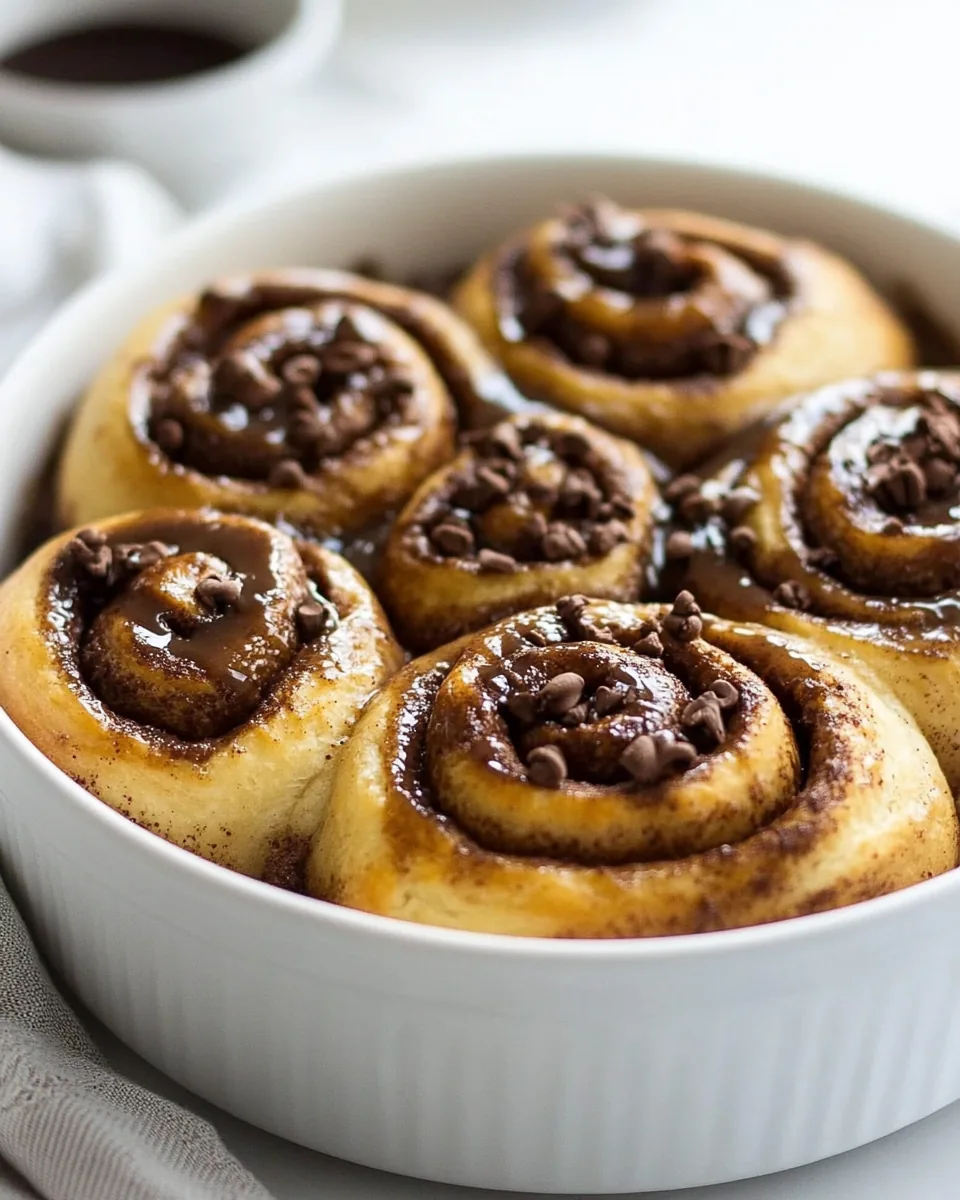
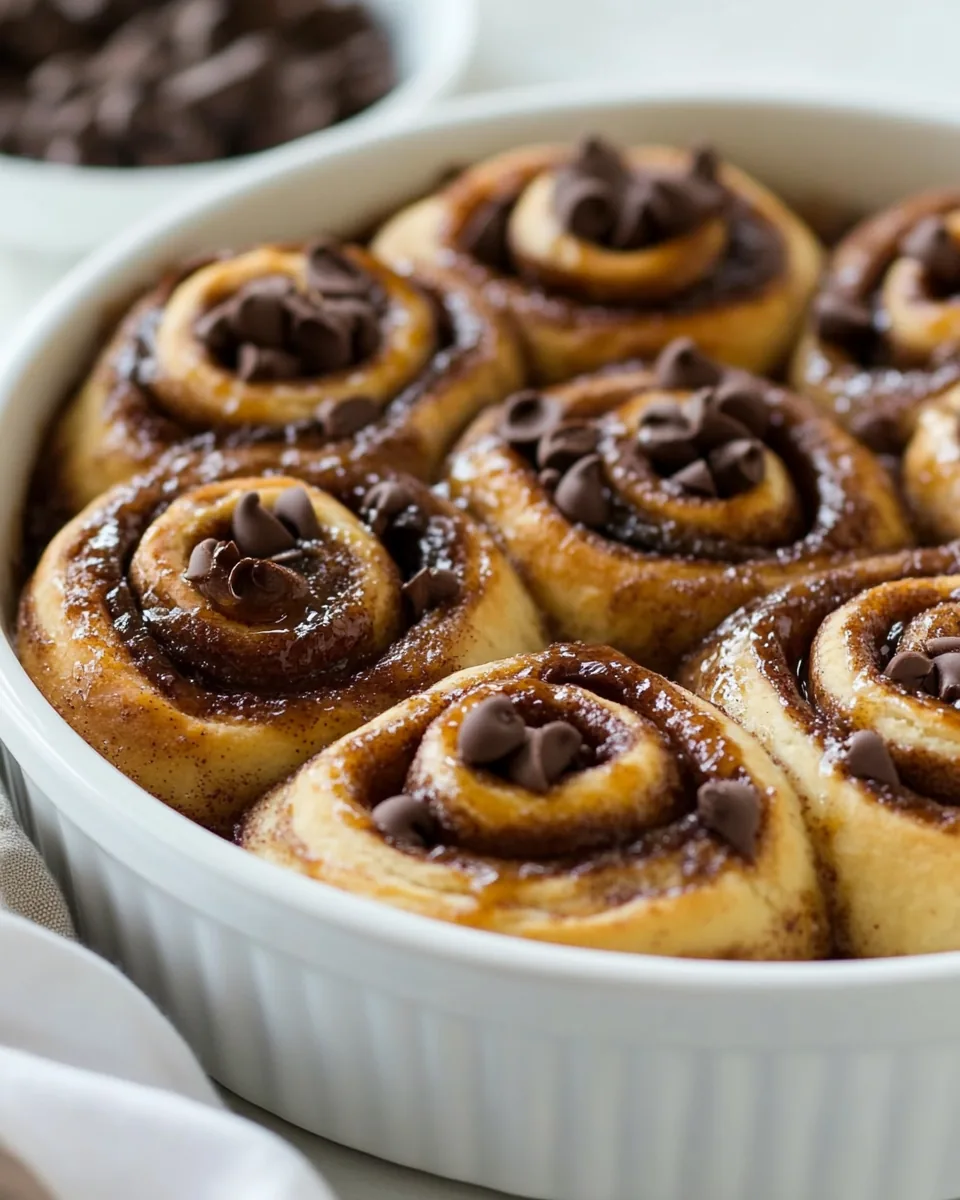
- Spread the remaining butter over the rolled-out dough, and then top it with a mixture of brown sugar and cinnamon. Sprinkle the chocolate chips evenly across the filling.
- Starting from the short side, carefully roll the dough into a tight log. Use a serrated knife to cut the roll into quarters, making sure to be gentle so the filling doesn’t spill out.
- Place the rolls into your prepared baking dish. If you’re making these rolls overnight, cover them tightly with plastic wrap and place in the fridge. If not, allow the rolls to rise again in a warm place for about 30 minutes.
- Preheat your oven to 400 degrees Fahrenheit. Once the rolls have risen, bake them for about 12 to 15 minutes until the tops are golden and the centers are cooked through. If the tops brown too quickly, cover them with foil.
- While the rolls are baking, prepare the espresso glaze by whisking together the sifted powdered sugar, espresso powder, vanilla extract, and a pinch of salt in a medium bowl. Add in the milk until you reach your desired consistency.
- As soon as the rolls are done baking, spoon the glaze over the warm rolls. Serve and enjoy the delightful combination of chocolate and cinnamon!
Things Worth Knowing
- Using the right temperature for your milk is crucial for activating the yeast. Too hot and it can kill the yeast; too cold and it won’t activate.
- The dough will be sticky at first. Make sure to flour your work surface generously to prevent sticking while kneading.
- If you want to make the rolls ahead of time, simply prepare the rolls, cover them tightly, and place them in the fridge overnight.
- Watch your rolls closely while baking. They can go from perfectly golden to overdone very quickly!
Change It Up
Feeling adventurous? Here are some fun ways to customize your Small Batch Chocolate Cinnamon Rolls.
- Storage: Store any leftovers in an airtight container at room temperature for up to three days. For longer storage, keep them in the fridge.
- Freezing: These rolls can be frozen! After baking, allow them to cool completely, then wrap them tightly in plastic wrap and foil, and they’ll keep for up to three months.
- Variations: Try adding nuts or dried fruits to the filling for extra texture.
- Gourmet Touch: Experiment with flavored chocolate chips, like mint or orange, to change up the flavor profile.
- Glaze Options: Instead of espresso glaze, consider a vanilla or caramel glaze for a different twist.
Great Combinations for Small Batch Chocolate Cinnamon Rolls
Serving Small Batch Chocolate Cinnamon Rolls is as delightful as making them! Here are some great ideas:
- Perfect for Breakfast: Pair these rolls with a hot cup of coffee or tea to start your day off right.
- Ideal for Brunch: Serve them alongside fresh fruit and yogurt for a well-rounded brunch spread.
- Cozy Evening Treat: Enjoy them as a warm dessert after dinner, perhaps with a scoop of ice cream.
- Holiday Gatherings: These rolls make for a fantastic addition to your holiday breakfast table. They’re sure to impress your guests!
- Storage Tips: If you plan to save them for later, ensure they’re sealed properly to maintain freshness.
FAQ
Conclusion
The Small Batch Chocolate Cinnamon Rolls are a delightful treat that brings warmth and comfort to any occasion. Their soft, fluffy texture combined with the rich chocolate and espresso glaze makes them simply irresistible. I encourage you to try making these rolls for yourself—you won’t be disappointed! They’re sure to become a beloved addition to your recipe collection.

Small Batch Chocolate Cinnamon Rolls
Ingredients
Equipment
Method
- In a microwave-safe mug, warm milk for about 20 seconds until it’s lukewarm, not hot (aim for about 105 to 115 degrees Fahrenheit). Stir in the active dry yeast and allow it to sit for 10 to 15 minutes until the top of the mixture is foamy. This shows that your yeast is active and ready to work its magic.
- In a medium bowl, whisk together the foamy yeast mixture, melted butter, granulated sugar, egg yolk, and salt. Ensure everything is mixed well before moving to the next step.
- Add the all-purpose flour a third at a time, mixing with a spoon until you form a thick and sticky dough. Don’t worry if it seems a bit rough; it will come together shortly.
- Dump the mixture onto a well-floured work surface. Knead the dough gently until it’s no longer sticky and forms a ball, which should take about 10 gentle folds. This process develops the gluten, making your rolls fluffy.
- Place the dough into a greased bowl, cover it with a towel, and let it rise in a warm place for about an hour, or until it has doubled in size.
- While the dough rises, lightly grease your 6 to 7-inch baking dish. Once the dough has risen, turn it out onto a lightly floured surface, gently squish and stretch it into an oblong shape.
- Using a floured rolling pin, roll the dough out to about 5 by 15 inches, making sure to keep it as rectangular as possible for even filling distribution.
- Spread the remaining butter over the rolled-out dough, and then top it with a mixture of brown sugar and cinnamon. Sprinkle the chocolate chips evenly across the filling.
- Starting from the short side, carefully roll the dough into a tight log. Use a serrated knife to cut the roll into quarters, making sure to be gentle so the filling doesn’t spill out.
- Place the rolls into your prepared baking dish. If you’re making these rolls overnight, cover them tightly with plastic wrap and place in the fridge. If not, allow the rolls to rise again in a warm place for about 30 minutes.
- Preheat your oven to 400 degrees Fahrenheit. Once the rolls have risen, bake them for about 12 to 15 minutes until the tops are golden and the centers are cooked through. If the tops brown too quickly, cover them with foil.
- While the rolls are baking, prepare the espresso glaze by whisking together the sifted powdered sugar, espresso powder, vanilla extract, and a pinch of salt in a medium bowl. Add in the milk until you reach your desired consistency.
- As soon as the rolls are done baking, spoon the glaze over the warm rolls. Serve and enjoy the delightful combination of chocolate and cinnamon!
Notes
- Overnight Rolls: Cover rolls tightly in plastic wrap, and place in the fridge overnight or up to 24 hours.
- Baking from Cold: Remove plastic wrap from rolls and place them into a cold oven. Turn your oven to 400 degrees and bake for 15 to 20 minutes until the tops are golden and centers cooked through. Watch closely; they go from pale to overdone very quickly. If they begin to brown too quickly, cover with foil until finished baking.
- Yeast Activation: If your yeast and milk mixture does not foam, your yeast may be bad, or may have been killed if the milk was too hot. Toss and try again, making sure the milk is just lukewarm.
- Measuring Flour: For best results, measure flour by weight or the Spoon and Sweep Method (spoon flour into your measuring cup, swipe excess off with the flat of a knife).