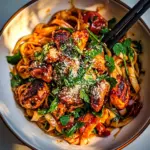
Baked Chicken Drumsticks
There’s something incredibly satisfying about a plate of Baked Chicken Drumsticks. Remember the last time you bit into a perfectly cooked drumstick, the skin crispy and the meat tender? That’s exactly the kind of joy these oven-baked delights bring. Growing up, we often had family gatherings where my mom would whip up a batch of these drumsticks, filling the house with a tantalizing aroma that would have everyone crowding around the kitchen, eagerly waiting for their turn to grab a piece. Whether it’s a weekend gathering or a simple weeknight dinner, these Baked Chicken Drumsticks have become a staple in our household, and I’m excited to share this recipe with you.
Recipe Snapshot
60 mins
10 mins
50 mins
Medium
320 kcal
24 g
Whole30, Vegan, Gluten-Free
12 g
Saucepan, Grater, Large Pot, Oven, Mixing Bowl, Baking Sheet
Why This Baked Chicken Drumsticks Hits Different
Comfort Food at Its Best
One of the reasons I absolutely love this recipe is that it’s the epitome of comfort food. The combination of crispy skin and juicy meat makes for a satisfying meal that warms the soul. Plus, you can customize the flavors based on what you have on hand, making it a versatile option for anyone.
Easy Prep and Cleanup
Another thing I appreciate about these Baked Chicken Drumsticks is how easy they are to prepare. With minimal ingredients and steps, you can spend less time in the kitchen and more time enjoying your meal with family and friends. And who doesn’t love a recipe that doesn’t leave a mountain of dishes to clean afterward?
A Hit with Everyone
These drumsticks are a guaranteed crowd-pleaser. Whether you’re serving them at a birthday party or a casual dinner, people of all ages love them! I’ve seen picky eaters go back for seconds, and that’s truly a win in my book.
Endless Flavor Possibilities
The flavors are also incredibly adaptable. You can spice them up with your favorite seasonings, or keep it simple with just salt and pepper. It’s fun to experiment with different marinades or sauces, which can transform the dish from a classic to something new and exciting.
Meal Prep Friendly
If you’re like me and love to meal prep, these Baked Chicken Drumsticks are perfect for that! You can bake a large batch, portion them out, and have ready-to-go meals throughout the week. Toss them in salads, wraps, or eat them on their own with some veggies.
Healthy and Satisfying
Lastly, they strike a nice balance between being delicious and relatively healthy. By baking instead of frying, you can enjoy crispy skin without the extra calories, making it a guilt-free option for your table.
Ingredients Required for Baked Chicken Drumsticks

The key ingredients in this recipe work harmoniously to create a dish that is both flavorful and satisfying. Each component plays a crucial role, from the tender chicken to the spices that bring it all together. Let’s explore what you’ll need!
- 20 Chicken Drumsticks: The star of the show, these drumsticks are juicy and perfect for baking.
- 1/3 Cup Flour: This helps to create a crispy coating; feel free to use any variety, including gluten-free.
- 3 Tablespoons Cornstarch: This is key to achieving that extra crunch.
- 1 Tablespoon Salt: Essential for seasoning the chicken to enhance its flavor.
- 3 1/2 Cups Pineapple Juice: This adds a sweet and tangy flavor to the dish.
- 1 Cup Brown Sugar: Provides sweetness and helps caramelize the chicken as it bakes.
- 1/4 Cup Soy Sauce: A savory component that adds umami depth.
- 1/4 Cup Rice Vinegar: This brightens up the flavors of the dish.
- 2 Tablespoons Fresh Grated Ginger: Adds a zesty kick and aroma.
- 3 Cloves Garlic, minced: An aromatic flavor enhancer.
- 1/4 to 1/2 Cup Sriracha Sauce: For those who enjoy a bit of heat, adjust according to your taste!
Instructions for Baked Chicken Drumsticks

Making these Baked Chicken Drumsticks is a simple process that results in a flavorful dish. I’ll walk you through the steps to ensure you get the best results possible. Let’s get cooking!
Preheat your oven to 450 degrees F. This high temperature is crucial for achieving that crispy exterior. While the oven heats up, you can prepare your baking sheets. Line two rimmed baking sheets with foil for easy cleanup, and spray them with non-stick cooking spray to prevent sticking.
In a mixing bowl, combine flour, cornstarch, and salt. Whisk them together until well combined. This mixture will give your chicken that desired crunch. Using paper towels, dry each drumstick thoroughly.
Once dried, roll each drumstick in the flour mixture, ensuring an even coating. It’s important not to overload them; a light dusting is all you need.
Lay the coated drumsticks out on the baking sheets, making sure they are evenly spaced. This will allow for even cooking and crisping.
Now, pop the baking sheets in the preheated oven and bake the drumsticks for 30 minutes. Be sure to flip them halfway through to ensure even cooking and browning.
While the chicken is baking, it’s time to prepare the sauce. In a medium sauce pot, pour in the pineapple juice along with the remaining ingredients: brown sugar, soy sauce, rice vinegar, ginger, garlic, and Sriracha. If you’re cautious about heat, stick with 1/4 cup of Sriracha; if you crave spice, go for 1/2 cup. Bring the mixture to a boil over medium heat.
Once boiling, reduce the heat and let the sauce simmer for 30 minutes. During this time, it will thicken up and develop beautiful flavors.
After 30 minutes, take the drumsticks out of the oven and pour the delicious sauce over them evenly. Use tongs to roll each drumstick around in the sauce to ensure they are well coated.
Put them back in the oven, uncovered, and bake for another 20 minutes. This final step allows the sauce to caramelize and gives your drumsticks that sticky, flavorful finish.
Once they are out of the oven, let them rest for a few minutes before serving warm. Enjoy the delightful flavors of your Baked Chicken Drumsticks!
Things Worth Knowing
- Cooking Temperature: Ensure your oven is fully preheated before placing the drumsticks inside. Baking at a high temperature helps achieve that ideal crispy skin.
- Marinating: For even more flavor, consider marinating the drumsticks in the sauce for a few hours or overnight before baking.
- Doneness: The internal temperature of the chicken should reach 165 degrees F for it to be safe to eat. Use a meat thermometer for accuracy.
- Flavor Variations: Feel free to experiment with different spices and herbs in the flour mixture for a unique taste.
Ways to Customize

There are countless ways to make your Baked Chicken Drumsticks even more delicious! Here are some ideas to explore:
- Seasoning Variations: Add your favorite herbs and spices to the flour mixture. Consider using paprika, cayenne pepper, or dried herbs for extra flavor.
- Sweetness Level: Adjust the amount of brown sugar in the sauce depending on how sweet you like your glaze.
- Your Favorite Sauce: Instead of the pineapple sauce, try a BBQ or teriyaki sauce for different flavor profiles.
- Side Dish Pairings: Serve your Baked Chicken Drumsticks with coleslaw, roasted vegetables, or a fresh salad for a complete meal.
- Storage: Leftovers can be stored in an airtight container in the fridge for up to three days. Reheat in the oven to keep them crispy.
- Freezing: You can freeze the cooked drumsticks for later. Just make sure they are cooled completely before transferring to freezer-safe bags.
- Meal Prep: Bake a large batch at once, freeze, and then reheat as needed for quick weeknight dinners.
What to Serve Alongside Baked Chicken Drumsticks
Serving Baked Chicken Drumsticks is a joyous occasion! Here are some delightful ideas for sides and pairings:
- Mashed Potatoes: Creamy mashed potatoes make for a comforting side that pairs beautifully with the sticky sauce.
- Vegetable Medley: Roasted or sautéed seasonal vegetables add color and nutrition to your meal.
- Rice: Serve over steamed rice to soak up the delicious sauce.
- Coleslaw: The crunchiness of coleslaw contrasts wonderfully with the tender drumsticks.
- Fresh Salad: A simple salad with a tangy vinaigrette will balance the richness of the chicken.
- Picnic or BBQ: These Baked Chicken Drumsticks are perfect for outdoor gatherings. Serve alongside corn on the cob and baked beans.
- Game Day Snacks: They also make a great addition to any game day spread. Pair with dips and veggies for a fun feast.
FAQ
Conclusion
Baked Chicken Drumsticks are truly a family favorite, offering a delightful blend of flavors that everyone can enjoy. They’re simple to make, versatile, and perfect for any occasion. I encourage you to try this recipe soon, whether for a casual weeknight dinner or a fun gathering with friends and family. You won’t regret it!

Baked Chicken Drumsticks
Ingredients
Equipment
Method
- Preheat your oven to 450 degrees F. This high temperature is crucial for achieving that crispy exterior. While the oven heats up, you can prepare your baking sheets. Line two rimmed baking sheets with foil for easy cleanup, and spray them with non-stick cooking spray to prevent sticking.
- In a mixing bowl, combine flour, cornstarch, and salt. Whisk them together until well combined. This mixture will give your chicken that desired crunch. Using paper towels, dry each drumstick thoroughly.
- Once dried, roll each drumstick in the flour mixture, ensuring an even coating. It’s important not to overload them; a light dusting is all you need.
- Lay the coated drumsticks out on the baking sheets, making sure they are evenly spaced. This will allow for even cooking and crisping.
- Now, pop the baking sheets in the preheated oven and bake the drumsticks for 30 minutes. Be sure to flip them halfway through to ensure even cooking and browning.
- While the chicken is baking, it’s time to prepare the sauce. In a medium sauce pot, pour in the pineapple juice along with the remaining ingredients: brown sugar, soy sauce, rice vinegar, ginger, garlic, and Sriracha. If you’re cautious about heat, stick with 1/4 cup of Sriracha; if you crave spice, go for 1/2 cup. Bring the mixture to a boil over medium heat.
- Once boiling, reduce the heat and let the sauce simmer for 30 minutes. During this time, it will thicken up and develop beautiful flavors.
- After 30 minutes, take the drumsticks out of the oven and pour the delicious sauce over them evenly. Use tongs to roll each drumstick around in the sauce to ensure they are well coated.
- Put them back in the oven, uncovered, and bake for another 20 minutes. This final step allows the sauce to caramelize and gives your drumsticks that sticky, flavorful finish.
- Once they are out of the oven, let them rest for a few minutes before serving warm. Enjoy the delightful flavors of your Baked Chicken Drumsticks!
Notes
- Storage: Leftovers can be stored in an airtight container in the fridge for up to three days. Reheat in the oven to keep them crispy.
- Freezing: You can freeze the cooked drumsticks for later. Just make sure they are cooled completely before transferring to freezer-safe bags.
- Meal Prep: Bake a large batch at once, freeze, and then reheat as needed for quick weeknight dinners.