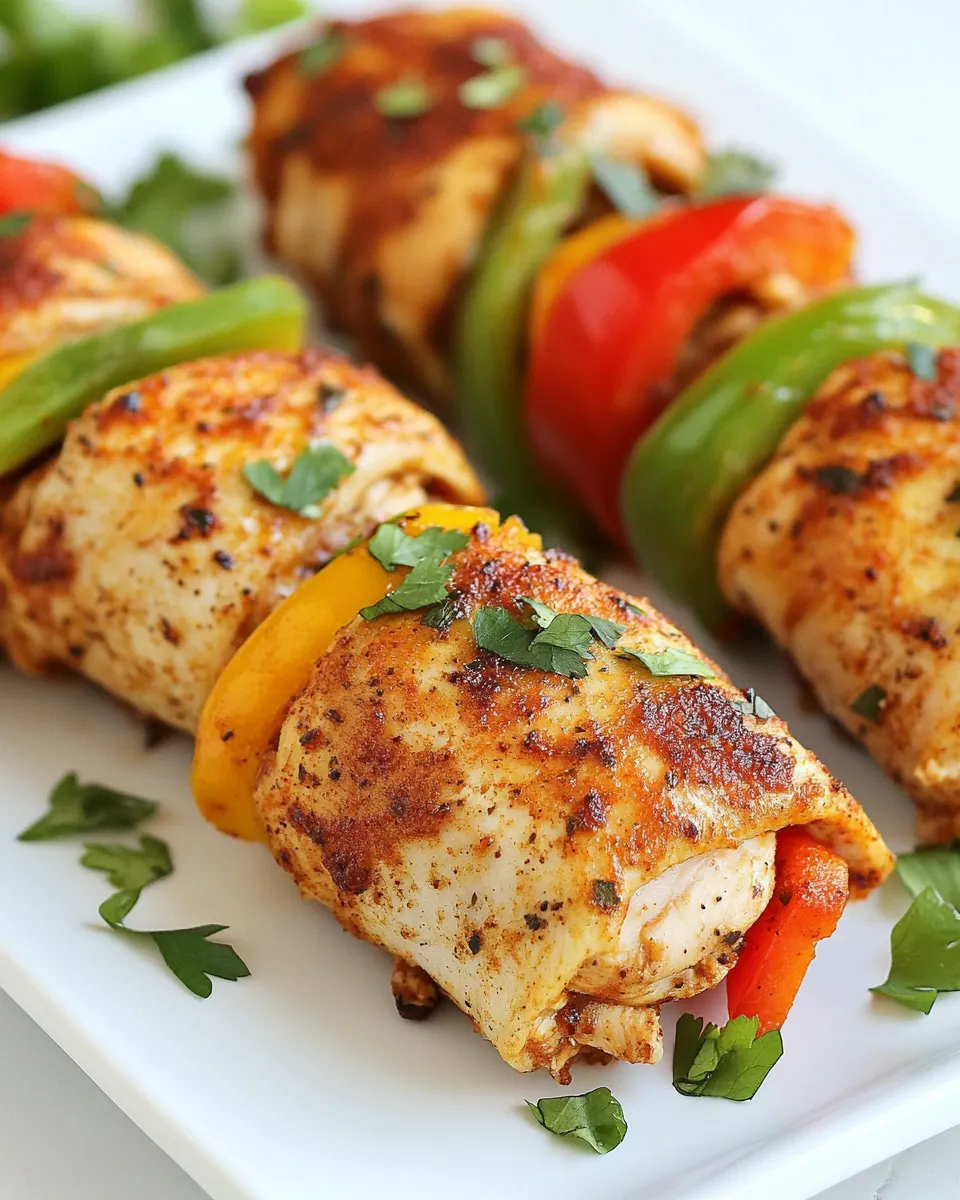
Baked Chicken Fajita Rollups
There’s something comforting about Baked Chicken Fajita Rollups that always brings a smile to my face. I remember the first time I made them for my family, filling our kitchen with the mouthwatering aroma of spices and sizzling chicken. These rollups are not just a meal; they evoke memories of family gatherings and cozy evenings. The combination of tender chicken wrapped around fresh bell peppers, all seasoned perfectly, makes it a dish that’s hard to resist. Whether it’s a busy weeknight or a leisurely weekend, you can count on these rollups to deliver comfort and satisfaction. They’re quick to prepare and even quicker to disappear from the plate!
Recipe Snapshot
30 mins
10 mins
20 mins
Medium
350 kcal
30 g
Keto, Paleo, Whole30
20 g
Frying Pan, Oven, Mixing Bowl, Chef’s Knife, Baking Sheet
Why We Love This Baked Chicken Fajita Rollups
Flavor Explosion
One of the reasons I absolutely adore Baked Chicken Fajita Rollups is the flavor explosion they deliver in every single bite. The dry spice mix adds a kick that elevates the chicken and vegetables, making it the star of any dinner table. Each rollup is packed with seasoned goodness that turns a simple dish into something extraordinary.
Customizable Delight
These rollups are incredibly versatile. You can easily customize them according to what you have on hand or your family’s taste preferences. Want to add more veggies? Go for it! Have some leftover cheese? Sprinkle it inside for an extra creamy texture. This flexibility means you can make them time and again without getting bored.
Perfect for Meal Prep
If you’re like me and enjoy having meals ready to go, these rollups are perfect for meal prepping. You can prepare them ahead of time, store them in the fridge, and simply bake them when it’s time to eat. They hold up beautifully, and they’re just as delicious reheated as they are fresh out of the oven.
Family-Friendly Fun
Cooking together is a wonderful way to bond with family, and making Baked Chicken Fajita Rollups is no exception. Kids love to help roll them up, and it’s a fun way to involve everyone in the kitchen. Plus, they can be a great way to introduce children to cooking with chicken and fresh veggies.
Healthy and Wholesome
For those keeping an eye on nutrition, this dish is packed with healthy ingredients. The chicken provides lean protein while the colorful bell peppers offer a wealth of vitamins. It’s a straightforward way to serve a wholesome dinner without compromising on flavor.
Ingredient List for Baked Chicken Fajita Rollups

When it comes to the ingredients for Baked Chicken Fajita Rollups, simplicity is key. Each item plays a vital role in creating a flavorful and satisfying dish. The standout ingredients here are the chicken and the vibrant bell peppers, which not only add color but also a sweet crunch. Together, they create a delightful combination that is sure to please any palate.
- 2 chicken breasts, cut in half lengthwise, thin about 1/4” thick: The foundation of this dish, providing lean protein that absorbs the spices beautifully.
- ½ red bell pepper, sliced: Adds sweetness and a pop of color, enhancing both the flavor and presentation.
- ½ yellow bell pepper, sliced: Offers a similar sweetness to the red pepper, creating a colorful mix in every rollup.
- ½ green bell pepper, sliced: The slightly bitter flavor contrasts nicely with the sweet peppers, adding depth.
- 2 Tbsp olive oil: Essential for cooking and ensures the chicken is juicy, while also adding a rich flavor.
- Juice of half a lime, optional: Brightens the dish and adds a refreshing zing to balance the spices.
- Toothpicks for securing chicken: They hold everything together, making it easier to manage when cooking.
- Dry spice mix: This consists of:
- 1 tablespoon chili powder: Brings a warm heat to the dish.
- 1/2 teaspoon garlic powder: Adds a savory depth that complements the chicken.
- 1/2 teaspoon cumin: Offers an earthy, warm flavor characteristic of fajitas.
- 1/2 teaspoon paprika, optional: Adds a hint of sweetness and a beautiful color.
- 1/2 teaspoon salt: Elevates all the flavors.
- 1/2 teaspoon ground black pepper: Provides a subtle heat and enhances the overall taste.
- 2 Tbsp cilantro, chopped (for garnish): A fresh herb to finish, adding brightness and a pop of flavor.
Preparation Steps for Baked Chicken Fajita Rollups
Making Baked Chicken Fajita Rollups is a fun and straightforward process that will have your kitchen smelling heavenly. Gather your ingredients and let’s get started! Follow these steps, and you’ll have a delicious meal ready in no time.
- Preheat your oven to 400°F. This step is crucial as it ensures even cooking once you place the rollups in the oven.
- In a small bowl, combine all the ingredients for the dry spice mix: chili powder, garlic powder, cumin, paprika, salt, and ground black pepper. Give it a good stir to mix everything evenly.
- Lay the chicken cutlets down on a clean working surface. Sprinkle the spice mix generously over the chicken fillets, ensuring they are coated evenly. This will infuse the meat with flavor.
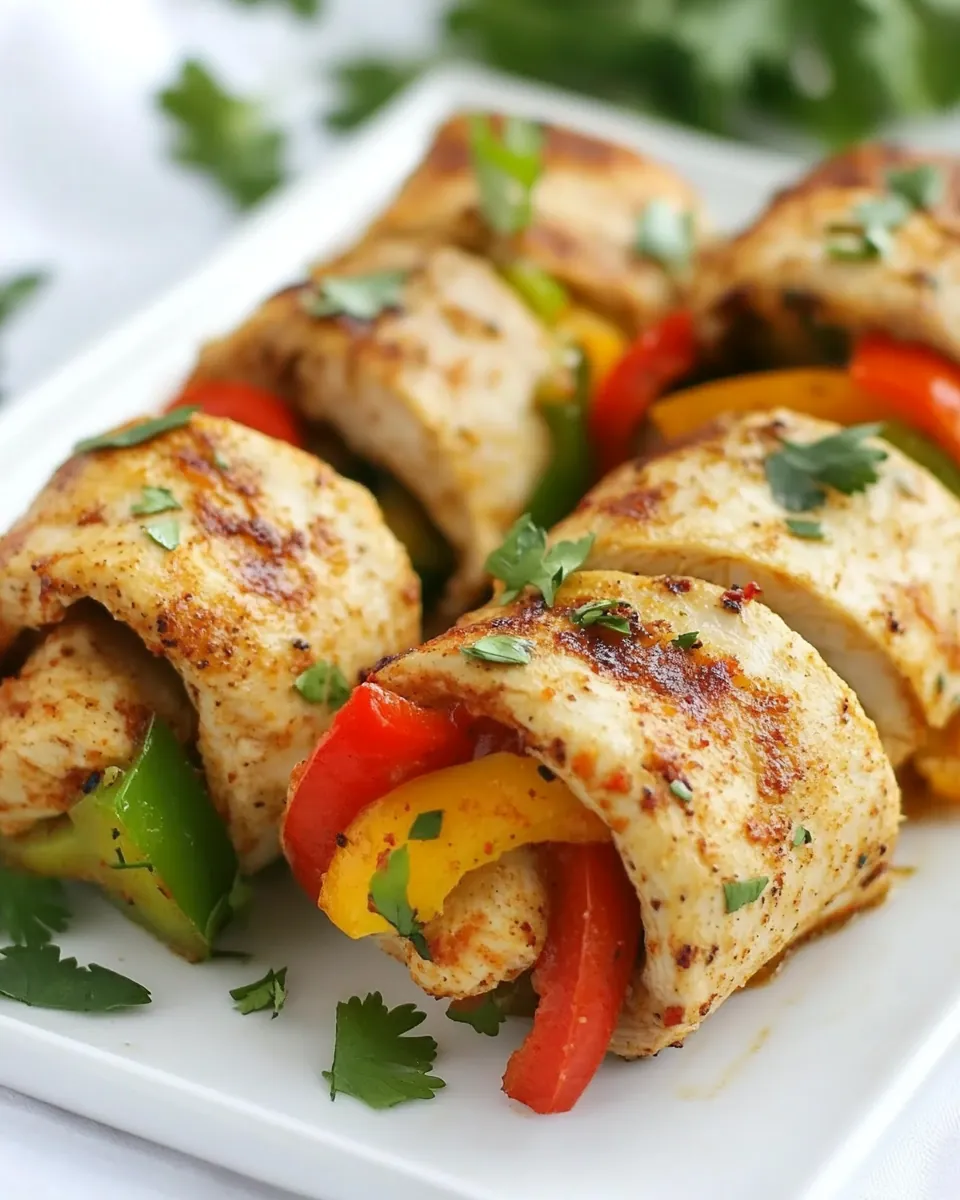
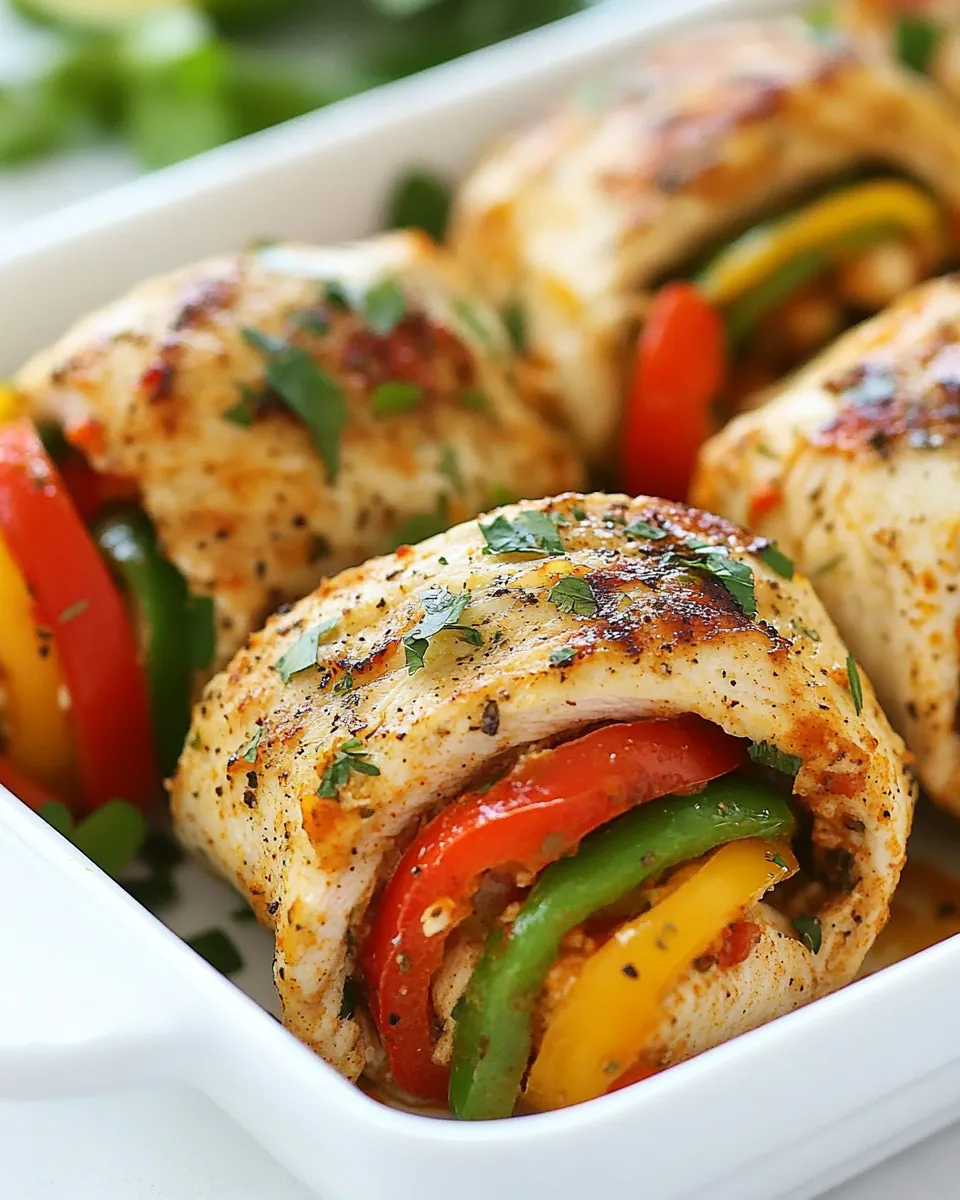
- Next, place 6 slices of the colorful bell peppers in the center of each chicken fillet. You can mix the colors for a vibrant presentation.
- Roll each fillet tightly, keeping the seam side down, and secure it with a toothpick to hold everything in place. If any spices remain on the cutting board, feel free to sprinkle them over the top of the rolls for extra flavor.
- In a large, heavy oven-safe pan, heat the olive oil over medium-high heat. You want the oil to be hot but not smoking, which will create a nice golden crust on the chicken.
- Carefully place the rollups in the heated pan, cooking for about 2 to 3 minutes on each side until golden brown. Watch for that lovely crispy exterior, which adds texture.
- Once they are golden, remove the pan from the heat. If your pan is oven-safe, you can place it directly in the oven. If not, transfer the rollups to a baking sheet.
- Bake for 15 minutes or until the chicken is fully cooked and the bell peppers are charred. The internal temperature should reach 165°F to ensure they are safe to eat.
- When done, remove from the oven, garnish with fresh cilantro, and a squeeze of lime. Serve with your favorite sides like veggies, rice, or tortillas and enjoy every bite!
Things Worth Knowing
- Test for doneness: Make sure to use a meat thermometer to check that the internal temperature of the chicken reaches 165°F for safety.
- Make-ahead tips: Prepare the rollups in advance and store them in the fridge until you’re ready to bake them. This saves time on busy nights.
- Spice it up: Feel free to adjust the spice levels by adding more chili powder or even some jalapeños for heat.
- Serving ideas: These rollups pair beautifully with a fresh salad or some seasoned rice for a complete meal.
Tips and Tricks about Baked Chicken Fajita Rollups
To get the most out of your Baked Chicken Fajita Rollups, here are some practical tips and tricks that can elevate your dish:
- Storage: If you have leftovers, store them in an airtight container in the fridge for up to three days. They make a delicious lunch the next day!
- Freezing: You can freeze cooked rollups for up to two months. Just make sure to wrap them tightly to avoid freezer burn.
- Pairing: Serve with a side of guacamole or sour cream for dipping. It adds a creamy texture that complements the spices well.
- Variations: Feel free to experiment with different veggies. Zucchini and mushrooms would also work beautifully in these rollups.
- Fresh Ingredients: Use fresh cilantro and lime juice right before serving to enhance the flavors.
What Goes Well With This Baked Chicken Fajita Rollups
Serving Baked Chicken Fajita Rollups can be as creative as you want it to be! Here are some ideas to consider:
- Fresh Salads: A light and zesty salad pairs wonderfully with these rollups, providing a refreshing contrast.
- Rice Dishes: Serving with cilantro-lime rice or Spanish rice can enhance the meal with additional flavors.
- Tortillas: They can be served with warm tortillas for a more traditional touch, making it a perfect dinner for taco night!
- Vegetables: Steamed or sautéed vegetables can add nutrition and color to your plate.
- Occasions: These rollups are ideal for family dinners, weekend gatherings, or even as part of a festive buffet spread.
- Seasonal Pairing: In the summer, consider adding a side of grilled corn on the cob for a great seasonal touch.
FAQ
Conclusion
**Baked Chicken Fajita Rollups** bring together vibrant flavors and healthy ingredients, making them a standout meal for any occasion. They’re not just delicious but also fun to prepare, especially when cooking with loved ones. If you haven’t tried making these yet, I encourage you to give them a go! They’re sure to become a favorite in your home, just as they have in mine.
Baked Chicken Fajita Rollups
Ingredients
Equipment
Method
- 1. Preheat your oven to 400°F. This step is crucial as it ensures even cooking once you place the rollups in the oven.
- 2. In a small bowl, combine all the ingredients for the dry spice mix: chili powder, garlic powder, cumin, paprika, salt, and ground black pepper. Give it a good stir to mix everything evenly.
- 3. Lay the chicken cutlets down on a clean working surface. Sprinkle the spice mix generously over the chicken fillets, ensuring they are coated evenly. This will infuse the meat with flavor.
- 4. Next, place 6 slices of the colorful bell peppers in the center of each chicken fillet. You can mix the colors for a vibrant presentation.
- 5. Roll each fillet tightly, keeping the seam side down, and secure it with a toothpick to hold everything in place. If any spices remain on the cutting board, feel free to sprinkle them over the top of the rolls for extra flavor.
- 6. In a large, heavy oven-safe pan, heat the olive oil over medium-high heat. You want the oil to be hot but not smoking, which will create a nice golden crust on the chicken.
- 7. Carefully place the rollups in the heated pan, cooking for about 2 to 3 minutes on each side until golden brown. Watch for that lovely crispy exterior, which adds texture.
- 8. Once they are golden, remove the pan from the heat. If your pan is oven-safe, you can place it directly in the oven. If not, transfer the rollups to a baking sheet.
- 9. Bake for 15 minutes or until the chicken is fully cooked and the bell peppers are charred. The internal temperature should reach 165°F to ensure they are safe to eat.
- 10. When done, remove from the oven, garnish with fresh cilantro, and a squeeze of lime. Serve with your favorite sides like veggies, rice, or tortillas and enjoy every bite!
Notes
- Storage: If you have leftovers, store them in an airtight container in the fridge for up to three days. They make a delicious lunch the next day!
- Freezing: You can freeze cooked rollups for up to two months. Just make sure to wrap them tightly to avoid freezer burn.
- Pairing: Serve with a side of guacamole or sour cream for dipping. It adds a creamy texture that complements the spices well.
- Variations: Feel free to experiment with different veggies. Zucchini and mushrooms would also work beautifully in these rollups.
- Fresh Ingredients: Use fresh cilantro and lime juice right before serving to enhance the flavors.