Caramel Apple Cheesecake
There’s something undeniably cozy about a slice of Caramel Apple Cheesecake. Just picture it: the cool autumn air outside, leaves swirling gently in the breeze, and the sweet aroma of apples mingling with rich caramel wafting through the kitchen. It’s a scene I cherish, one that always brings my family together. Whether it’s after a hearty fall dinner or as a sweet end to a holiday gathering, this cheesecake never fails to impress. I remember the first time I made it—my friends were skeptical at first, but one bite was all it took to turn their doubts into smiles. It’s that perfect blend of creamy, sweet, and slightly tart from the apples that makes it irresistible. The golden caramel drizzled on top adds just the right touch of decadence and warmth, making it feel truly special. So, let’s dive into this delightful dessert that captures the essence of fall!
Recipe Snapshot
1 hr 40 mins
40 mins
60 mins
Hard
450 kcal
6 g
Gluten-Free, Low FODMAP
28 g
9-inch Springform Pan, Roasting pan, KitchenAid stand mixer
What Sets This Caramel Apple Cheesecake Apart
Rich, Indulgent Flavor
What I love most about Caramel Apple Cheesecake is its layers of flavor. The creamy texture of the cheesecake base pairs perfectly with the tartness of the apples, creating a balance that keeps you coming back for more. The warm, spiced notes of apple pie spice add a cozy feel, making every bite comforting.
Perfect for Fall Gatherings
As the leaves change and the air becomes crisp, this cheesecake is the ultimate fall treat. It’s easy to make and can be prepared ahead of time, making it ideal for entertaining guests during the holiday season. I find it truly brings people together, sparking conversation and joy around the table.
Visual Appeal
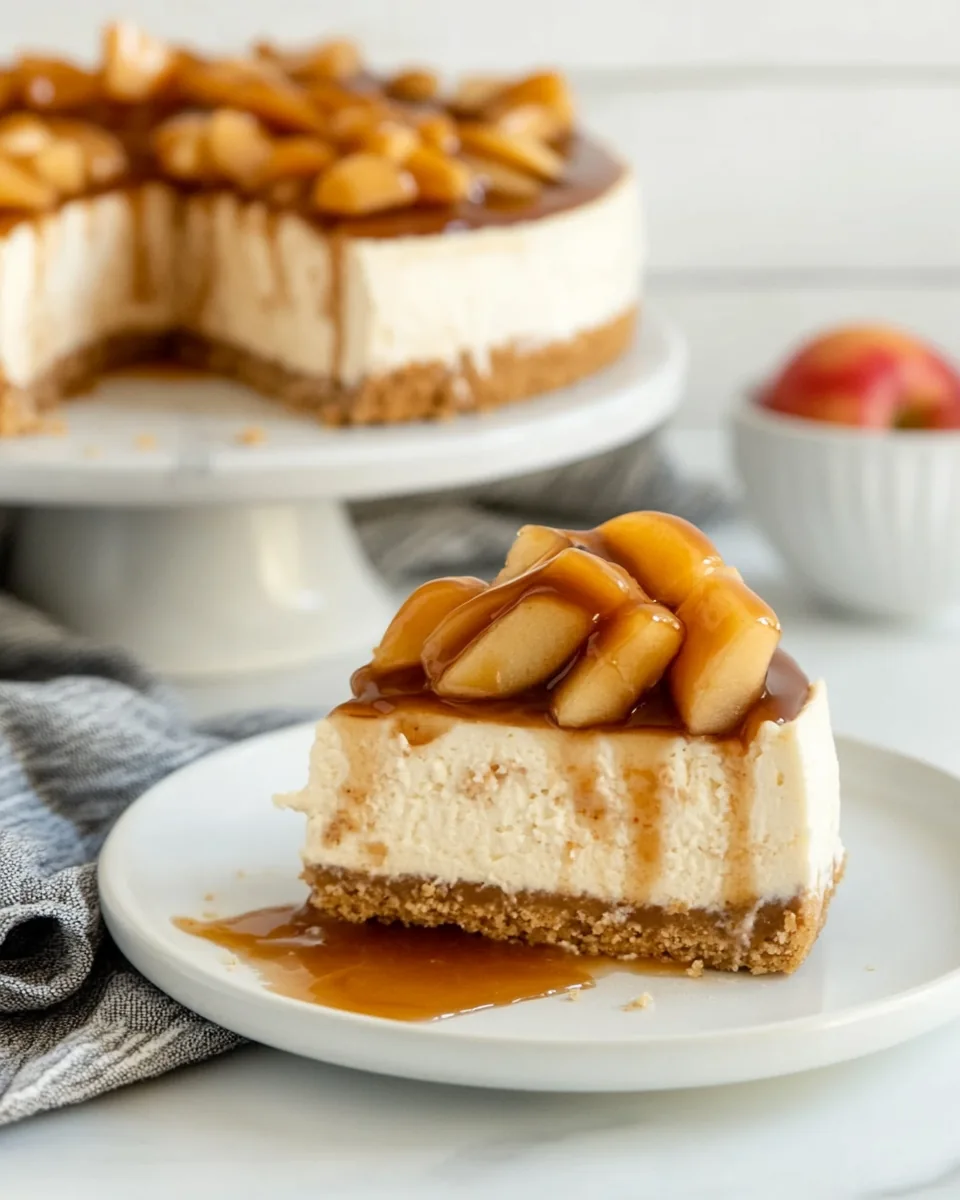
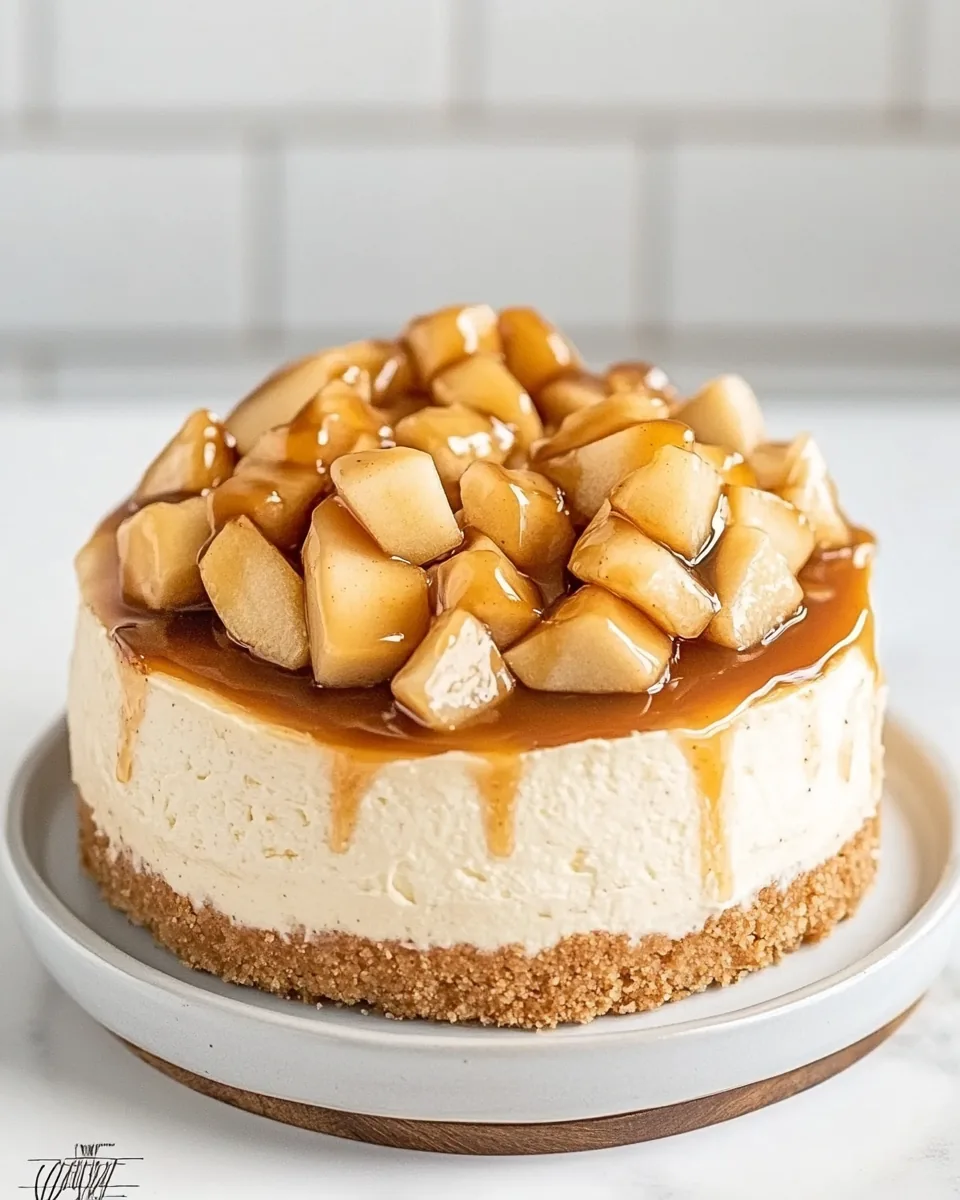
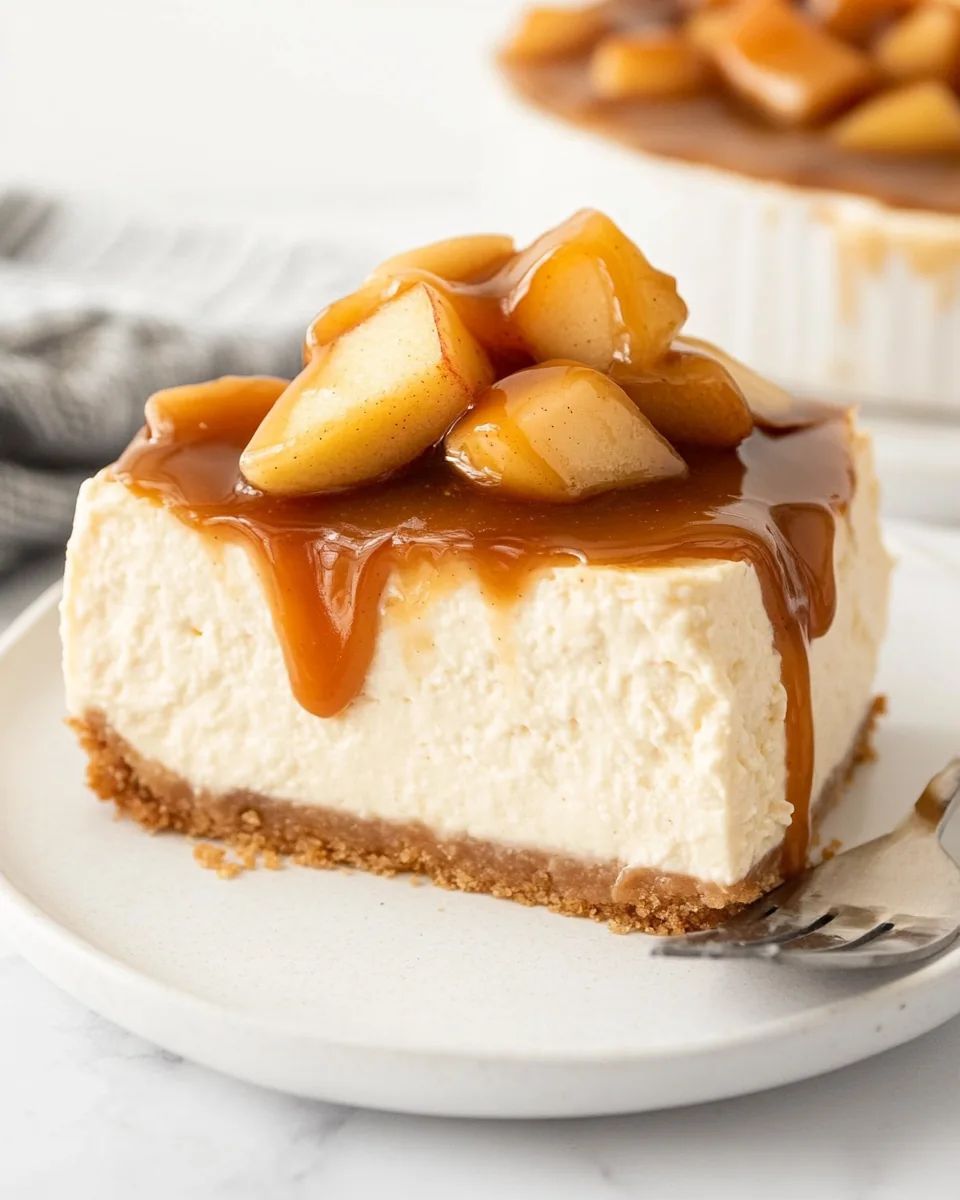
Let’s not forget about how stunning this dessert is! The luscious caramel drizzled atop the cheesecake combined with the visually appealing sautéed apples creates a beautiful presentation. It makes for an impressive centerpiece at any gathering.
Family Tradition
For me, baking this cheesecake has become a cherished family tradition. Each year, I gather my loved ones in the kitchen, sharing laughter and stories as we prepare this delicious dessert together. It’s more than just a recipe; it’s a way to bond and create memories, which makes it even more special.
Versatile Serving Options
This cheesecake is wonderfully versatile. Whether served as a dessert for a cozy dinner or as a festive treat for a holiday gathering, it fits any occasion seamlessly. You can even offer it with a scoop of vanilla ice cream or a dollop of whipped cream, enhancing the experience.
What You Need for Caramel Apple Cheesecake
Creating a fantastic Caramel Apple Cheesecake begins with selecting high-quality ingredients that harmonize beautifully. The star ingredients—the cream cheese and Honeycrisp apples—bring a delightful creaminess and a natural sweetness that shines through. Together with gingersnap cookies for a spiced crust and rich butter, these components come together to create a dessert that’s not just a treat but a memorable experience.
- 8 ounces of gingersnap cookies (about 25 cookies), crushed. These provide a delightful kick of spice and a crunchy texture to the crust.
- 4 tablespoons of unsalted butter, melted. This helps bind the cookie crumbs together, forming a delicious base.
- 32 ounces of cream cheese, at room temperature. This creamy filling is the heart of the cheesecake.
- 1 cup of lightly packed light brown sugar. This adds sweetness and a hint of molasses flavor.
- 4 large eggs, at room temperature. They help create a rich, smooth texture.
- 2 teaspoons of apple pie spice. This blend adds warmth and complexity.
- 2 teaspoons of vanilla extract or vanilla bean paste. A must for that aromatic sweetness.
- 2 tablespoons of all-purpose flour. This stabilizes the filling for the perfect texture.
- Pinch of sea salt. A dash of salt enhances and balances the sweetness.
- 3 large Honeycrisp apples, peeled, cored, and sliced into ¼-inch slices. These add a fresh, fruity layer.
- 1 ½ tablespoons of unsalted butter. For sautéing the apples and adding richness.
- 2 tablespoons of lightly packed light brown sugar. For caramelizing the apples.
- ½ teaspoon of apple pie spice. Enhances the flavor of the apples.
- Salted caramel sauce. Drizzled on top for that sweet finishing touch.
Making This Caramel Apple Cheesecake
Making a Caramel Apple Cheesecake is an indulgent journey that’s worth every moment. Follow these steps to create a creamy, decadent dessert that will impress anyone at your table. Start by gathering your ingredients and let’s get cooking!
- Preheat your oven to 350ºF. This sets the stage for a perfectly baked cheesecake.
- Tightly wrap the bottom of a 9-inch springform pan in heavy-duty foil. This crucial step prevents any leaks from the water bath, which helps your cheesecake bake evenly. I like to take it a step further and place the foil-wrapped pan inside an oven bag for extra protection—though that’s optional.
- Lightly spray the springform pan with nonstick cooking spray. This ensures the cheesecake releases beautifully after baking.
- In a medium bowl, stir together the crushed gingersnap cookies and melted butter until thoroughly combined. You want a crumbly mixture that holds together when pressed.
- Press the crumbs into the bottom and about an inch up the sides of the prepared springform pan. It should feel firm and compact.
- Place the crust in the preheated oven and bake for about 8 minutes. Watch for it to become lightly golden, then remove it from the oven and allow it to cool completely.
- While the crust cools, take out your stand mixer and beat the cream cheese until smooth in the bowl fitted with the paddle attachment. Make sure there are no lumps—this ensures a creamy filling.
- Add in the light brown sugar and mix until combined. The mixture will become lighter in color and smooth.
- Incorporate the eggs one at a time, ensuring each is fully mixed in before adding the next. Scraping down the sides of the bowl between each addition is key to a uniform batter.
- Now it’s time to add in the apple pie spice, vanilla, flour, and a pinch of sea salt. Beat these together until fully incorporated and smooth. The aroma will be heavenly!
- Pour the batter into the prepared crust, smoothing out the top with a spatula.
- Take a larger pan (like a roasting pan) and place your springform pan inside it. Pour boiling water into the larger pan until it is halfway up the sides of the springform pan. This water bath technique prevents the cheesecake from cracking.
- Bake the cheesecake for about 60 minutes. The edges will appear set, while the center will still jiggle slightly. This is perfect!
- Once baked, turn off the oven and crack the door open. Allow the cheesecake to rest in the cooling oven for one hour. This gentle cooling helps it set without sudden temperature changes.
- After an hour, carefully remove the cheesecake from the water bath and place it on a cooling rack. Let it cool completely before refrigerating it for at least 8 hours or overnight. This step is crucial for flavor development!
- Before serving, melt butter in a large skillet over medium heat. Add in the sliced Honeycrisp apples and sprinkle them with brown sugar and apple pie spice. Sauté for a few minutes, just until the apples start to soften but still hold some texture.
- Once the apples are cooked to your liking, remove them from heat and let them cool completely. This will be the topping for your cheesecake!
- Top the cheesecake slices with sautéed apples and a drizzle of salted caramel sauce just before serving. This adds a delightful sweetness that complements the tart apples.
Things Worth Knowing
- Room Temperature Ingredients: Ensure your cream cheese and eggs are at room temperature. This helps them blend smoothly without lumps.
- Water Bath Baking: Using a water bath promotes even baking and prevents the cheesecake from cracking. It’s a game-changer!
- Cooling Time: Don’t rush the cooling process! Allowing the cheesecake to cool gradually in the oven helps maintain its texture and flavor.
- Apple Preparation: Choose firm apples, like Honeycrisp, for the best texture when sautéing. They hold their shape well.
- Storage: Store leftovers in the fridge, well-covered, for up to five days. This cheesecake stays delicious!
Recipe Notes about Caramel Apple Cheesecake

As you embark on making this Caramel Apple Cheesecake, keep these tips in mind for the best results. Each point will help you perfect every aspect of your baking!
- Storage: Store any leftover cheesecake in an airtight container in the refrigerator. It’ll stay fresh for about five days, though I doubt it will last that long!
- Freezing: You can freeze the cheesecake before adding the topping. Wrap it tightly in plastic wrap and foil. It can be kept in the freezer for up to three months.
- Pairing: This cheesecake pairs beautifully with a dollop of whipped cream or a scoop of vanilla ice cream for a touch of creaminess.
- Serving Temperature: For the best flavor and texture, serve the cheesecake chilled but not too cold—let it sit out for about 15 minutes before serving.
- Variations: Feel free to get creative! Try adding in some chopped nuts or different spices for a twist.
Pairing Suggestions for Caramel Apple Cheesecake
When it comes to serving your Caramel Apple Cheesecake, there are endless ways to enjoy it. Here are some delightful pairing suggestions that will enhance your dessert experience:
- Warm Spices: Serve with a sprinkle of cinnamon or nutmeg on top for an added flavor kick.
- Ice Cream: A scoop of vanilla ice cream complements the cheesecake beautifully, adding creaminess.
- Seasonal Fruits: Freshly sliced pears or figs can add an intriguing contrast to the sweetness.
- Hot Beverages: Pair it with a cup of spiced chai, hot cider, or coffee to bring out the flavors.
- Special Occasions: This cheesecake is perfect for fall gatherings, Thanksgiving dinners, or even as a cozy dessert during a movie night.
- Storage Tips: Keep leftovers stored securely in the fridge, and consider freezing for longer storage.
FAQ
Conclusion
The Caramel Apple Cheesecake is truly a standout dessert that captures the essence of fall. Every layer—from the spiced crust to the creamy filling and warm apple topping—creates a delightful experience that’s hard to resist. I encourage you to give this recipe a try; it’s sure to become a favorite among family and friends. Celebrate the season with this delicious treat, and enjoy the sweet moments it brings!
Caramel Apple Cheesecake
Ingredients
Equipment
Method
- Preheat your oven to 350ºF. This sets the stage for a perfectly baked cheesecake.
- Tightly wrap the bottom of a 9-inch springform pan in heavy-duty foil. This crucial step prevents any leaks from the water bath, which helps your cheesecake bake evenly. I like to take it a step further and place the foil-wrapped pan inside an oven bag for extra protection—though that’s optional.
- Lightly spray the springform pan with nonstick cooking spray. This ensures the cheesecake releases beautifully after baking.
- In a medium bowl, stir together the crushed gingersnap cookies and melted butter until thoroughly combined. You want a crumbly mixture that holds together when pressed.
- Press the crumbs into the bottom and about an inch up the sides of the prepared springform pan. It should feel firm and compact.
- Place the crust in the preheated oven and bake for about 8 minutes. Watch for it to become lightly golden, then remove it from the oven and allow it to cool completely.
- While the crust cools, take out your stand mixer and beat the cream cheese until smooth in the bowl fitted with the paddle attachment. Make sure there are no lumps—this ensures a creamy filling.
- Add in the light brown sugar and mix until combined. The mixture will become lighter in color and smooth.
- Incorporate the eggs one at a time, ensuring each is fully mixed in before adding the next. Scraping down the sides of the bowl between each addition is key to a uniform batter.
- Now it’s time to add in the apple pie spice, vanilla, flour, and a pinch of sea salt. Beat these together until fully incorporated and smooth. The aroma will be heavenly!
- Pour the batter into the prepared crust, smoothing out the top with a spatula.
- Take a larger pan (like a roasting pan) and place your springform pan inside it. Pour boiling water into the larger pan until it is halfway up the sides of the springform pan. This water bath technique prevents the cheesecake from cracking.
- Bake the cheesecake for about 60 minutes. The edges will appear set, while the center will still jiggle slightly. This is perfect!
- Once baked, turn off the oven and crack the door open. Allow the cheesecake to rest in the cooling oven for one hour. This gentle cooling helps it set without sudden temperature changes.
- After an hour, carefully remove the cheesecake from the water bath and place it on a cooling rack. Let it cool completely before refrigerating it for at least 8 hours or overnight. This step is crucial for flavor development!
- Before serving, melt butter in a large skillet over medium heat. Add in the sliced Honeycrisp apples and sprinkle them with brown sugar and apple pie spice. Sauté for a few minutes, just until the apples start to soften but still hold some texture.
- Once the apples are cooked to your liking, remove them from heat and let them cool completely. This will be the topping for your cheesecake!
- Top the cheesecake slices with sautéed apples and a drizzle of salted caramel sauce just before serving. This adds a delightful sweetness that complements the tart apples.
Notes
- Room Temperature Ingredients: Ensure your cream cheese and eggs are at room temperature. This helps them blend smoothly without lumps.
- Water Bath Baking: Using a water bath promotes even baking and prevents the cheesecake from cracking. It’s a game-changer!
- Cooling Time: Don’t rush the cooling process! Allowing the cheesecake to cool gradually in the oven helps maintain its texture and flavor.
- Apple Preparation: Choose firm apples, like Honeycrisp, for the best texture when sautéing. They hold their shape well.
- Storage: Store leftovers in the fridge, well-covered, for up to five days. This cheesecake stays delicious!