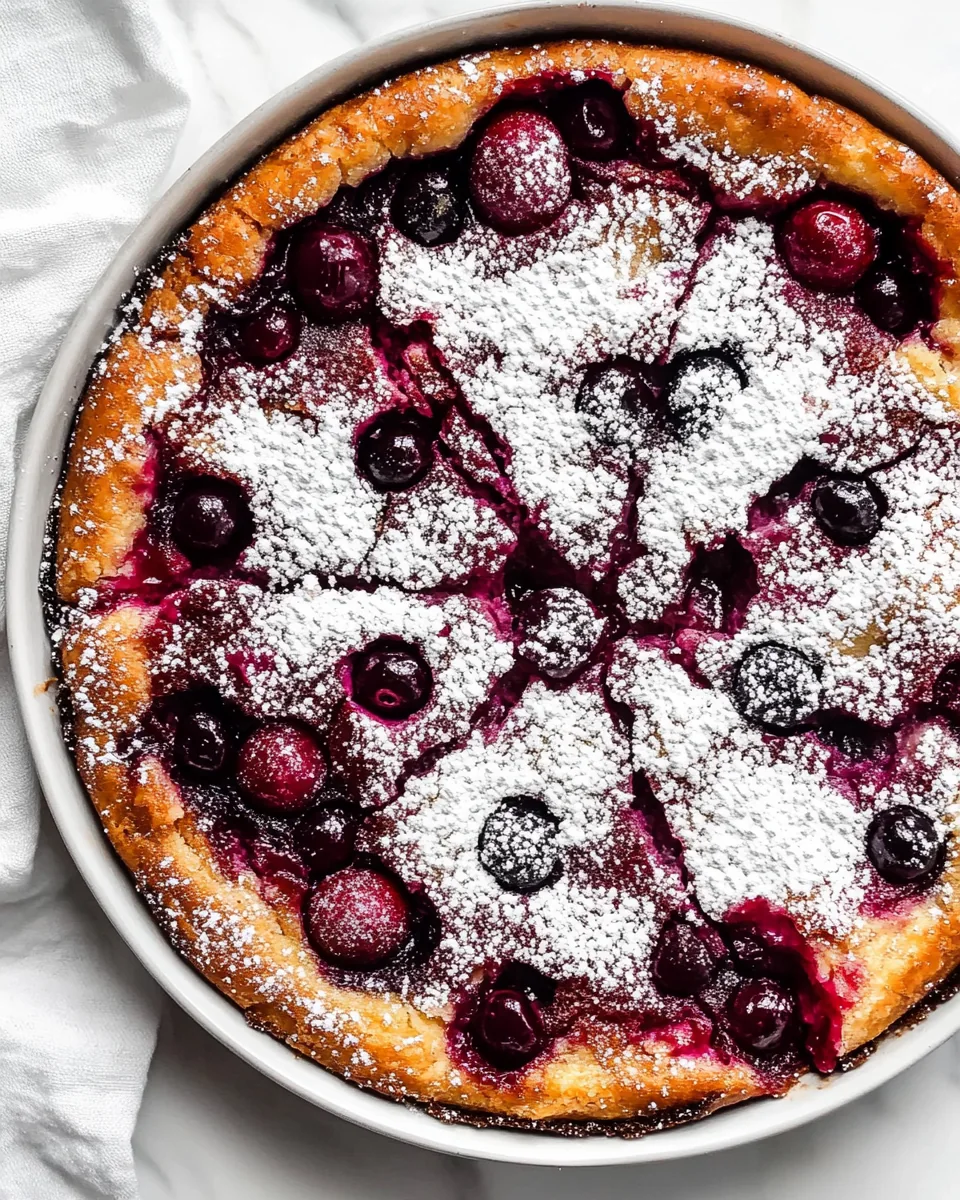
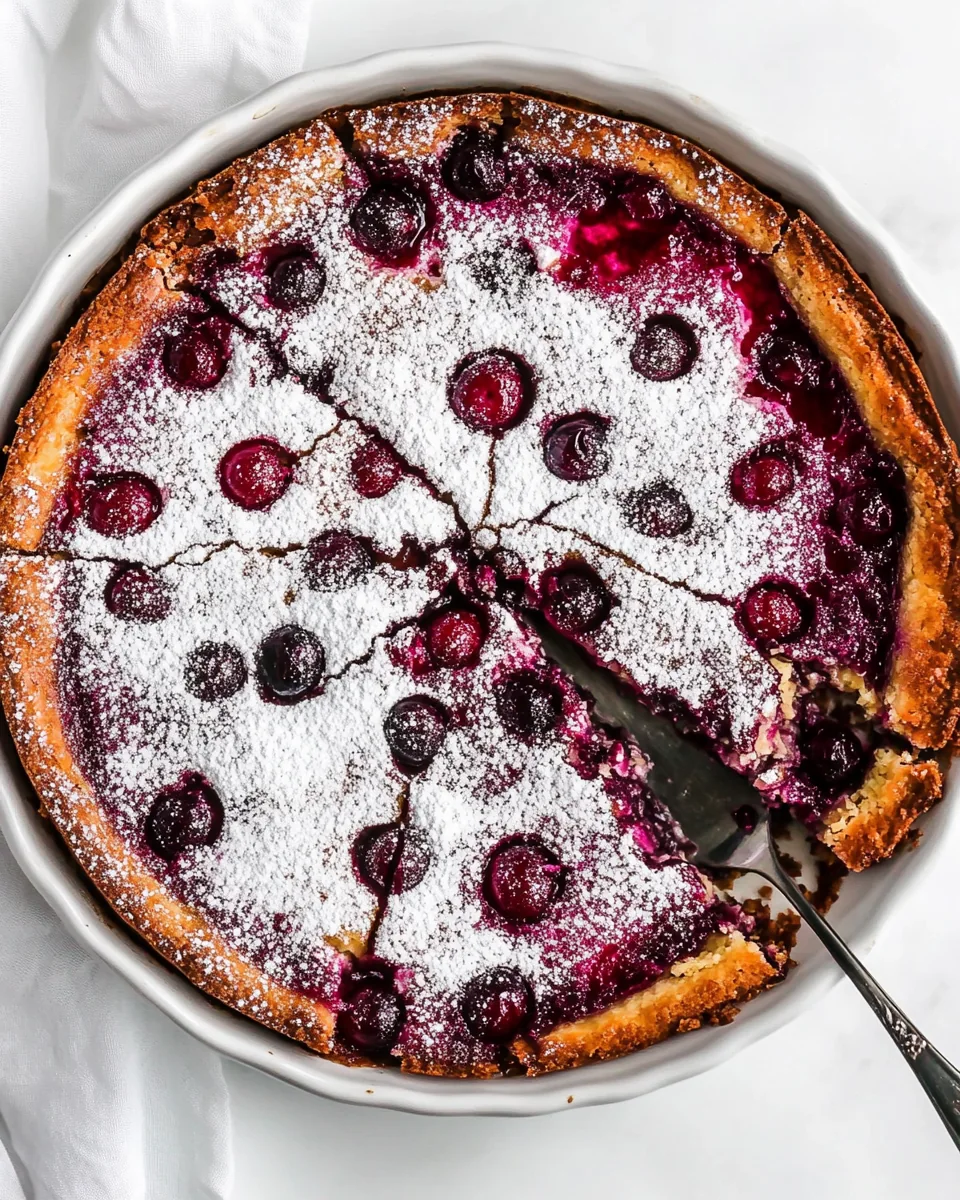
Cherry Clafoutis
When it comes to the sweet joys of summer, few desserts can match the charming simplicity of Cherry Clafoutis. I still recall the first time I tasted it; the sun was shining, and the air was filled with the sweet scent of ripe cherries. My neighbor, an incredible cook, invited me over for a casual brunch, and there it was—a beautiful clafoutis sitting in the center of the table. The moment I took a bite, I was hooked. The soft, custardy texture combined with the tartness of fresh cherries felt like a warm hug from the inside out.
This dish is not only easy to make but also showcases the vibrant flavors of summer. You simply use a handful of ingredients to create a dessert that feels sophisticated yet homey. It’s the perfect way to impress guests or to indulge yourself on a quiet evening. The best part? You can whip it up in no time at all, making it a fantastic choice for unexpected gatherings or lazy weekends. Serve it warm, dusted with powdered sugar, and watch as everyone falls in love with this delightful treat.
Recipe Snapshot
60 mins
15 mins
45 mins
Medium
210 kcal
5 g
Vegan, Gluten-Free, AIP
8 g
Cherry Pitter, 12-inch Cast Iron Skillet
What Sets This Cherry Clafoutis Apart
Flavorful Freshness
One of the reasons I adore Cherry Clafoutis is the burst of fresh cherry flavor in every bite. Using ripe, juicy cherries means you’re getting the essence of summer in a single dish. The tartness of the cherries perfectly balances the sweetness of the batter, creating a harmonious experience with every forkful.
Effortless Elegance
No one will believe how simple it is to create such a stunning dessert. With minimal effort, you can present a dish that looks as if it came straight from a gourmet kitchen. Pouring the batter over arranged cherries makes for a delightful surprise when it comes out of the oven!
Versatility at Its Best
Cherry Clafoutis is incredibly versatile. You can substitute cherries with other fruits like pears or apples, depending on what’s in season or what you have on hand. This adaptability means you can enjoy variations throughout the year, keeping things fresh and exciting.
Perfect for Any Occasion
This dessert shines at brunches, picnics, or cozy dinners at home. It’s a sweet way to celebrate any gathering. Plus, its rustic charm invites warmth and conversation around the table, making it an ideal centerpiece.
Easy Storage and Reheating
One of the practical aspects of Cherry Clafoutis is its storage. Leftovers (if you have any!) can be easily kept in an airtight container. It even reheats beautifully, allowing you to enjoy it warm for days after making it.
Ingredients Overview for Cherry Clafoutis
When crafting Cherry Clafoutis, it’s essential to focus on high-quality ingredients that work harmoniously together. The key players include fresh cherries, which are the star of the show, and a simple batter made from pantry staples like all-purpose flour and eggs. Each ingredient contributes to the overall texture and flavor, resulting in a delightful dessert.
- 1 pound cherries (pitted) – These fresh fruits provide the main flavor and natural sweetness, making them essential for authenticity.
- ½ cup all-purpose flour – This ingredient forms the backbone of the batter, giving it structure and a delicate texture.
- ¼ teaspoon salt – A pinch of salt enhances the sweetness and balances the flavors perfectly.
- ½ cup sugar – Used to sweeten the batter, allowing the cherries’ tartness to shine through without being overly sweet.
- 1 teaspoon vanilla – Adds a warm, aromatic note to the overall flavor profile.
- 4 eggs – Essential for creating the custardy texture of the clafoutis.
- 1½ cups half and half – This rich dairy base ensures the batter is creamy and smooth, resulting in a luscious finished product.
- Powdered sugar – For dusting the top, adding an elegant finish and a touch of sweetness.
- 1 tablespoon butter (softened, for buttering the dish) – Helps to prevent sticking and adds a nice richness to the clafoutis.
Instructions for Cherry Clafoutis

Making Cherry Clafoutis is an enjoyable and straightforward process. Just follow these steps, and you’ll have a beautiful dessert ready to impress. Let’s dive into the cooking!
Prep the cherries: Start by preheating your oven to 375℉. While the oven is heating up, take your fresh cherries and remove the stems. I recommend washing and drying them thoroughly. Next, use a cherry pitter to pit all your cherries; it saves time and reduces mess!
Make the batter: Now for the fun part! In a saucepan, bring the half and half to a gentle boil. Once it’s boiling, remove it from the heat and stir in the vanilla. Allow the cream to cool for about five minutes before moving on. This step is crucial as it prevents cooking the eggs when mixed later. Using either a blender or a hand mixer, combine the cooled cream, eggs, sugar, flour, and salt. Mix until the batter is smooth without any lumps—this smoothness will ensure a creamy texture.
Assemble and bake the clafoutis: Take your softened butter and grease a 12-inch cast iron skillet to prevent sticking. Spread the pitted cherries evenly across the bottom of the skillet. Pour the prepared batter gently over the cherries, covering them completely. Carefully place the skillet in the oven and bake for about 45 minutes. Keep an eye on it; you’ll know it’s ready when it’s puffed up and golden brown on top. A toothpick inserted in the center should come out clean. Once baked, dust the top with powdered sugar for that perfect finishing touch. Serve it warm and enjoy!
Things Worth Knowing
- Choosing the right cherries: Opt for sweet, ripe cherries for the best flavor. They should be firm and shiny.
- Blending the batter: Ensure the batter is well-blended to avoid lumps; this will provide a smooth texture.
- Serving temperature: Cherry Clafoutis is best served warm, as it enhances the flavors and texture. Dust with powdered sugar right before serving.
- Baking tips: Keep an eye on the clafoutis towards the end of baking. If it starts to brown too quickly, cover it with foil.
- Resting time: Allowing the clafoutis to rest for a few minutes before serving enhances its flavor and texture.
Making Adjustments

When making Cherry Clafoutis, there are many ways to adjust the recipe to suit your preferences. Here are some tips:
- Storage: Store leftovers in an airtight container or wrapped well with plastic in the fridge. It will last 3 to 4 days and is best if reheated.
- Freezing: You can freeze the clafoutis after baking. Slice it and wrap individual pieces tightly in plastic wrap before storing in a freezer bag. Thaw and reheat in the oven.
- Variations: Try using other fruits like blueberries, raspberries, or peaches for a different flavor twist. Each fruit brings its unique qualities that can elevate this dish.
- Serving suggestions: Pair it with a scoop of vanilla ice cream or a dollop of whipped cream for a decadent treat.
- Flavor boosters: Add a hint of almond extract or a sprinkle of nutmeg to the batter for an extra layer of flavor.
Perfect Pairings for Cherry Clafoutis
When serving Cherry Clafoutis, consider these delightful options to create a well-rounded meal experience:
- Breakfast or Brunch: This dish is perfect for breakfast or brunch gatherings. Serve alongside scrambled eggs and fresh fruit for a balanced meal.
- Picnic Delight: Pack slices of Cherry Clafoutis for a picnic. It’s easy to transport and can be enjoyed at room temperature.
- Seasonal Celebrations: Pair the clafoutis with light summer salads or grilled meats during backyard cookouts.
- Light Lunch: Serve a slice of clafoutis with a refreshing salad for a light lunch option. The sweetness of the clafoutis complements savory dishes beautifully.
- Festive Dinners: This dessert can also be a hit at holiday gatherings. The vibrant color and flavor of the cherries bring a festive touch to any table.
FAQ
Conclusion
The beauty of Cherry Clafoutis lies in its simplicity and the celebration of fresh fruit. This dessert not only satisfies your sweet tooth but also brings a touch of elegance to any occasion. I encourage you to give this recipe a try, whether for a special brunch or a cozy night in. You won’t be disappointed!
Cherry Clafoutis
Ingredients
Equipment
Method
- Prep the cherries: Start by preheating your oven to 375℉. While the oven is heating up, take your fresh cherries and remove the stems. I recommend washing and drying them thoroughly. Next, use a cherry pitter to pit all your cherries; it saves time and reduces mess!
- Make the batter: Now for the fun part! In a saucepan, bring the half and half to a gentle boil. Once it’s boiling, remove it from the heat and stir in the vanilla. Allow the cream to cool for about five minutes before moving on. This step is crucial as it prevents cooking the eggs when mixed later. Using either a blender or a hand mixer, combine the cooled cream, eggs, sugar, flour, and salt. Mix until the batter is smooth without any lumps—this smoothness will ensure a creamy texture.
- Assemble and bake the clafoutis: Take your softened butter and grease a 12-inch cast iron skillet to prevent sticking. Spread the pitted cherries evenly across the bottom of the skillet. Pour the prepared batter gently over the cherries, covering them completely. Carefully place the skillet in the oven and bake for about 45 minutes. Keep an eye on it; you’ll know it’s ready when it’s puffed up and golden brown on top. A toothpick inserted in the center should come out clean. Once baked, dust the top with powdered sugar for that perfect finishing touch. Serve it warm and enjoy!
Notes
- Storage: Store leftovers in an airtight container or wrapped well with plastic in the fridge. It will last 3 to 4 days and is best if reheated.
- Freezing: You can freeze the clafoutis after baking. Slice it and wrap individual pieces tightly in plastic wrap before storing in a freezer bag. Thaw and reheat in the oven.
- Variations: Try using other fruits like blueberries, raspberries, or peaches for a different flavor twist. Each fruit brings its unique qualities that can elevate this dish.
- Serving suggestions: Pair it with a scoop of vanilla ice cream or a dollop of whipped cream for a decadent treat.
- Flavor boosters: Add a hint of almond extract or a sprinkle of nutmeg to the batter for an extra layer of flavor.