Classic Beef Chili
There’s nothing quite like the warmth and comfort that a steaming bowl of Classic Beef Chili brings, especially on a chilly winter evening. I remember the first time I tried making chili from scratch. It was a lazy Sunday, and the weather outside was frightfully cold. I wanted something hearty, something that would warm not just my stomach but my soul. As I simmered the ingredients together, the rich aromas of spices and beef filled my kitchen, enveloping me in a comforting embrace. Each bite was a burst of flavor, and I knew I had stumbled upon a dish that would become a family favorite.
Over the years, I’ve tweaked my Classic Beef Chili recipe, adding a personal touch with a blend of spices and the perfect balance of beans and beef. The beauty of chili is that it’s so versatile and forgiving; you can adjust the heat, add more beans, or throw in some extra veggies. It’s a dish that invites creativity while still being straightforward enough for a weeknight dinner. Serving it with a dollop of sour cream, shredded cheese, and maybe some warm cornbread on the side turns it into a feast that everyone can enjoy.
Whether it’s game day, a winter gathering, or just a cozy night in, this Classic Beef Chili has a special place in my heart and on my table. It’s more than just a meal; it’s a memory-maker, a comfort food that brings people together. I can’t wait for you to try it!
Recipe Snapshot
3 hr 20 mins
20 mins
180 mins
Hard
370 kcal
24 g
Keto, Paleo, Whole30
18 g
Saucepan, Oven, Large Pot, Chef’s Knife, Wooden Spoon, Cutting Board
Why You Need This Classic Beef Chili
Heartwarming Comfort Food
One of the main reasons I cherish my Classic Beef Chili is its comforting nature. There’s something undeniably soothing about a warm bowl of chili on a cold day. The combination of spices and rich beef creates a dish that warms you from the inside out. It’s like a hug in a bowl!
Perfect for Sharing
Chili is best enjoyed with others. I’ve hosted several gatherings where my Classic Beef Chili was the star of the show. It’s a dish that encourages sharing and conversation, perfect for those chilly nights when you want to gather friends around the table. Plus, it’s easy to make a large batch, so everyone can enjoy it.
Customizable to Your Taste
Another aspect I love is the versatility of chili. You can easily tweak the ingredients to suit your palate. Want it spicier? Add more chili powder or some diced jalapeños. Prefer it milder? Simply reduce the heat. The base recipe is a blank canvas for your culinary creativity!
Easy to Prepare
Preparing my Classic Beef Chili is a breeze! Most of the time spent is just letting it simmer away, allowing the flavors to meld together beautifully. You can use this time to relax, prep your toppings, or even prepare some cornbread to go along with it!
Meal Prep Friendly
This chili makes for fantastic meal prep. It stores well in the fridge for several days, and the flavors only get better over time. You can also freeze it for up to four months, making it easy to have a delicious meal ready whenever you need it.
Ingredients You’ll Need for Classic Beef Chili
The ingredients for my Classic Beef Chili are simple yet effective, combining to create layers of flavor. The key players here are the ground beef, which provides a hearty base, and a blend of spices that brings warmth and depth. Each ingredient complements the others, creating a cohesive and satisfying dish that’s sure to please.
- 2 tablespoons vegetable oil: This is used for sautéing the vegetables, creating a base for your chili.
- 1 large yellow onion, diced: It adds sweetness and flavor.
- 1 medium green bell pepper, seeded and diced: Adds a refreshing crunch.
- 2 celery stalks, diced: Provides additional flavor and texture.
- 3 garlic cloves, pressed or minced: Enhances the overall taste profile.
- 4 ounces tomato paste: Adds richness and depth.
- 3 cups water: Helps to create the chili’s base.
- 15 ounces tomato sauce: Complements the tomato paste and adds moisture.
- 2 ½ pounds 80/20 ground beef: The main protein that gives the chili its hearty texture.
- 4 tablespoons chili powder: Provides that classic chili flavor.
- 2 tablespoons ground cumin: Adds warmth and earthiness.
- 2 teaspoons kosher salt: Enhances all the flavors.
- ¼ teaspoon cayenne pepper: For a little kick.
- 2 15-ounce cans chili beans or kidney beans, drained and lightly rinsed: Adds fiber and texture.
- 2 tablespoons white vinegar: Adds brightness to the finished dish.
The Process for Making Classic Beef Chili

Making Classic Beef Chili is an enjoyable process that fills your kitchen with incredible aromas. As you follow these steps, take your time to appreciate the delightful transformation of simple ingredients into a heartwarming dish. You’ll love how everything melds together, creating a robust and flavorful chili.
- Start by heating the vegetable oil in a Dutch oven or a large, heavy-bottom pot over medium heat. Allow the oil to get hot, then add the diced onion, green bell pepper, celery, and minced garlic. Stir frequently, watching as the vegetables begin to soften, about 5 to 7 minutes. You want them to be tender but not browned; the goal is to enhance their flavors.
- Next, stir in the tomato paste into the sautéed vegetables. Cook for another 2 to 3 minutes, stirring occasionally. This step deepens the flavors by allowing the paste to caramelize slightly and mingle with the other ingredients.
- Now, pour in the water and give it a good stir, scraping up any bits stuck to the bottom of the pot. This is where a lot of flavor comes from! It also helps deglaze the pot.
- Add the ground beef to the pot. Using a wooden spoon, break the beef into smaller pieces as you stir it into the mixture. Cook until the beef is browned, about 6 to 8 minutes, making sure it’s fully cooked.
- Once the beef is browned, add the tomato sauce, chili powder, ground cumin, cayenne pepper, and kosher salt. Stir everything together, bringing it to a medium boil. You’ll notice the aroma wafting through your kitchen, and that’s a good sign!
- After it reaches a boil, add the drained beans to the pot. Stir them in gently, then reduce the heat to a simmer. Allow the chili to cook uncovered for 2 to 3 hours. This simmering process is crucial as it allows the flavors to develop and the chili to thicken. Stir every so often to ensure nothing sticks to the bottom.
- As you near the end of cooking, taste your chili. Before serving, add the white vinegar to brighten the flavors. Adjust the seasoning if necessary. I often find that a little extra salt or a dash of hot sauce really enhances the final taste.
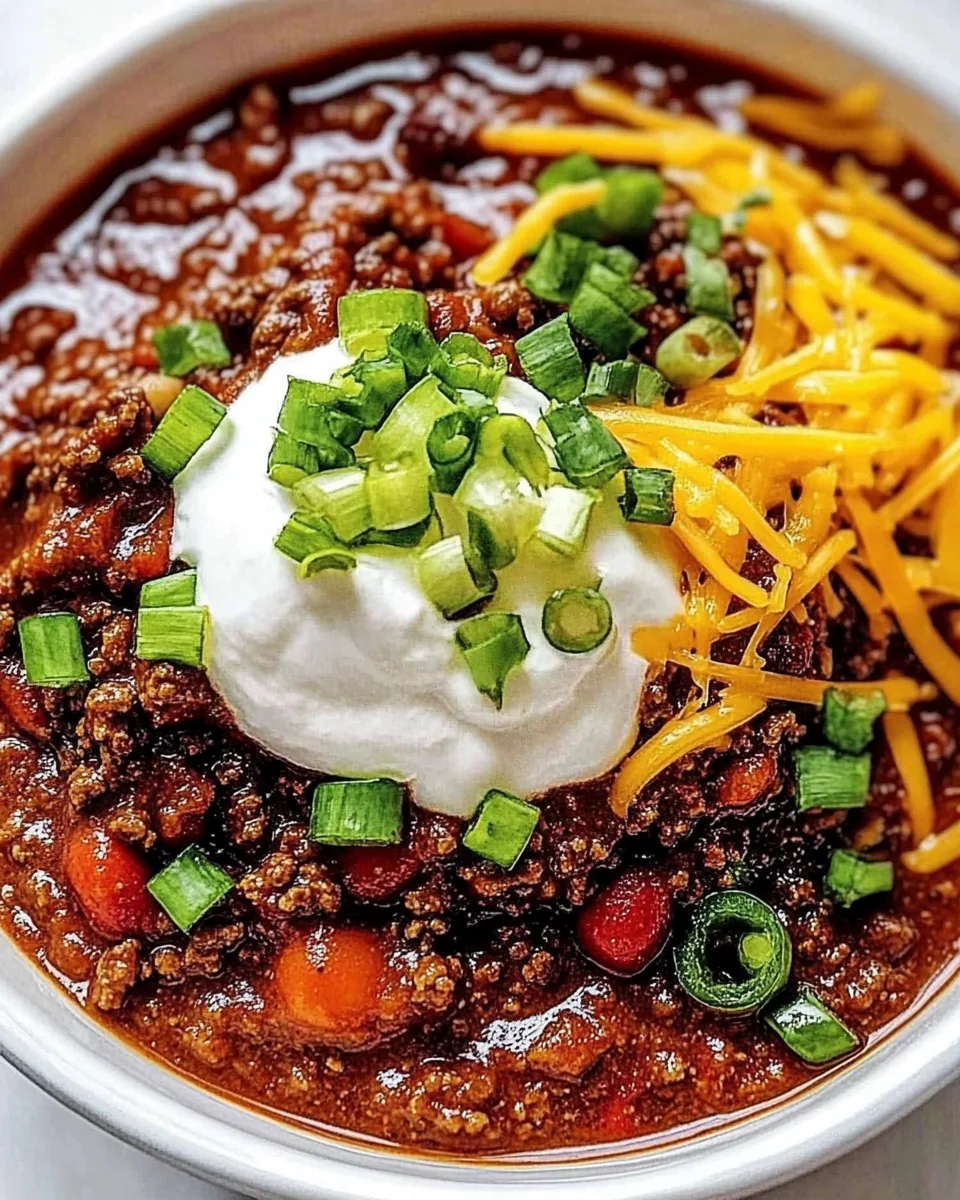
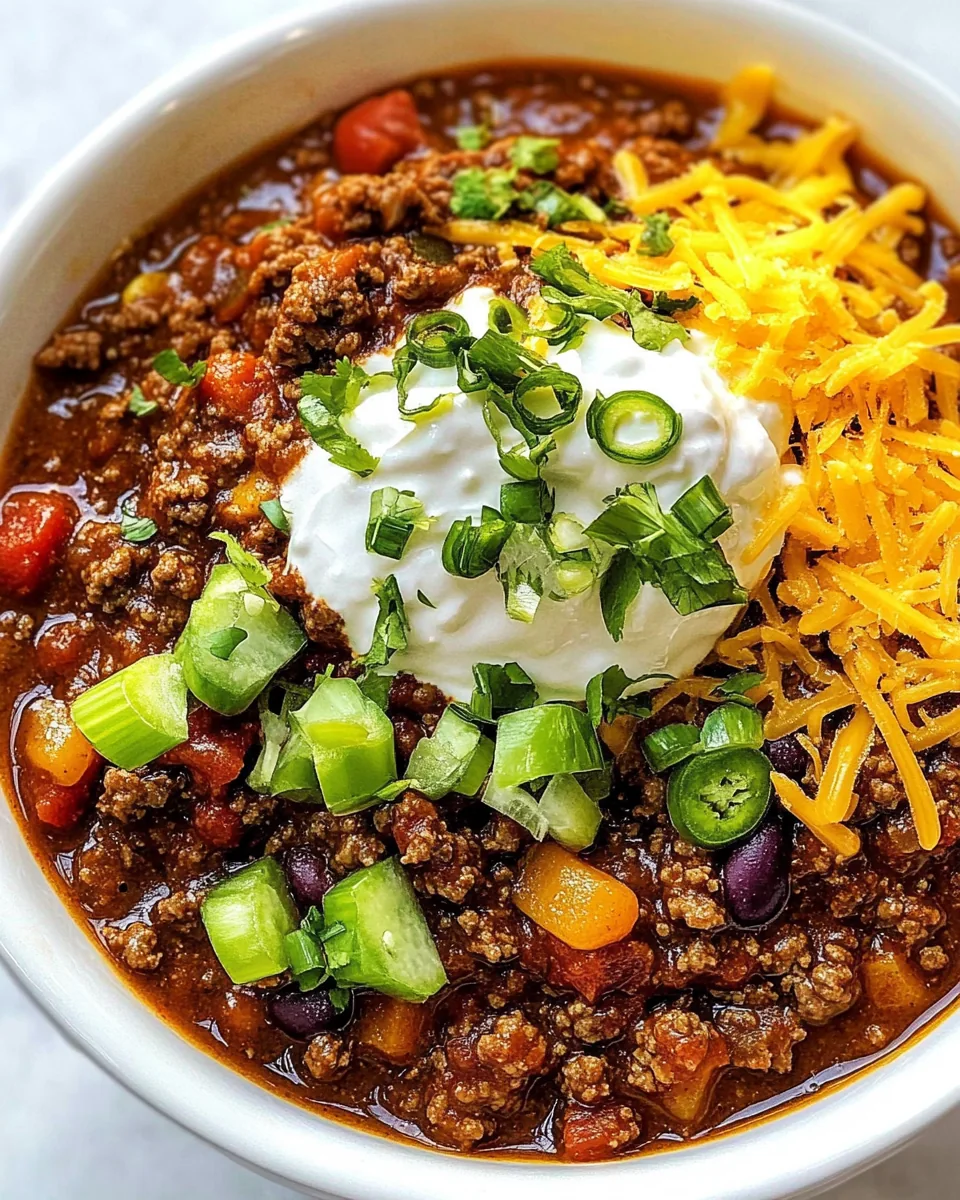
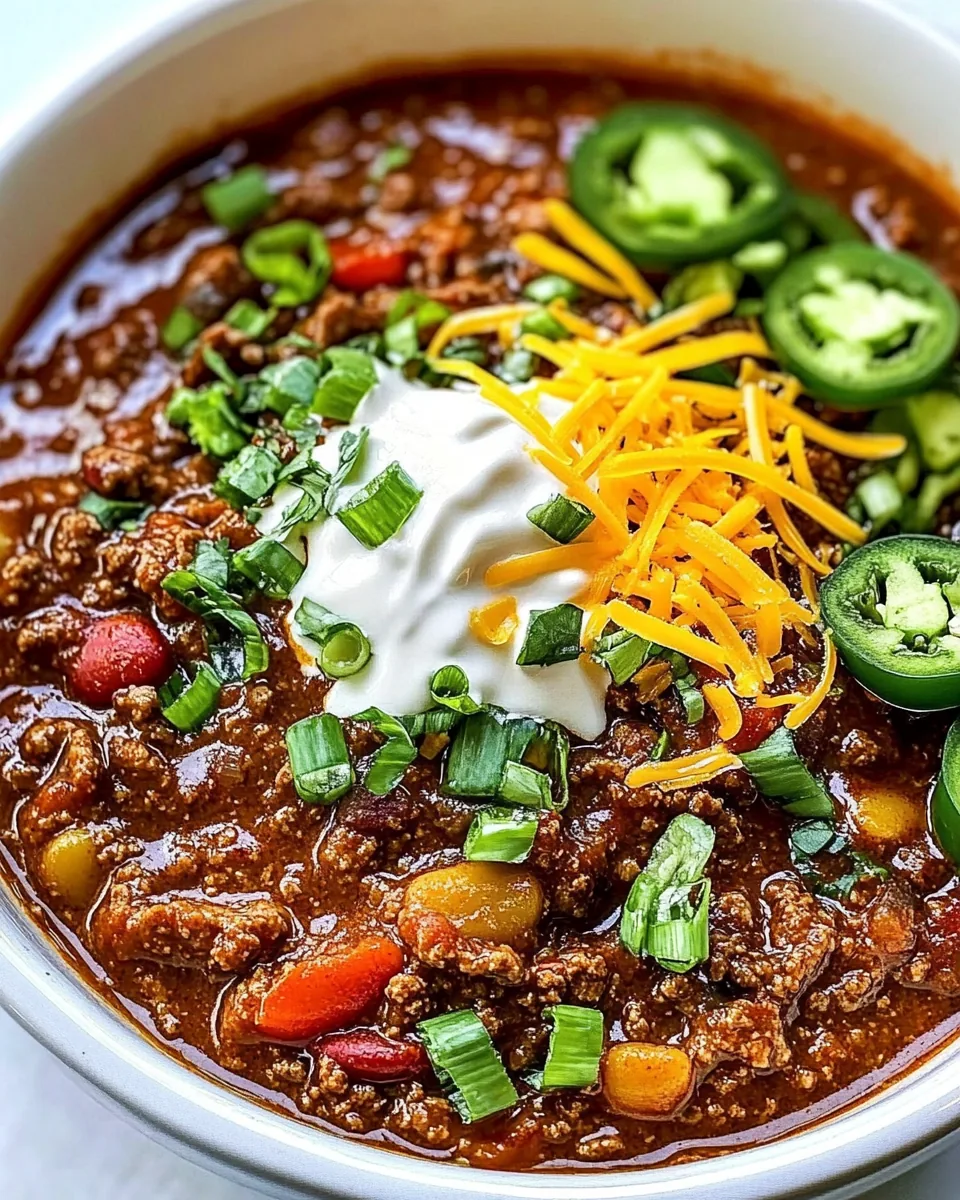
- Serve your Classic Beef Chili with toppings such as shredded cheddar cheese, minced onion, or sliced jalapeños. These not only add flavor but also a nice visual appeal to your dish. Enjoy your creation!
Things Worth Knowing
- Temperature Control: Keeping an eye on the simmering temperature is key. Too high can lead to scorched flavors, while too low can result in a watery chili.
- Flavor Development: The longer you simmer, the more the flavors meld together. If time allows, let it simmer longer for an even richer taste.
- Ingredient Quality: Use fresh ingredients whenever possible. Fresh vegetables and quality beef will elevate your chili.
- Spice Adjustment: Feel free to adjust the spices based on your heat preference. If you like it spicier, increase the cayenne or add fresh peppers.
Expert Tips about Classic Beef Chili
Every chef has their own secrets to making the best chili, and I’m excited to share mine with you! These tips will help you elevate your Classic Beef Chili experience and ensure that it’s a hit every time.
- Storage: Once you’ve enjoyed your chili, store leftovers in an airtight container. It’ll keep in the refrigerator for up to four days, making it perfect for quick meals later in the week.
- Freezing: You can freeze your chili for up to four months. Just make sure to cool it completely before transferring it to a freezer-safe container.
- Pairing: Consider pairing your chili with cornbread, crunchy tortilla chips, or a fresh salad for a balanced meal.
- Serving: Serve with a variety of toppings like sour cream, avocado, or fresh herbs to let everyone customize their bowl.
- Leftover Transformations: Use leftover chili to make chili cheese fries or nachos. It’s a great way to repurpose your delicious dish!
Serving Suggestions
Serving your Classic Beef Chili can be as enjoyable as making it! Here are some ideas to enhance your dining experience:
- Weeknight Dinner: This chili is perfect for a cozy family dinner. Serve it in large bowls with crusty bread on the side.
- Game Day Treat: If you’re watching sports, serve your chili in small cups for a fun finger food. It’s a crowd-pleaser!
- Seasonal Gatherings: Whether it’s a winter holiday or a summer barbecue, Classic Beef Chili fits any occasion with its hearty flavor.
- Chili Bar: Set up a chili bar with toppings like shredded cheese, diced onions, jalapeños, and sour cream. Let guests customize their own bowls!
- Meal Prep: Make a large batch and portion it out for easy lunches throughout the week. Just heat and enjoy!
FAQ
Conclusion
The Classic Beef Chili is not just a meal; it’s a comforting experience that brings warmth and joy to your table. With its rich flavors and hearty ingredients, it’s perfect for any occasion. I encourage you to try making it yourself and feel the cozy vibes it brings to your home. Enjoy every bite, and share it with those you love!
Classic Beef Chili
Ingredients
Equipment
Method
- Start by heating the vegetable oil in a Dutch oven or a large, heavy-bottom pot over medium heat. Allow the oil to get hot, then add the diced onion, green bell pepper, celery, and minced garlic. Stir frequently, watching as the vegetables begin to soften, about 5 to 7 minutes. You want them to be tender but not browned; the goal is to enhance their flavors.
- Next, stir in the tomato paste into the sautéed vegetables. Cook for another 2 to 3 minutes, stirring occasionally. This step deepens the flavors by allowing the paste to caramelize slightly and mingle with the other ingredients.
- Now, pour in the water and give it a good stir, scraping up any bits stuck to the bottom of the pot. This is where a lot of flavor comes from! It also helps deglaze the pot.
- Add the ground beef to the pot. Using a wooden spoon, break the beef into smaller pieces as you stir it into the mixture. Cook until the beef is browned, about 6 to 8 minutes, making sure it’s fully cooked.
- Once the beef is browned, add the tomato sauce, chili powder, ground cumin, cayenne pepper, and kosher salt. Stir everything together, bringing it to a medium boil. You’ll notice the aroma wafting through your kitchen, and that’s a good sign!
- After it reaches a boil, add the drained beans to the pot. Stir them in gently, then reduce the heat to a simmer. Allow the chili to cook uncovered for 2 to 3 hours. This simmering process is crucial as it allows the flavors to develop and the chili to thicken. Stir every so often to ensure nothing sticks to the bottom.
- As you near the end of cooking, taste your chili. Before serving, add the white vinegar to brighten the flavors. Adjust the seasoning if necessary. I often find that a little extra salt or a dash of hot sauce really enhances the final taste.
- Serve your Classic Beef Chili with toppings such as shredded cheddar cheese, minced onion, or sliced jalapeños. These not only add flavor but also a nice visual appeal to your dish. Enjoy your creation!