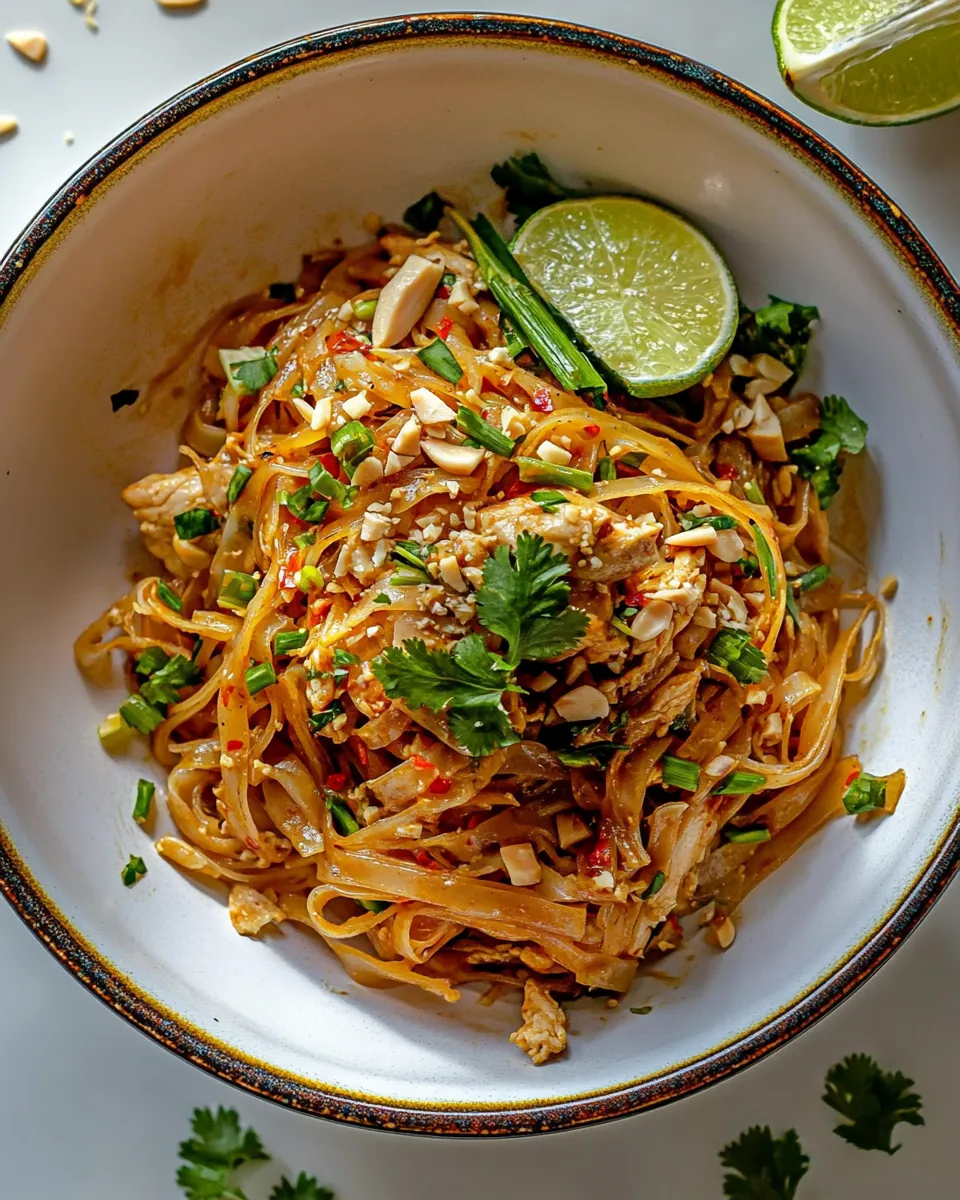
Garlic Butter Chicken Pad Thai
There’s something incredibly satisfying about whipping up a dish like Garlic Butter Chicken Pad Thai on a busy weeknight. I remember the first time I made this recipe; it was a chilly evening, and I had just returned home from work, feeling the weight of the day on my shoulders. The aroma of garlic sizzling in butter instantly lifted my spirits, and before I knew it, the vibrant colors of the vegetables and the tangy sauce brought my kitchen to life. This dish is not just a meal; it’s a celebration of flavors that transport you straight to the bustling streets of Thailand. Whether you’re cooking for family or just for yourself, you’ll find that this quick and delightful dish makes any night feel special.
Recipe Snapshot
30 mins
15 mins
15 mins
Medium
550 kcal
30 g
Whole30, Gluten-Free, Low FODMAP
20 g
Skillet, Chef’s Knife, Baking Sheet
The Charm of This Garlic Butter Chicken Pad Thai
This recipe stands out for several reasons that make it not just a meal, but an experience.
1. Quick and Easy
This dish can be prepared in just thirty minutes, making it perfect for those busy weeknights when you want something delicious without spending hours in the kitchen.
2. Flavor Explosion
The combination of garlic butter, tamari, and fresh vegetables creates a rich flavor profile that tantalizes your taste buds. Each bite is a delightful mix of savory and slightly sweet, thanks to the maple syrup.
3. Versatile Ingredients
One of the best things about Garlic Butter Chicken Pad Thai is its versatility. You can easily swap out vegetables or proteins based on what you have in your fridge, making it a great dish for using up leftovers.
4. Colorful Presentation
This dish is as beautiful as it is tasty. The bright red bell pepper, fresh green onions, and vibrant bean sprouts make for a visually stunning plate that’s sure to impress anyone you serve.
5. A Healthy Choice
With a balance of protein from the chicken and a variety of vegetables, this dish is not only delicious but also a healthier option compared to takeout. You can indulge in the rich flavors without the guilt.
6. Perfect for Meal Prep
Leftovers can be stored in the fridge for a few days, making this dish ideal for meal prepping. It reheats beautifully, so you can enjoy it for lunch or dinner throughout the week!
What Goes Into Garlic Butter Chicken Pad Thai
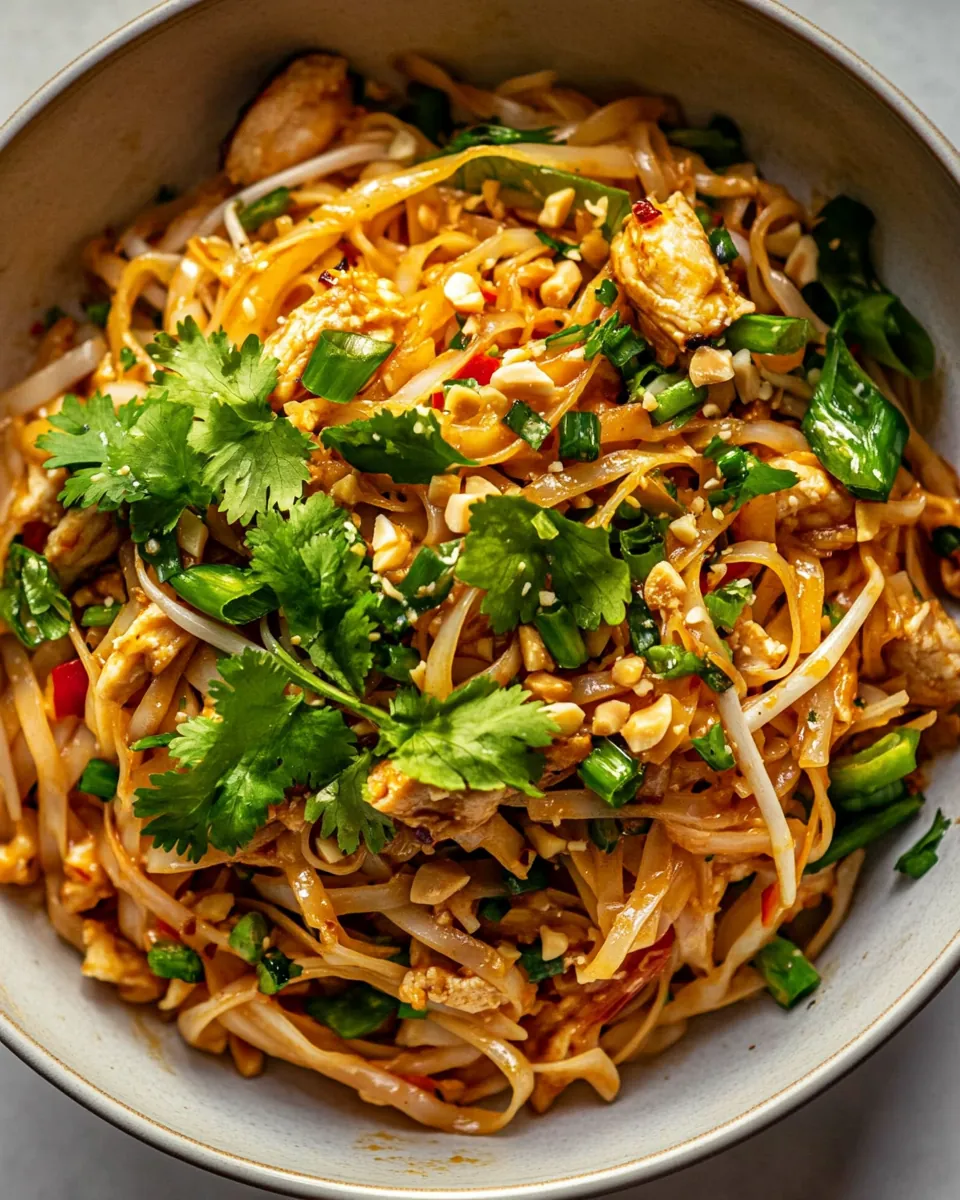
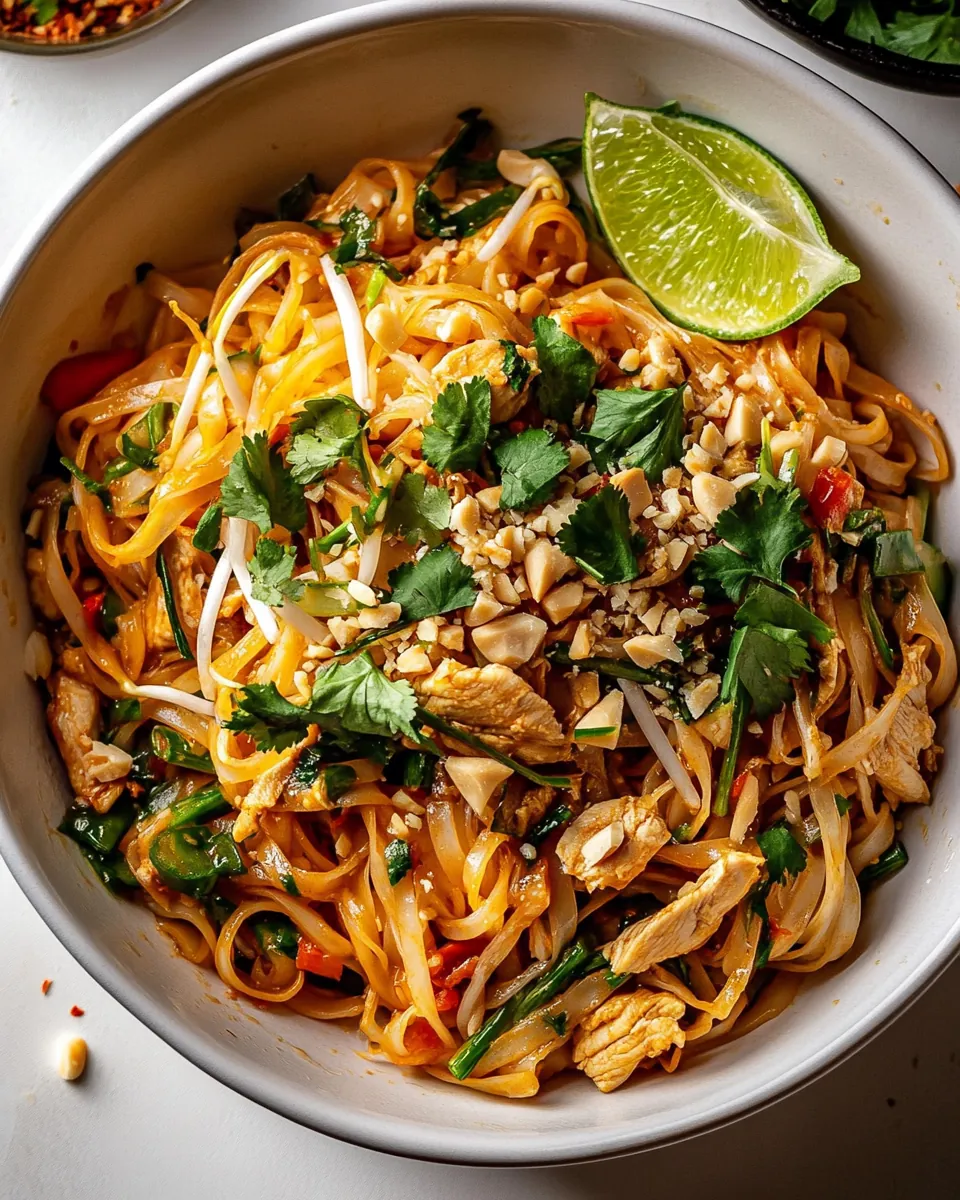
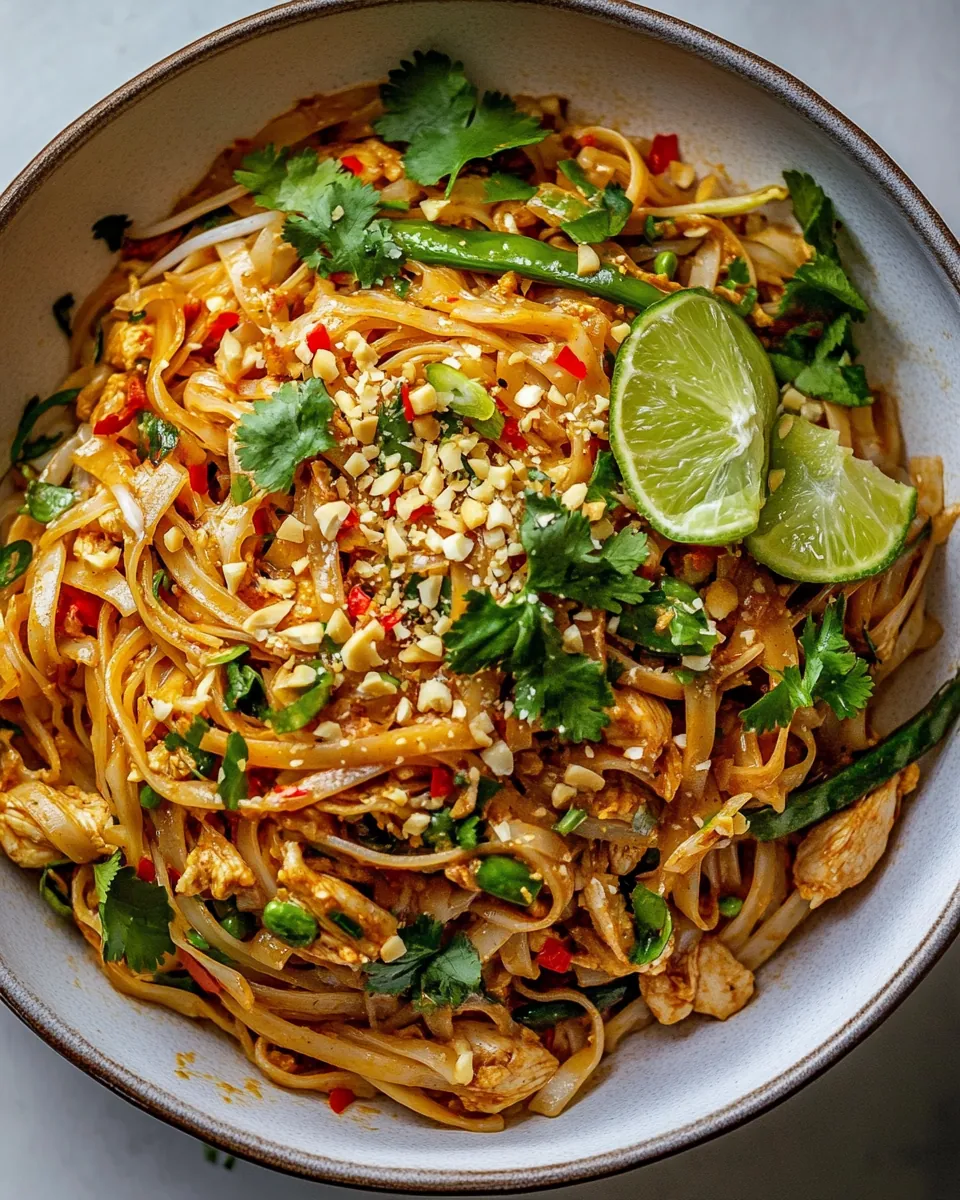
The ingredients in Garlic Butter Chicken Pad Thai come together to create a dish that is not only delicious but also harmonious. The wide rice noodles are the perfect base, soaking up the rich flavors of the sauce while providing a satisfying chew. Fresh vegetables add color and crunch, while the chicken provides heartiness to keep you full. Let’s dive into the key players in this mouth-watering dish!
- 6 ounces wide rice noodles
- 1/3 cup tamari or soy sauce
- 3 tablespoons real maple syrup
- 2 tablespoons fish sauce
- 2 tablespoons rice vinegar
- black pepper and chili flakes, to taste
- 3 tablespoons sesame oil (or olive oil)
- 3/4 pound ground chicken
- 1 red bell pepper, thinly sliced
- 3 tablespoons salted butter
- 1 shallot, sliced
- 4-6 cloves garlic, chopped
- 2-3 eggs, beaten
- 2 cups mung bean sprouts
- 1/2 cup chopped cilantro or Thai basil
- 4 green onions, chopped
- 1/3 cup roasted peanuts, chopped
The Process for Making Garlic Butter Chicken Pad Thai
Cooking Garlic Butter Chicken Pad Thai is a delightful journey! You’ll start by soaking the rice noodles and preparing your flavorful sauce, then moving on to cooking the chicken and veggies. Each step enhances the dish while filling your kitchen with mouth-watering aromas. Get ready for a culinary adventure!
- Soak the rice noodles according to packaged directions. Once they’re soft and pliable, drain them and set aside. This step is crucial as it ensures your noodles have the right texture to absorb all the sauce flavors.
- In a bowl, combine the tamari or soy sauce, maple syrup, fish sauce, rice vinegar, black pepper, and chili flakes. This mixture will create a deliciously tangy sauce that brings everything together.
- Heat a large skillet over medium heat. Once hot, add the sesame oil, then add the ground chicken and red bell pepper. Cook for about five minutes until the chicken is browned all over and the pepper is tender. You’ll want to stir occasionally to ensure even cooking.
- Add the butter, shallot, and garlic to the skillet. Stir them in and cook until the garlic turns golden, which should take about one to two minutes. The smell will be absolutely heavenly!
- Next, toss in the soaked noodles and prepared sauce. Stir everything together until the noodles are warmed through and well-coated, about one minute. You want those noodles to soak up all the delicious sauce.
- Push the noodles to one side of the skillet, and crack the eggs into the empty space. Let them sit for about one minute until the edges start to set. Then, roughly scramble the eggs and fold them into the noodles. This adds a lovely richness to your dish.
- Remove the skillet from heat and mix in the mung bean sprouts, cilantro or Thai basil, and green onions. Toss everything together until well combined. The fresh herbs add an aromatic touch.
- Serve your warm noodles topped with roasted peanuts, additional chili flakes, and a squeeze of lime juice for an extra zing. Enjoy every delicious bite!
Things Worth Knowing
- Using fresh ingredients is key to maximizing flavor in your dish, so opt for fresh vegetables and herbs when possible.
- Make sure to soak the rice noodles just enough so they are pliable but not mushy, as over-soaking can lead to undesirable texture.
- Don’t rush the cooking process; allow the garlic to turn golden for a deeper flavor in your sauce.
- Feel free to adjust the level of spiciness by increasing or decreasing the amount of chili flakes in your sauce.
Pro Tips and Tweaks
Cooking is an art, and with every recipe, there’s always room for improvement. Here are some tips to help you master the art of preparing Garlic Butter Chicken Pad Thai:
- Storage: Leftovers can be stored in an airtight container in the fridge for up to three days. Reheat gently in a skillet or microwave to maintain the noodle’s texture.
- Freezing: While it’s best enjoyed fresh, this dish can be frozen. Just make sure to store it in a freezer-safe container. To reheat, thaw overnight in the fridge before warming.
- Pairing: Serve your Pad Thai with a side of fresh spring rolls or a light cucumber salad for a refreshing contrast.
- Customizing: Experiment with different proteins, like shrimp or tofu, to make this dish your own.
- Add vegetables: Feel free to add any of your favorite vegetables, such as carrots or broccoli, to the mix for added nutrition.
- Adjust the sweetness: Depending on your preference, you can add more or less maple syrup to suit your taste.
Perfect Matches for Garlic Butter Chicken Pad Thai
This dish is not just a meal; it’s a versatile option for various occasions. Here’s how you can serve it:
- Lunch or Dinner: Perfect for a quick lunch or a comforting dinner, this dish can be enjoyed at any time of day.
- Casual Gatherings: Serve Garlic Butter Chicken Pad Thai at casual gatherings or family dinners where everyone can dig in.
- Meal Prep: Ideal for busy weeks, you can make a big batch ahead of time, making your weeknight meals a breeze.
- Side Dish: Consider serving it alongside grilled chicken or shrimp for a more substantial meal.
- Seasonal Variations: Feel free to adjust the vegetables based on the season for the freshest taste.
- Storage Tips: If you’re planning on making this in advance, consider storing the sauce separately to keep the noodles from getting soggy.
FAQ
Conclusion
The Garlic Butter Chicken Pad Thai is truly a gem in the world of quick home-cooked meals, offering a delightful balance of flavors and textures that everyone will love. I encourage you to give this recipe a try, as it’s not only easy to prepare but also a sure way to impress your family or guests. Enjoy the delicious taste of Thailand right at home!
Garlic Butter Chicken Pad Thai
Ingredients
Equipment
Method
- 1. Soak the rice noodles according to packaged directions. Drain.
- 2. To make the sauce, combine the tamari/soy sauce, maple syrup, fish sauce, rice vinegar, black pepper, and chili flakes in a bowl.
- 3. Add the sesame oil, ground chicken, and red bell pepper to a large skillet set over medium heat. Cook until the chicken is browned all over, about 5 minutes.
- 4. Add the butter, shallot, garlic, and a pinch of chili flakes and black pepper. Continue to cook until the garlic begins to turn golden, 1-2 minutes.
- 5. Add the soaked noodles and sauce, tossing to combine. Cook until the noodles are warmed through, about 1 minute.
- 6. Push the noodles to one side of the skillet and add the eggs to the other side. Let cook until the edges start to set, about 1 minute. Roughly scramble the egg, then toss it with the noodles.
- 7. Add the bean sprouts, cilantro, and green onions, and toss again.
- 8. Serve warm noodles topped with basil, green onions, peanuts, and chili flakes. Add a squeeze of lime juice if desired.
Notes
- Tip 1: Leftovers can be stored in an airtight container in the fridge for up to three days.
- Tip 2: This dish can be frozen in a freezer-safe container.
- Tip 3: Serve alongside fresh spring rolls for a refreshing contrast.
- Tip 4: You can experiment with different proteins like shrimp or tofu.
- Tip 5: Adjust the sweetness according to your preference.