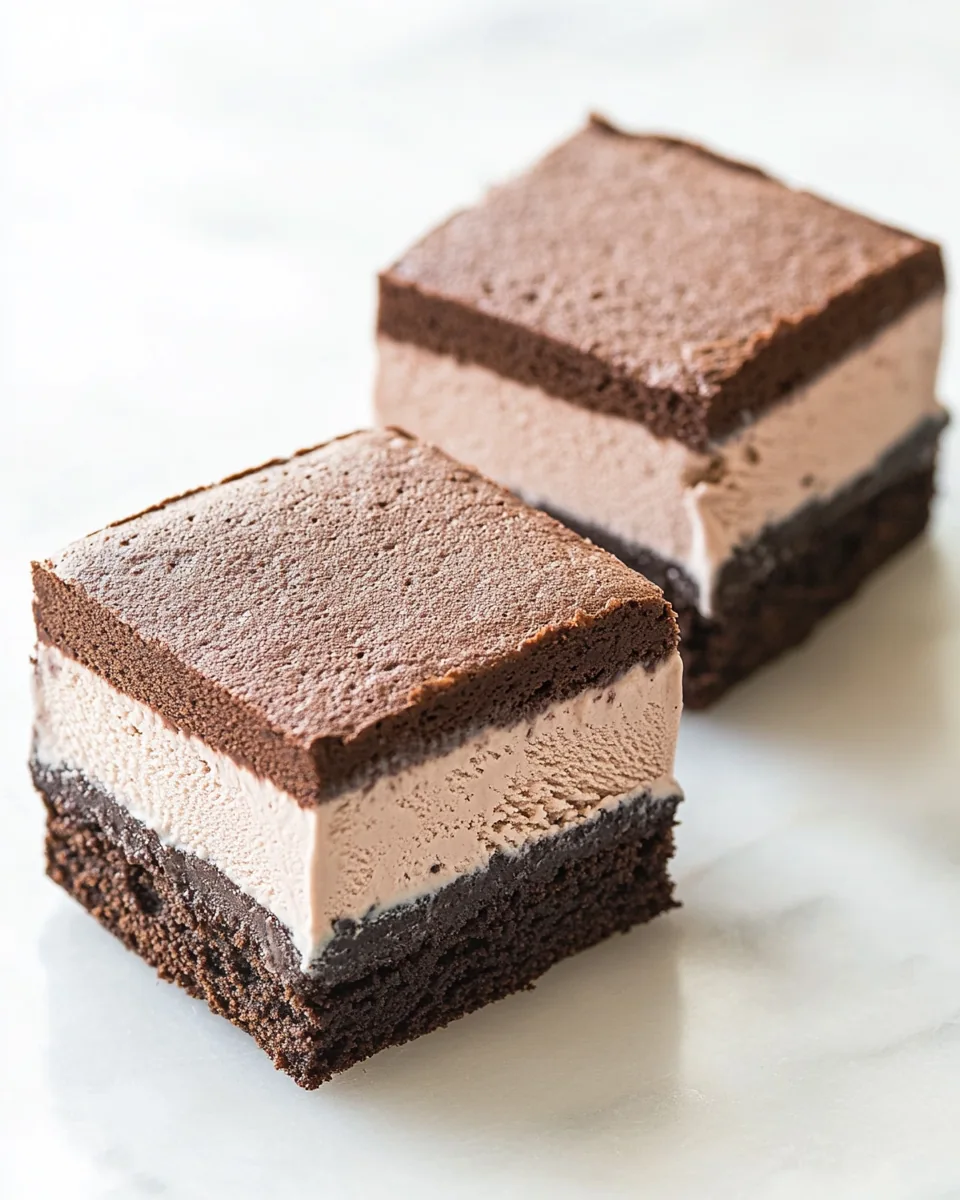
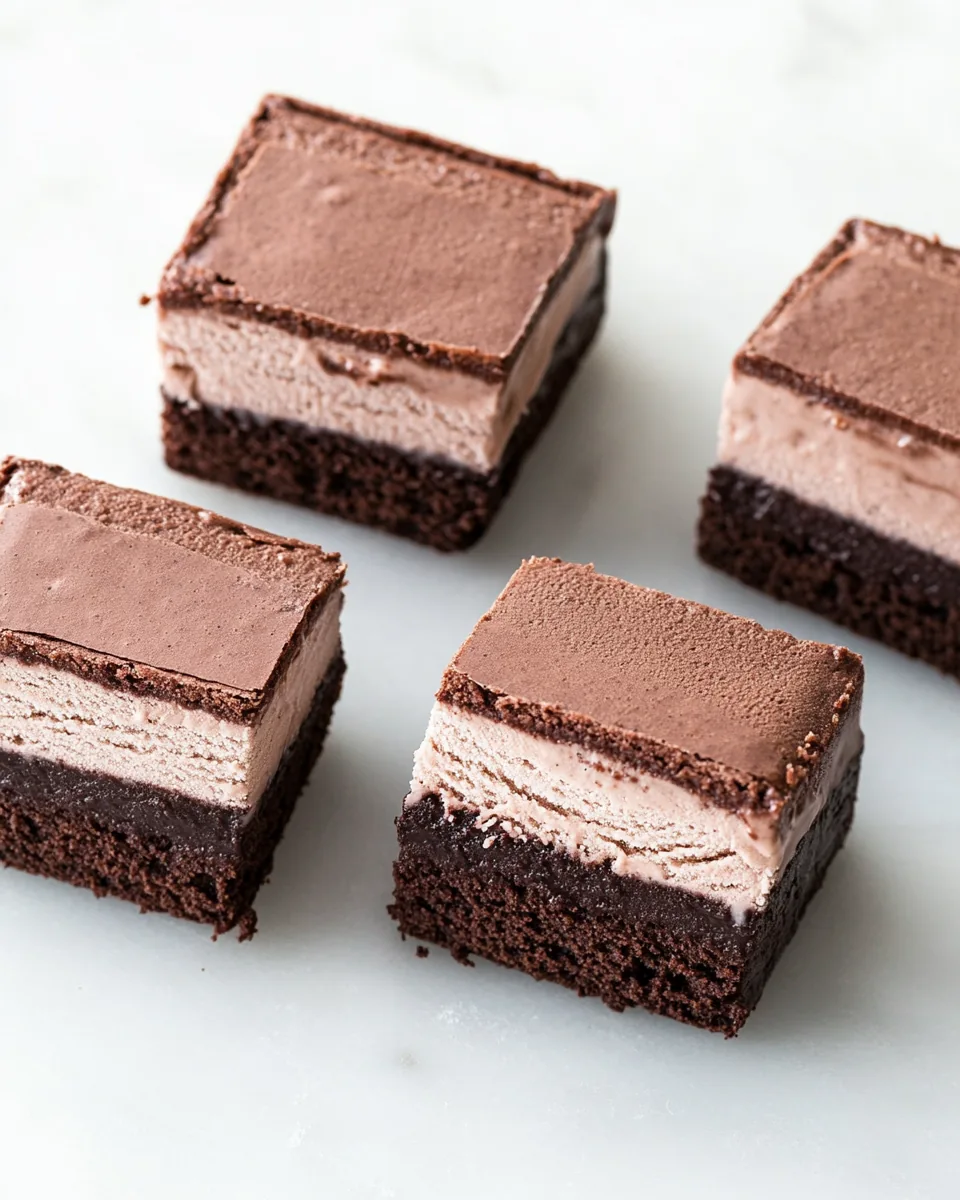
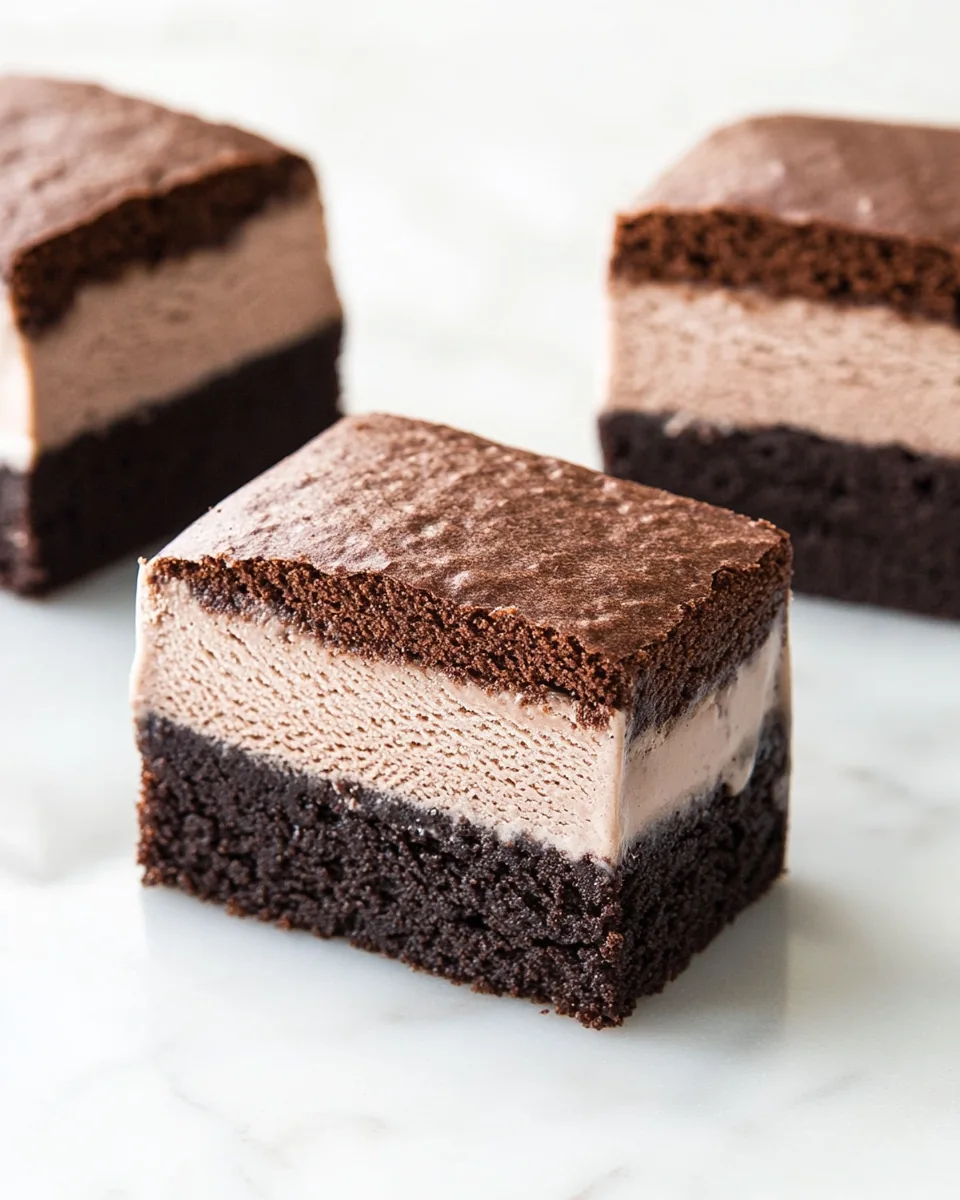
Malted Fudge Brownie Ice Cream Sandwiches
There’s nothing quite like indulging in a homemade dessert, and the Malted Fudge Brownie Ice Cream Sandwiches have become my go-to treat for summer gatherings. I remember the first time I made them; it was a sunny afternoon, and my friends were coming over for a backyard barbecue. I thought, why not take two of my favorite treats—fudge brownies and ice cream—and make them into something even more special? With the sun shining and laughter in the air, the idea of these sandwiches seemed perfect. As I baked the brownies, the heavenly aroma filled the kitchen, and I could hardly wait to share them. These sandwiches are more than just a dessert; they’re a sweet memory waiting to happen.
Recipe Snapshot
60 mins
45 mins
15 mins
Hard
350 kcal
4 g
Gluten-Free, Low FODMAP
18 g
Oven, Large Pot, Mixing Bowl, Baking Sheet, Chef’s Knife, Food Processor, Frying Pan, Wooden Spoon, Whisk
Why This Malted Fudge Brownie Ice Cream Sandwiches Shines
Irresistible Flavor Combination
The flavors of chocolate and malt come together beautifully in the Malted Fudge Brownie Ice Cream Sandwiches. The rich, fudgy brownies provide the perfect base, while the ice cream adds a creamy texture that balances everything out. You can customize the ice cream flavor to match your mood or the season, making it a versatile dessert option that never disappoints.
Perfect for Any Occasion
Whether it’s a birthday party, a summer picnic, or simply a weekend treat, these sandwiches are sure to impress. They’re not just visually appealing; they taste amazing too! The combination of the chewy brownies and the cold ice cream is a crowd favorite. Trust me, once you serve these, your guests will be asking for seconds!
Fun to Make Together
Making Malted Fudge Brownie Ice Cream Sandwiches can be a fun activity for the whole family. Kids love to help out with the assembly. They can scoop the ice cream and spread it between the brownie layers, turning the process into a delightful family bonding experience.
Make-Ahead Convenience
Another great aspect is that these sandwiches can be made ahead of time. You can prepare them a day or two in advance and keep them in the freezer until you’re ready to serve. This makes them a great option for busy days when you want an impressive dessert without the last-minute rush.
Endless Customization
Want to switch things up? You can easily add ingredients like nuts or sprinkles to the brownie layer, or even use different types of ice cream. The possibilities are endless! Each time you make them, you can create a unique flavor that keeps everyone excited.
What to Gather for Malted Fudge Brownie Ice Cream Sandwiches
Gathering the right ingredients is essential to creating delicious Malted Fudge Brownie Ice Cream Sandwiches. Each component plays a critical role in achieving the perfect balance of flavors and textures. The rich chocolate, creamy ice cream, and hint of malt combine to create a delightful dessert. Here’s what you’ll need:
- 6 oz dark chocolate (50-60%), finely chopped: A key ingredient for the brownies, providing deep chocolate flavor.
- ⅔ cup all-purpose flour: This gives structure to the brownie layer.
- ½ cup dark or dutch process cocoa powder: Intensifies the chocolate flavor.
- ½ teaspoon instant espresso powder: Optional, but it enhances the chocolate’s richness.
- ½ teaspoon baking powder: Helps the brownies rise slightly.
- ½ teaspoon fine sea salt: Balances the sweetness.
- 1 cup unsalted butter, at room temperature: Adds richness and moisture.
- 1 cup granulated sugar: Sweetens the brownies.
- ½ cup packed light brown sugar: Adds a hint of caramel flavor.
- 3 large eggs, at room temperature: Binds the ingredients together.
- 1 teaspoon vanilla extract: Enhances the overall flavor.
- 2 tablespoons whole milk: Adds moisture to the batter.
- 2 oz dark chocolate (50-70%), finely chopped: For added texture in the brownies.
- 2 oz milk chocolate (25-35%), finely chopped: Gives sweetness and creaminess.
- ⅓ cup heavy cream: Essential for the ganache.
- 1 tablespoon unsalted butter, at room temperature, cut into small pieces: For the ganache.
- 7 oz sweetened condensed milk: A creamy base for the ice cream.
- ¼ cup dark or dutch-process cocoa powder, sifted: To flavor the ice cream.
- 2 tablespoons malted milk powder: Optional but adds a unique malty flavor.
- 1 teaspoon vanilla extract: Used in the ice cream mixture.
- Pinch fine sea salt: Enhances flavor.
- 1 cup heavy cream: For whipping in the ice cream.
Step by Step Instructions for Malted Fudge Brownie Ice Cream Sandwiches
Making Malted Fudge Brownie Ice Cream Sandwiches is a delightful process that combines baking and freezing. It might seem a bit involved, but I promise every step is worth it. Let’s dive into the steps to create this delicious treat!
To make the brownie layer, preheat your oven to 350ºF. Lightly butter the bottom and sides of a half sheet pan, about 18 by 13 inches, and line it with parchment paper. Leave at least an inch of overhang on the two long sides. This will help you remove the brownies easily once they’re baked.
In a double boiler or microwave on low power, melt 6 oz of dark chocolate until smooth. Allow it to cool slightly while you prepare the dry ingredients.
In a separate bowl, sift together ⅔ cup of all-purpose flour, ½ cup of cocoa powder, ½ teaspoon of espresso powder, ½ teaspoon of baking powder, and ½ teaspoon of salt. This mixture will provide the structure and flavor for your brownies.
Using a stand mixer fitted with the paddle attachment, beat 1 cup of softened butter with 1 cup of granulated sugar and ½ cup of brown sugar on medium-high speed for about 2 to 3 minutes, until the mixture is light and fluffy. This is an important step as it incorporates air into the batter.
Add the 3 eggs, one at a time, ensuring each is well combined before adding the next. Increase the mixer speed to high and beat for another 2 to 3 minutes until fluffy and increased in volume. Finally, mix in 1 teaspoon of vanilla extract and 2 tablespoons of whole milk to enhance the flavor.
With the mixer on low, drizzle in the melted chocolate and mix until just incorporated, scraping down the sides of the bowl as needed. Then, sprinkle the dry ingredient mixture over the top and mix on low speed or fold in with a spatula until just combined. Avoid overmixing to keep the brownies chewy.
Drop dollops of the brownie batter onto the prepared baking sheet and spread it into an even layer using an offset spatula. It’s okay if the batter doesn’t reach the edges, as it will spread during baking. Bake for 13 to 15 minutes, or until the top is cracked and the edges are slightly darker brown. Once baked, place the sheet on a wire rack to cool completely.
After the brownies have cooled, refrigerate them for at least 30 minutes to make them easier to cut and work with.
While the brownies are chilling, prepare an 8 by 8-inch square baking pan. Line the bottom and sides with two strips of parchment paper, ensuring they cross at the bottom and allow for overhang. This will help you easily lift the brownies out later.
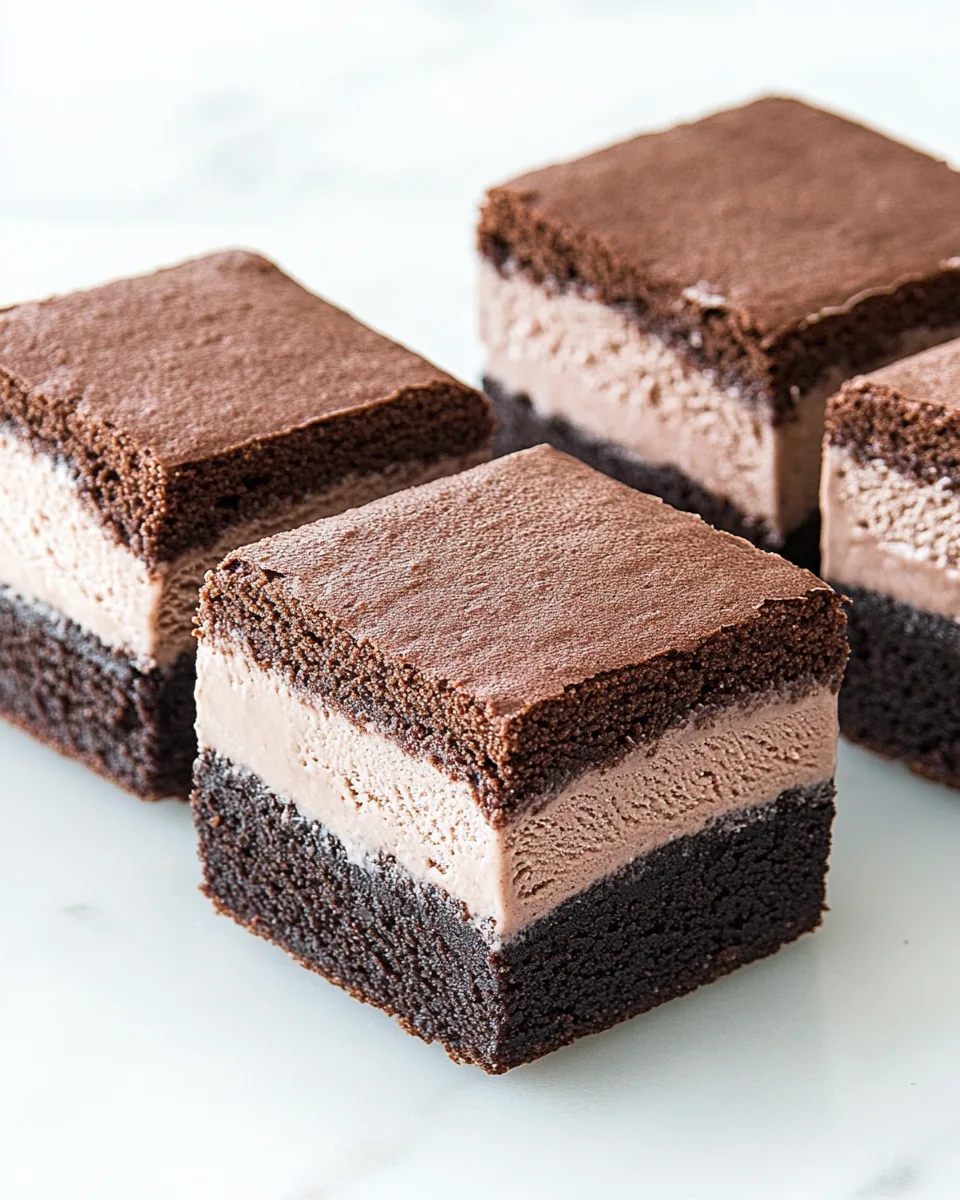
Once the brownies are chilled, carefully slide them onto a large cutting board, keeping the parchment on the bottom. Measure and cut two 8-inch squares using a ruler. These will form the base and top of your sandwiches. Any scraps can be enjoyed as a chef’s treat!
Gently lower one parchment-backed brownie square into the bottom of the lined baking pan. Place the other square back in the fridge or freezer while preparing the ganache.
To make the ganache, place the chopped chocolate in a heat-proof bowl. In a small saucepan, warm ⅓ cup of heavy cream over low heat until it just begins to steam. Pour the hot cream over the chocolate and let it sit for 30 seconds. Then, whisk gently in concentric circles until smooth. Add 1 tablespoon of butter, one piece at a time, whisking until melted and combined.
Immediately pour the ganache over the brownie layer in the pan, spreading it into the corners. Tap the pan on the counter to level the ganache layer and remove any air bubbles. Refrigerate for about 20 to 30 minutes, until set.
For the ice cream, combine 7 oz of sweetened condensed milk, ¼ cup of sifted cocoa powder, and 1 teaspoon of vanilla in a mixing bowl. In another bowl, dissolve 2 tablespoons of malted milk powder in 1 tablespoon of warm water and mix it into the cocoa mixture.
In a clean metal mixing bowl, whip 1 cup of heavy cream until medium peaks form. Spoon about a third of the whipped cream into the cocoa mixture and fold gently. Add the remaining whipped cream and fold until no streaks remain. This will give your ice cream a light and airy texture.
Pour the ice cream base over the set ganache layer and spread it evenly. Freeze for 30 to 45 minutes until it starts to firm up. Then, gently place the second brownie square, parchment side up, on top of the ice cream, pressing lightly to adhere.
Return the entire pan to the freezer and freeze until completely set, at least 4 hours or overnight.
When ready to serve, use the overhanging parchment paper to lift the entire block out of the pan onto a cutting board. Use a large knife (running it under hot water helps) to cut the sandwiches into 16 even squares. Wipe the knife between cuts for clean edges. Serve immediately, or return the cut sandwiches to the freezer for later enjoyment. These treats can last up to 2 months in an airtight container!
Things Worth Knowing
- Chilling the Brownies: Allowing the brownies to chill after baking helps them firm up, making them easier to cut and sandwich.
- Whipping Cream: For best results, use a chilled bowl and beaters when whipping heavy cream to ensure it reaches the right consistency.
- Melting Chocolate: When melting chocolate, do so gently to prevent burning. If using a microwave, do it in short bursts, stirring in between.
- Assembly Time: Be gentle when placing the second brownie layer on the ice cream to prevent it from squeezing out.
Expert Tips about Malted Fudge Brownie Ice Cream Sandwiches
Creating the perfect Malted Fudge Brownie Ice Cream Sandwiches can be even easier with a few expert tips. Here’s how to make the most of your baking adventure:
- Storage: To store leftovers, place the sandwiches in an airtight container and keep them in the freezer. They can last up to two months.
- Freezing: If you plan to freeze the sandwiches, wrap them individually in plastic wrap for easy access later.
- Pairing: These sandwiches pair wonderfully with a dollop of whipped cream or a drizzle of chocolate sauce for an extra indulgent treat.
- Variations: Experiment with different ice cream flavors, such as mint chocolate chip or cookies and cream, to create your unique versions of these sandwiches.
- Presentation: For a beautiful presentation, serve the sandwiches on a platter with fresh berries or a scoop of ice cream on the side.
How to Serve Malted Fudge Brownie Ice Cream Sandwiches
Serving your Malted Fudge Brownie Ice Cream Sandwiches is just as fun as making them. Here are some delightful ways to enjoy them:
- Chilled Treat: Serve the sandwiches straight from the freezer for a refreshing dessert during hot summer days.
- With Fresh Fruits: Pair them with fresh berries or sliced bananas for a fruity contrast to the rich chocolate.
- Perfect for Parties: These sandwiches are ideal for birthday parties, barbecues, or any outdoor gathering. They add a fun twist to dessert.
- Individual Wrapping: For a picnic or event, consider wrapping individual sandwiches in parchment paper for easy serving.
- Gourmet Presentation: Drizzle with chocolate sauce and sprinkle with crushed nuts for a gourmet touch when serving to guests.
- Pair with Beverages: Enjoy these with a glass of milk, iced coffee, or a sweet dessert wine for an adult twist.
FAQ
Conclusion
The Malted Fudge Brownie Ice Cream Sandwiches are a delightful treat that combines rich chocolate with creamy ice cream, perfect for any occasion. Whether you’re hosting a summer gathering or simply craving something sweet, this recipe is sure to impress. I encourage you to give it a try, and I promise you won’t be disappointed. Enjoy making memories with each delicious bite!
Malted Fudge Brownie Ice Cream Sandwiches
Ingredients
Equipment
Method
- To make brownie layer, preheat oven to 350ºF. Lightly butter the bottom and sides of a half sheet pan (18-by-13-inches); line with parchment paper, leaving at least an inch of overhang on the two long sides.
- In a double boiler or in the microwave on low power, melt chocolate until smooth. Set aside to cool slightly.
- In a separate bowl, sift together flour, cocoa powder, espresso powder, baking powder, and salt and set aside.
- In the bowl of a stand mixer fitted with the paddle attachment, beat butter, sugar, and brown sugar on medium-high speed for 2 to 3 minutes or until light and fluffy. Add eggs, one at a time, beating well after each addition. Increase speed to high and beat for another 2 to 3 minutes or until fluffy and increased in volume. Mix in vanilla and milk.
- With the mixer running on low, drizzle in melted chocolate and mix until just incorporated, scraping down the sides of the bowl with a spatula as needed. Sprinkle dry ingredients over top and mix on low speed or fold in with a spatula until just incorporated.
- Drop dollops of batter onto prepared baking sheet, and spread into an even layer using an offset spatula (it's ok if the batter doesn't go quite all the way to the edges, it'll spread more as it bakes). Bake for 13 to 15 minutes or until top is cracked and edges are slightly darker brown. Place sheet pan on a wire rack to cool completely, then refrigerate for at least 30 minutes (or more) to make the brownie easier to work with.
- While the brownie is chilling, prepare an 8-by-8-inch square baking pan (ideally one with crisp, sharp corners and straight rather than angled sides). Lining the bottom and sides with two 8-inch-wide by at least 14-inch long strips of parchment paper placed perpendicular in the baking pan, creasing the corners and top edges. You should have a good inch or two of overhang; you will need this later to lift the sandwiches out of the pan.
- Carefully lift and slide the chilled brownie onto a large cutting board, leaving the parchment on the bottom. Use a ruler to measure and cut two 8-inch squares (should be exactly the same size as the inside of your baking pan). Use a large knife or a sharp rotary cutter to cut through the brownie and the parchment lining the bottom. Any scraps you can do with as you please (chef's treat!)
- Gently lower one of the parchment-backed squares into the bottom of the parchment-lined baking pan. Put the other square back in the fridge or freezer until the rest of the sandwich assembly is ready.
- To make the ganache, place chopped chocolate in a heat-proof bowl. Warm cream in a small saucepan over low heat until it just begins to steam and bubble around the edges (do not let it boil).
- Pour hot cream over chopped chocolate; let sit for 30 seconds, then gently start to whisk, working in concentric circles from the center out, until chocolate is fully melted and ganache is smooth. Add butter, one piece at a time, and gently whisk until melted.
- Immediately pour still-warm ganache over the first layer of brownie in the baking pan, spreading it into the corners as needed, tapping the pan on the counter to level the ganache layer and remove air bubbles. Refrigerate for 20 to 30 minutes until set and no longer shiny.
- For the ice cream, combine sweetened condensed milk, sifted cocoa powder, and vanilla in a large mixing bowl. In a separate small bowl, dissolve malted milk powder in 1 tablespoon warm water, then mix into cocoa mixture.
- Pour the cream into a clean metal mixing bowl or the bowl of a stand mixer fitted with the whisk attachment. If you like, you can also chill the metal bowl and whisk which will help your cream to whip up nicely. Turn mixer to medium-high speed and whip until cream forms medium peaks (try not to overmix or it will be harder to incorporate into the cocoa mixture).
- Spoon in about 1/3 of the whipped cream into bowl with cocoa mixture, folding and gently stirring to lighten up the mixture. Add remaining whipped cream and fold with a large rubber spatula until evenly incorporated and no streaks of bright white cream are visible.
- Pour ice cream base on top of set ganache, spreading into an even layer. Freeze for 30 to 45 minutes or until ice cream layer starts to freeze and firms up a bit. Gently place second brownie square, parchment side up, on top of ice cream, pressing lightly to adhere (don't press too hard or the ice cream may squeeze out the sides).
- Return to freezer and freeze until completely set, at least 4 hours or overnight.
- Before serving, use the parchment paper overhang to lift the entire block out of the baking pan and onto a cutting board. Use a large knife (running it briefly under hot water to make it easier) to cut sandwiches into 16 even squares. Wipe or rinse off the knife between each slice for the cleanest looking cuts. Serve immediately, or return cut squares to the freezer to enjoy later (if storing longer than a day, put them in an airtight container or wrap individually with plastic wrap). Sandwiches will keep for up to 2 months.
Notes
- Tip 1: To store leftovers, place the sandwiches in an airtight container and keep them in the freezer. They can last up to two months.
- Tip 2: If you plan to freeze the sandwiches, wrap them individually in plastic wrap for easy access later.
- Tip 3: These sandwiches pair wonderfully with a dollop of whipped cream or a drizzle of chocolate sauce for an extra indulgent treat.
- Tip 4: Experiment with different ice cream flavors, such as mint chocolate chip or cookies and cream, to create your unique versions of these sandwiches.
- Tip 5: For a beautiful presentation, serve the sandwiches on a platter with fresh berries or a scoop of ice cream on the side.