Milk Chocolate Stuffed Peanut Butter Bunny Cookies
When I think about the joy of baking, Milk Chocolate Stuffed Peanut Butter Bunny Cookies take center stage. These delightful cookies aren’t just a treat; they’re a celebration of springtime and all things sweet! The first time I made these cookies, I was filled with nostalgia, reminiscing about the Easter egg hunts of my childhood. The sweet aroma of butter and peanut butter wafting through the kitchen instantly transported me back to those sunny afternoons, and I knew I was onto something special. With each bunny cookie, I could already picture the smiles of family and friends as they took a bite and experienced the delicious surprise of milk chocolate hidden inside.
It’s easy to fall in love with this festive recipe, especially when the kids get involved in the cookie-cutting fun! Shaping the dough into cute bunnies (or if you prefer, Easter eggs) adds a layer of creativity that makes the baking process even more enjoyable. Plus, it’s always a hit to see the shiny, decorated cookies come out of the oven, all waiting to be devoured. Whether you’re preparing for a family gathering or simply indulging in a sweet afternoon treat, these cookies will surely bring a smile to your face.
The moment I dip the cookies in white chocolate, it’s like magic happens; they transform into something almost too cute to eat! The addition of sprinkles or a light dusting of sugar makes them look irresistible. And let’s not forget about the taste—rich, creamy, and perfectly balanced with that touch of sweetness. So, if you’re looking for a delightful dessert to make this spring, I can’t recommend Milk Chocolate Stuffed Peanut Butter Bunny Cookies enough. They’re not just cookies; they’re little bites of happiness!
Recipe Snapshot
45 mins
30 mins
15 mins
Medium
230 kcal
3 g
Gluten-Free, Low FODMAP
12 g
Mixing Bowl, Whisk, Baking Sheet, Oven
The Beauty of This Milk Chocolate Stuffed Peanut Butter Bunny Cookies
Whimsical Appeal
One of the best reasons to love Milk Chocolate Stuffed Peanut Butter Bunny Cookies is their whimsical appeal. Shaped like adorable bunnies, these treats are perfect for Easter celebrations or any spring gathering. Their playful design makes them a delightful centerpiece that sparks joy and conversation, especially among children.
Deliciously Decadent
These cookies are a sweet indulgence that combines the rich flavors of milk chocolate, peanut butter, and butter. Each bite offers a creamy, gooey surprise that keeps you coming back for more! The contrast of textures—soft and chewy cookie dough paired with melted chocolate—creates a mouthwatering experience that’s hard to resist.
Fun for Everyone
Baking these cookies is a fun activity for the whole family. Kids can help with cutting the shapes and decorating, making it a perfect bonding experience. You’ll create cherished memories while crafting delicious treats that everyone will love.
Customizable Creations
Another standout feature is their versatility. While the recipe calls for milk chocolate and white chocolate, you can experiment with different fillings or toppings. Consider adding colorful sprinkles, or even swapping the chocolates for something like dark chocolate for a richer flavor.
Perfect for Sharing
These cookies are fantastic for sharing! Whether it’s a gathering with friends or a festive Easter brunch, Milk Chocolate Stuffed Peanut Butter Bunny Cookies are sure to impress. They make wonderful gifts and are easy to package beautifully for anyone you want to surprise.
Allergen-Friendly Options
To accommodate different dietary needs, you can easily modify this recipe. For example, use gluten-free flour to make these cookies more accessible, ensuring that everyone can enjoy the fun and flavor of your homemade desserts!
Ingredients You’ll Need for Milk Chocolate Stuffed Peanut Butter Bunny Cookies
The ingredients for Milk Chocolate Stuffed Peanut Butter Bunny Cookies come together to create a wonderful balance of flavors and textures. Each ingredient plays a crucial role in crafting these delightful cookies. The star players include butter, which brings richness; peanut butter, providing that nutty essence; and, of course, the milk chocolate that takes these cookies to the next level.
- Salted Butter: 1 stick (1/2 cup), at room temperature. This is essential for that rich taste and tender texture.
- Light Brown Sugar: 3/4 cups, adding sweetness and moisture to the dough.
- Creamy Peanut Butter: 1/2 cup, providing the iconic flavor and a creamy texture.
- Pure Vanilla Extract: 2 teaspoons, enhancing the overall taste with warmth.
- Egg: 1, at room temperature, helping bind the ingredients together.
- All-Purpose Flour: 1 3/4 to 2 cups, giving the cookies structure; make sure to measure accurately.
- Baking Soda: 1/4 teaspoon, acting as a leavening agent for a light cookie.
- Salt: 1/4 teaspoon, balancing the sweetness.
- Milk Chocolate: 12 ounces, melted, for the delicious filling.
- White Chocolate: 12 ounces, melted, for coating the cookies.
- Coconut Oil: 1 tablespoon, melted (optional), for adding shine to the chocolate.
- Granulated Sugar: for dusting (optional), providing a lovely finish.
Recipe Directions for Milk Chocolate Stuffed Peanut Butter Bunny Cookies
Making Milk Chocolate Stuffed Peanut Butter Bunny Cookies is an exciting process that you’ll want to savor. Let’s dive into the steps that will lead you to delicious cookie fame!
- Preheat the oven to 350 degrees F (175 degrees C). Lining a baking sheet with parchment paper will prevent sticking and make cleanup a breeze.
- In a large mixing bowl, cream together the butter, brown sugar, peanut butter, and vanilla extract until light and fluffy, about 2 minutes. You want to achieve a pale color and a smooth consistency. This step is crucial as it incorporates air into the mixture, resulting in a light cookie.
- Add the egg and mix until fully incorporated. Following this, gradually add in the flour, baking soda, and salt. Beat the mixture until it comes together into a cohesive dough. If your dough feels dry, don’t hesitate to add a tablespoon of water; conversely, if it’s too wet, sprinkle in more flour as needed. Ensure not to exceed 2 cups.
- Generously flour your work surface and divide the dough into two halves. Flatten each half into a disk about an inch thick. Roll out the dough to a thickness of 1/4 inch. Always use enough flour to avoid sticking.
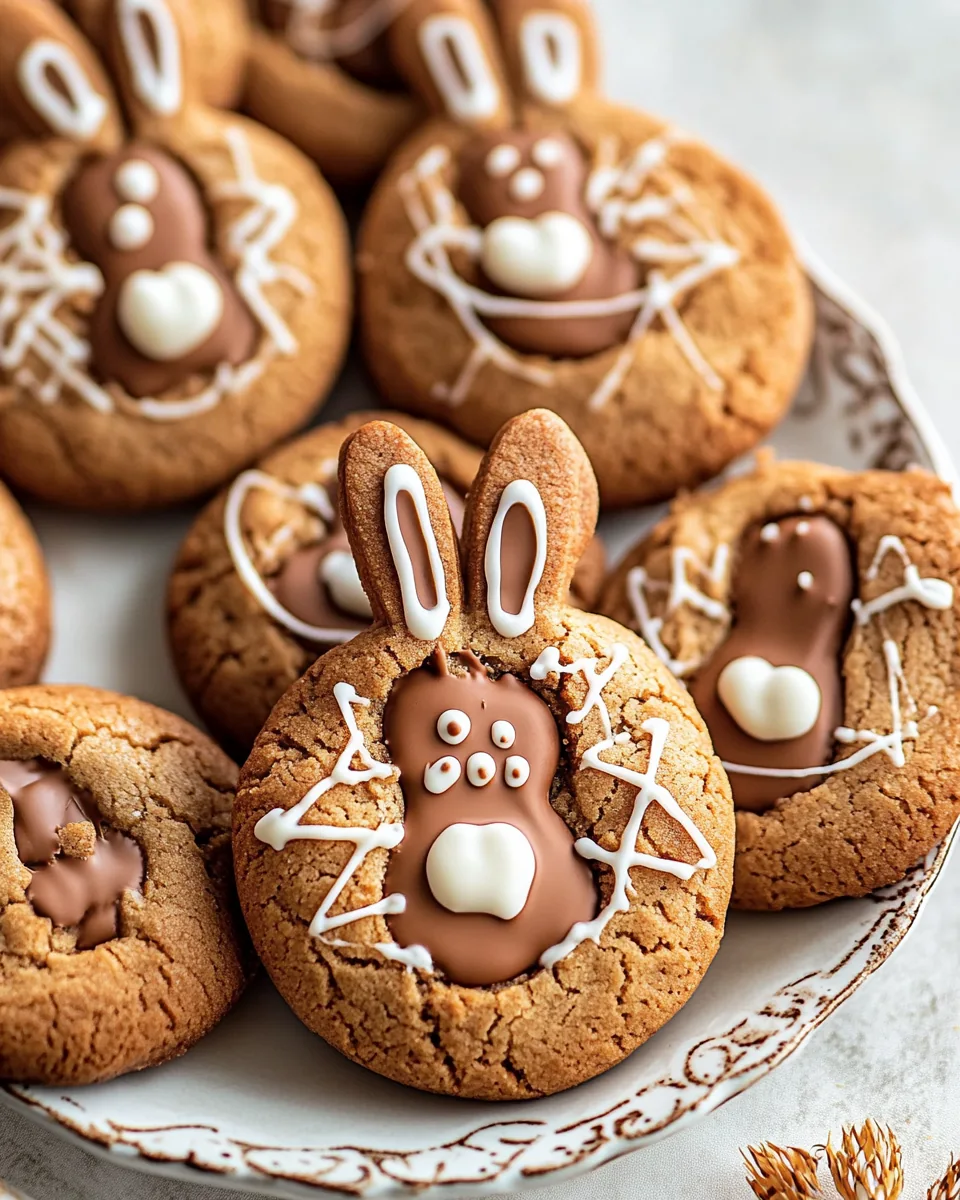
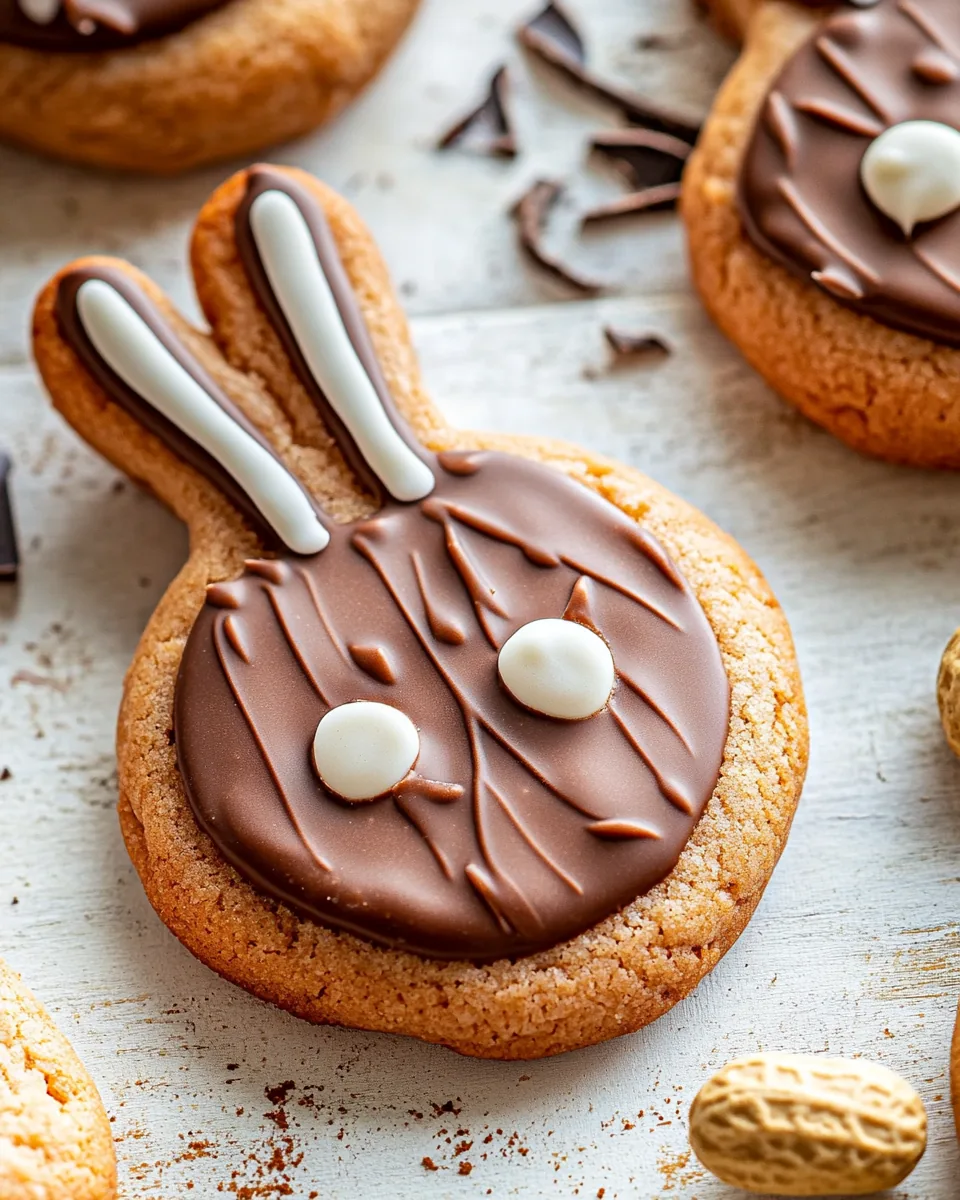
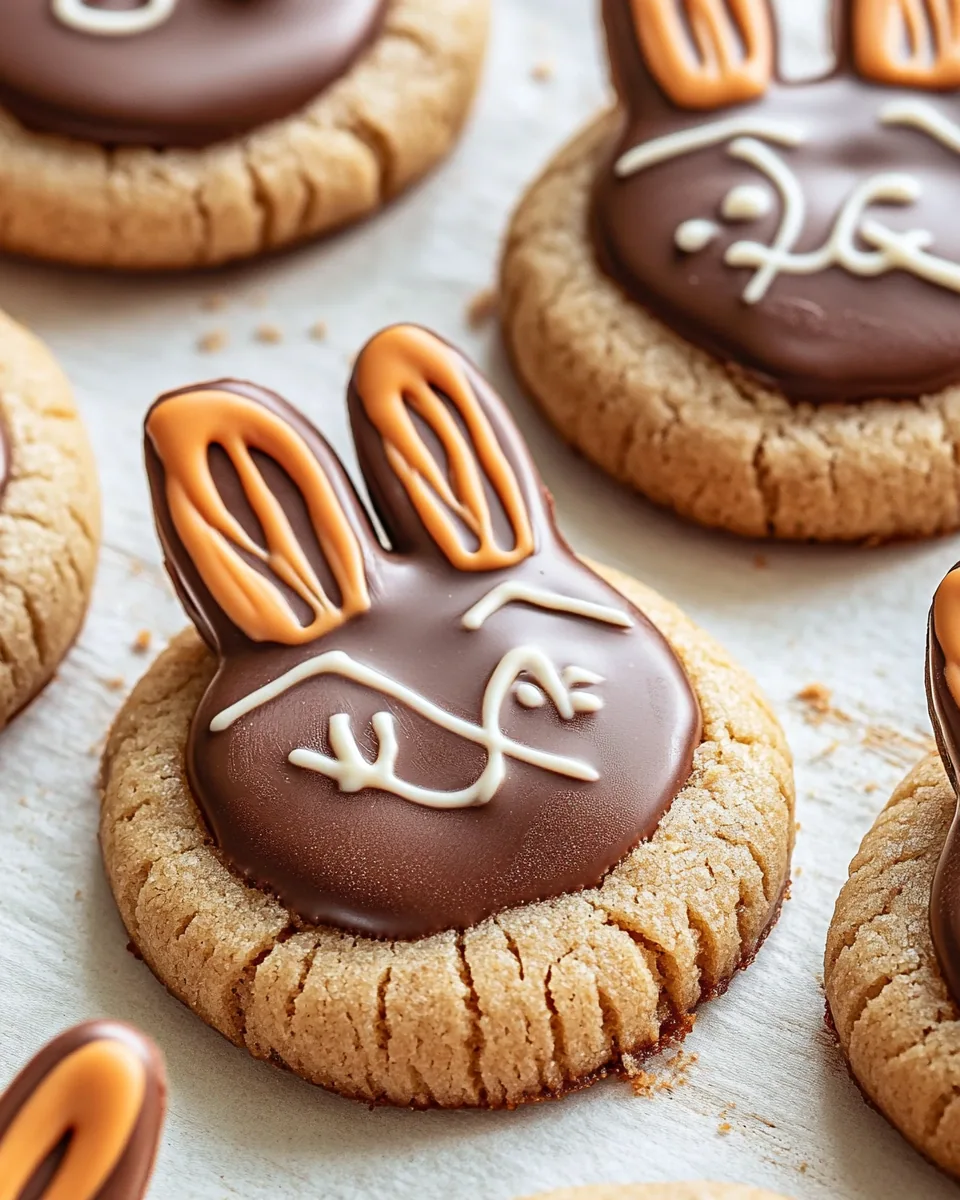
- Using a bunny-shaped cookie cutter, cut out shapes from the rolled dough. If you’re feeling creative, you can use circles for Easter eggs. Gently transfer the cut cookies to the prepared baking sheet using a spatula. For half of the cookies, cut out small ovals from the tops of the bunny ears and the bottoms for their “feet” using a pairing knife.
- Place the cookie sheet in the oven and bake for 10 to 12 minutes, until lightly golden brown. Keep an eye on them; you want just the right amount of color. Once baked, allow them to cool on the sheet for 5 minutes before transferring them to a wire rack to cool completely.
- While your cookies are cooling, mix together the melted white chocolate and melted coconut oil (if using). Dip each of the cutout cookies into the melted white chocolate and place them back on the parchment-lined baking sheet. Allow the chocolate to harden before proceeding. You can dust them lightly with sugar for added flair.
- To assemble the cookies, spread a layer of melted milk chocolate over the cookies without cutouts. Gently place the white chocolate-covered cookie on top, pressing down slightly to adhere. You can also use a ziplock bag with a small cut in the corner to pipe on facial features like eyes, noses, and whiskers.
- Allow the decorated cookies to rest at room temperature for at least 1 hour or refrigerate them for 15 minutes to speed up the hardening process.
- If opting to create Easter Eggs, roll the remaining dough into circles and shape them into ovals before decorating. You can draw on designs with the melted chocolate for a festive touch.
- For a unique twist, immediately sprinkle the baked cookies with cinnamon sugar after they come out of the oven for a delightful flavor.
Things Worth Knowing
- Cookie Thickness: Make sure to roll the dough to even thickness for uniform baking. Uneven thickness can lead to some cookies being overbaked while others are underdone.
- Chilling the Dough: If the dough feels too sticky to work with, chill it in the fridge for about 30 minutes. This will help it firm up and be easier to roll.
- Using High-Quality Chocolate: Opt for high-quality milk chocolate and white chocolate for the best flavor. The chocolate makes a significant difference in taste.
- Decorative Ideas: Get creative with toppings! Consider adding edible glitter or sprinkles for an extra festive touch.
- Cookie Cutter Variety: Use different shapes depending on the season—hearts for Valentine’s, bunnies for Easter, or stars for the holidays.
Expert Tips about Milk Chocolate Stuffed Peanut Butter Bunny Cookies
Ready to elevate your baking game with these tips? Let’s dive into some expert advice that will ensure your Milk Chocolate Stuffed Peanut Butter Bunny Cookies turn out perfectly every time.
- Storage: To keep your cookies fresh, store them in an airtight container at room temperature for up to 4 days. If you want to preserve their softness, you can add a slice of bread to the container.
- Freezing: If you wish to make these cookies in advance, they freeze beautifully. Just freeze the unbaked cookie dough balls, then bake them straight from the freezer, adding a couple of extra minutes to the baking time.
- Pairing: These cookies pair wonderfully with a glass of cold milk or a warm cup of coffee. They also make an excellent addition to dessert platters for gatherings.
- Decorating Tips: When decorating, use melted chocolate in a squeeze bottle for more control, allowing you to create intricate designs on your cookies.
- Flavor Variations: Don’t hesitate to experiment with flavors. Add a pinch of cinnamon or nutmeg to the dough for an extra layer of flavor, or mix in some chopped nuts for added crunch.
Serve This Milk Chocolate Stuffed Peanut Butter Bunny Cookies With
Looking to serve Milk Chocolate Stuffed Peanut Butter Bunny Cookies and make your dessert spread shine? Here are some delightful options you can pair with these sweet treats:
- Spring Fruit Salad: A refreshing fruit salad with seasonal fruits like strawberries, blueberries, and kiwi adds a burst of color and natural sweetness, perfectly complementing the rich cookies.
- Coffee: Serve these cookies with a cup of freshly brewed coffee or espresso. The balance of flavors is simply divine!
- Vanilla Ice Cream: A scoop of vanilla ice cream alongside the cookies makes for an indulgent dessert. The creaminess of the ice cream contrasts wonderfully with the chewy cookies.
- Milk: A classic pairing, nothing beats a tall glass of cold milk to wash down the sweetness of the cookies.
- Cookie Platter: Consider creating a cookie platter featuring a mix of your favorite cookies for a delightful dessert table at parties or gatherings; these bunny cookies will surely be the star!
- Picnic Treats: Perfect for picnics or outdoor gatherings in spring, these cookies can be enjoyed with friends and loved ones while soaking up the sun.
FAQ
Conclusion
Milk Chocolate Stuffed Peanut Butter Bunny Cookies are not just a treat; they’re a delightful experience! Whether for a holiday or just a sweet craving, these cookies bring joy and fun to any gathering. I encourage you to try making them and share the love with your family and friends. You’ll be amazed at how quickly they disappear!

Milk Chocolate Stuffed Peanut Butter Bunny Cookies
Ingredients
Equipment
Method
- 1. Preheat the oven to 350 degrees F. Line a baking sheet with parchment paper.
- 2. In a large mixing bowl, cream together the butter, brown sugar, peanut butter, and vanilla until light and fluffy, about 2 minutes. Add the egg and mix until combined.
- 3. Add the 1 3/4 cup flour, baking soda, and salt. Beat until combined and the dough forms a ball. If the dough feels dry, add 1 tablespoon water. If the dough it too wet, add 1 tablespoon of flour until it comes together. Do not use more than 2 cups.
- 4. Generously flour your work surface. Divide the dough in half and flatten each half into a disk. Roll out the dough to 1/4 inch thickness. Make sure you're using enough flour or your dough will stick.
- 5. Cut out the cookies using a bunny cookie cutter. If you don't have a bunny, simply use a circle and make Easter Egg cookies. Using a spatula, transfer the cookies to a parchment-lined baking sheet. To half of the cookies, cut out a small oval at the top of the bunnies ears and 2 ovals at the bottom of the bunnies to create “feet” using a pairing knife.
- 6. Transfer the cookies to the oven and bake for 10-12 minutes, until lightly golden brown. Cool on the baking sheet for 5 minutes, then transfer to a wire cooling rack to cool completely.
- 7. Mix together the melted white chocolate and coconut oil, if using. Dip each of the cutout cookies in melted white chocolate and place on a parchment-lined baking sheet. Let the chocolate harden. Dust lightly with sugar, if desired.
- 8. To assemble, spread the melted milk chocolate over half of the cookies with no cutouts. Place the top white chocolate covered cookie over the milk chocolate, gently pressing to adhere. Transfer the remaining melted milk chocolate to a ziplock bag and snip a very small portion of the corner off the bag. Use the bag to draw on the eyes, nose, and whiskers. Let the chocolate harden at room temperature for 1 hour or for 15 minutes in the fridge.
- 9. To make Easter Eggs, cut the dough into circles and use your hands to gently shape the circle into an oval to make Easter Eggs. To decorate, draw on lines and dots with melted chocolate.
- 10. To make Cinnamon Sugar Cookies, as soon as the cookies come out of the oven, sprinkle them generously with cinnamon sugar. Once cool, you can shake off any excess sugar, then decorate as desired with melted chocolate.
Notes
- Cookie Cutter: this is the exact cookie cutter I am using.
- Storing: Cookies can be served immediately or let the chocolate firm up and store in an airtight container for up to 4 days.
- Glazing: If you'd like to glaze the cookies, skip using the white chocolate and instead, make a simple sugar glaze. In a medium bowl, beat together 2 cups powdered sugar, 1 tablespoon vanilla, and 1 tablespoon water until smooth and drizzly. If needed, thin the glaze by adding water, 1 tablespoon at a time, until drizzly.