Old Fashioned Custard Pie
The Old Fashioned Custard Pie has always been a cherished dessert in my family, evoking memories of cozy gatherings and warm conversations. I can still hear the laughter of my relatives as they gathered around the table, eagerly anticipating the first slice of this delicious pie. The creamy filling, combined with a perfectly baked crust, creates a combination that is simply irresistible. It’s the kind of dessert that brings everyone together, where each bite transports you back to those special moments shared with loved ones. I remember my grandmother meticulously preparing the ingredients, her gentle touch transforming simple items into a work of art. The sweet aroma wafting through the kitchen was just as comforting as the pie itself.
Whenever I make the Old Fashioned Custard Pie, I feel that same warmth and nostalgia flooding back. This pie is not just a recipe; it’s a piece of my family’s history, linked to countless joyous occasions. Whether it’s a holiday celebration or a casual weekend dinner, this pie fits perfectly into any setting, making it a timeless treat. The creamy custard filling, combined with subtle hints of nutmeg and cinnamon, is a flavor profile that resonates deeply with many. Every forkful is a reminder of love, patience, and the simple joys of home-cooked food. So, let’s roll up our sleeves and create this delightful dessert that holds so much meaning.
Recipe Snapshot
1 hr 15 mins
45 mins
30 mins
Medium
320 kcal
5g g
Gluten-Free, Low FODMAP
17g g
Oven, Mixing Bowl, Baking Sheet, Chef’s Knife, Food Processor, Frying Pan, Wooden Spoon, Whisk
The Beauty of This Old Fashioned Custard Pie
Tradition Meets Taste
What I love most about the Old Fashioned Custard Pie is its ability to blend tradition with taste. This recipe has been passed down through generations, each adding their little twist, yet the core flavors remain unchanged. There’s something about making it just like my grandmother did that makes me feel connected to my roots.
Perfect for Any Occasion
This pie is incredibly versatile! Whether it’s a festive gathering or a simple family dinner, the Old Fashioned Custard Pie is a crowd-pleaser. It’s a great way to bring a sense of comfort to any table, inviting everyone to indulge in its creamy goodness.
Filling and Flavorful
The custard filling of this pie is a delightful mix of textures and flavors. The creamy base, enriched with eggs and milk, creates a luscious experience with every bite. The subtle spices elevate the flavor, providing a warm and inviting scent that fills your kitchen.
Balance of Sweetness
This pie strikes the perfect balance between sweet and savory. The sugar in the custard filling complements the richness of the cream, while the hint of salt enhances the overall flavor without overpowering it. It’s sweet enough to satisfy your cravings without being cloying.
Perfect Pairing with Coffee
Imagine enjoying a slice of the Old Fashioned Custard Pie alongside a cup of freshly brewed coffee. The combination is simply magical, enhancing the flavors of both the pie and the beverage. This pairing is perfect for a cozy afternoon or as a delightful ending to a dinner party.
Easy to Prepare
Don’t be intimidated by the idea of making a custard pie. The steps are straightforward, making it accessible for both novice and experienced bakers. With a little patience, you can create a pie that looks and tastes like it came from a bakery!
What to Buy for Old Fashioned Custard Pie
When preparing the Old Fashioned Custard Pie, choosing the right ingredients is essential. They work in harmony to create the perfect blend of flavors and textures. The key components include fresh dairy products, eggs, and aromatic spices, all of which contribute to the pie’s creamy filling and delightful crust. Quality ingredients truly make a difference in achieving that homemade taste.
- 8 tablespoons unsalted butter at room temperature – This ingredient provides a rich flavor and helps create a flaky crust.
- 1/3 cup light brown sugar – Adds a subtle sweetness with a hint of caramel flavor.
- 1 large egg yolk – Enriches the custard mixture, helping to create a smooth texture.
- 1 teaspoon vanilla extract – Provides warmth and depth to the custard flavor.
- 1 1/2 cups all-purpose flour, spooned and leveled – The backbone of the crust, contributing to its structure.
- 3/4 cup rolled oats – Adds texture and a hearty quality to the crust.
- 1/4 teaspoon salt – Enhances the flavors of the other ingredients.
- 1 tablespoon water – Helps to bind the crust ingredients together.
- 4 large eggs – The star ingredient in the custard, contributing to its creamy consistency.
- 1 large egg yolk – For added richness in the custard mixture.
- 1¼ cups heavy cream – Creates a luxurious, creamy texture in the custard.
- 1¼ cups whole milk – Balances the richness of the heavy cream.
- 3/4 cup granulated sugar – Sweetens the custard perfectly.
- 2 teaspoons vanilla bean paste or extract – For an aromatic touch and beautiful specks throughout the custard.
- 1/4 teaspoon EACH ground nutmeg, ground cinnamon, fine sea salt – These spices add warmth and depth to the flavor profile.
- Pinch of ground cloves, or more to taste – Introduces a subtle spiciness to the filling.
- 1 cup pecans, finely chopped – Adds a delightful crunch and pairs beautifully with the custard.
- 1/3 cup packed light brown sugar – Enhances the sweetness and adds moisture.
- 2 tablespoons dark corn syrup – Provides a sticky sweetness that binds the pecan topping.
- 2 tablespoons unsalted butter – For richness in the topping.
- 1/4 teaspoon EACH sea salt, ground cinnamon, plus more to taste – For the perfect flavor balance in the topping.
- 2 tablespoons heavy cream – Adds creaminess to the topping mixture.
- 1/2 teaspoon vanilla extract – To flavor the topping.
- 1 tablespoon coarse sugar for topping – For a delightful crunchy finish.
Making This Old Fashioned Custard Pie
Making the Old Fashioned Custard Pie is easier than you might think! Follow these steps carefully, and you’ll have a delicious dessert that’ll impress your family and friends. Each step builds on the last, so don’t rush and enjoy the process of creating something truly special.
- Prep Custard Eggs: Start by cracking four large eggs and one egg yolk into a medium bowl. Allow them to sit at room temperature while you prepare the pie crust. This will help them mix better with the other ingredients later.
- Mix Ingredients: In the bowl of a stand mixer fitted with the paddle attachment, cream the unsalted butter and light brown sugar at medium speed for about two minutes until smooth and fluffy. Add the egg yolk and vanilla extract, mixing to combine. Scrape down the sides of the bowl, then add the all-purpose flour, rolled oats, and salt, mixing on low speed until everything is just combined. Don’t overmix! Add the water and mix again until the dough is smooth and cohesive.
- Form Crust: Lightly spray a standard 9-inch pie plate with nonstick cooking spray, or use a spray that contains flour. Press the dough evenly up the sides and into the bottom of the pie plate. Be careful not to compact the dough too much, or it may become difficult to remove later.
- Chill: Place the crust in the refrigerator and chill it for at least thirty minutes, or even overnight if you have the time. This step is crucial for achieving a flaky crust.
- Par-bake: Preheat your oven to 375 degrees F. As soon as you put the crust in the oven, start making the custard filling to ensure it can be added to a warm crust. Bake the crust without pie weights for about twelve to fifteen minutes, or until it’s lightly golden. A quiche pan will require only eight to ten minutes. Once baked, let the crust cool for about ten minutes.
- Oven: Reduce the oven temperature to 325 degrees F in preparation for baking the pie.
- Scald Milk: In a medium saucepan, combine the heavy cream and whole milk over medium-low heat. Warm it just until you see tiny bubbles forming around the edges, about two to three minutes. Remove from heat; you don’t want it to boil.
- Whisk Eggs and Sugar: While the milk is heating, whisk the eggs and the additional egg yolk in a medium bowl until combined. Gradually whisk in the granulated sugar, vanilla bean paste, and the spices including the ground nutmeg. This mixture should be even and well-distributed, adding the nutmeg at this stage or sprinkling it over the pie before baking, depending on your preference.
- Temper Eggs: To avoid scrambling the eggs, slowly drizzle one ladleful of the hot milk mixture into the egg mixture, whisking constantly. Repeat this process until the milk is fully incorporated, ensuring everything is well combined.
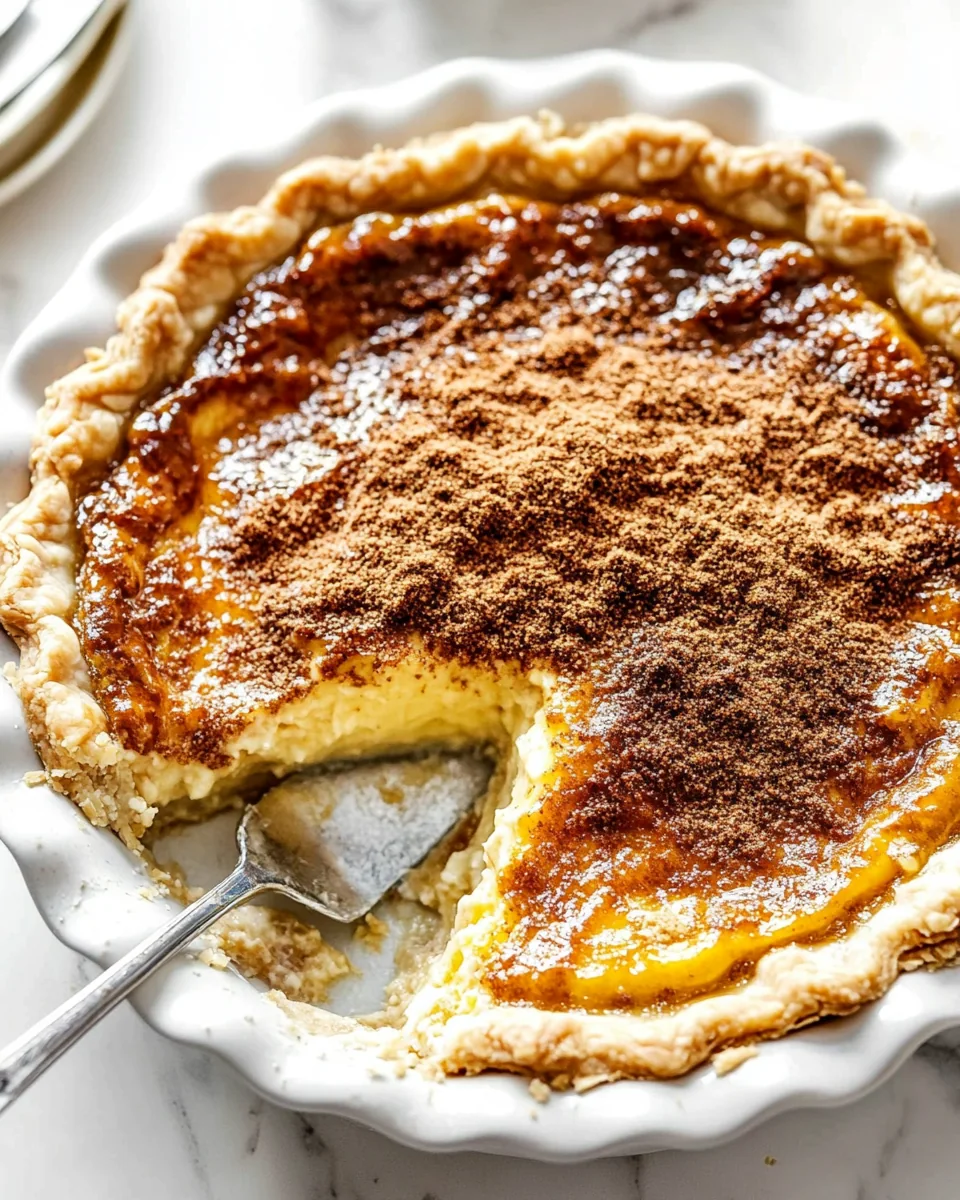
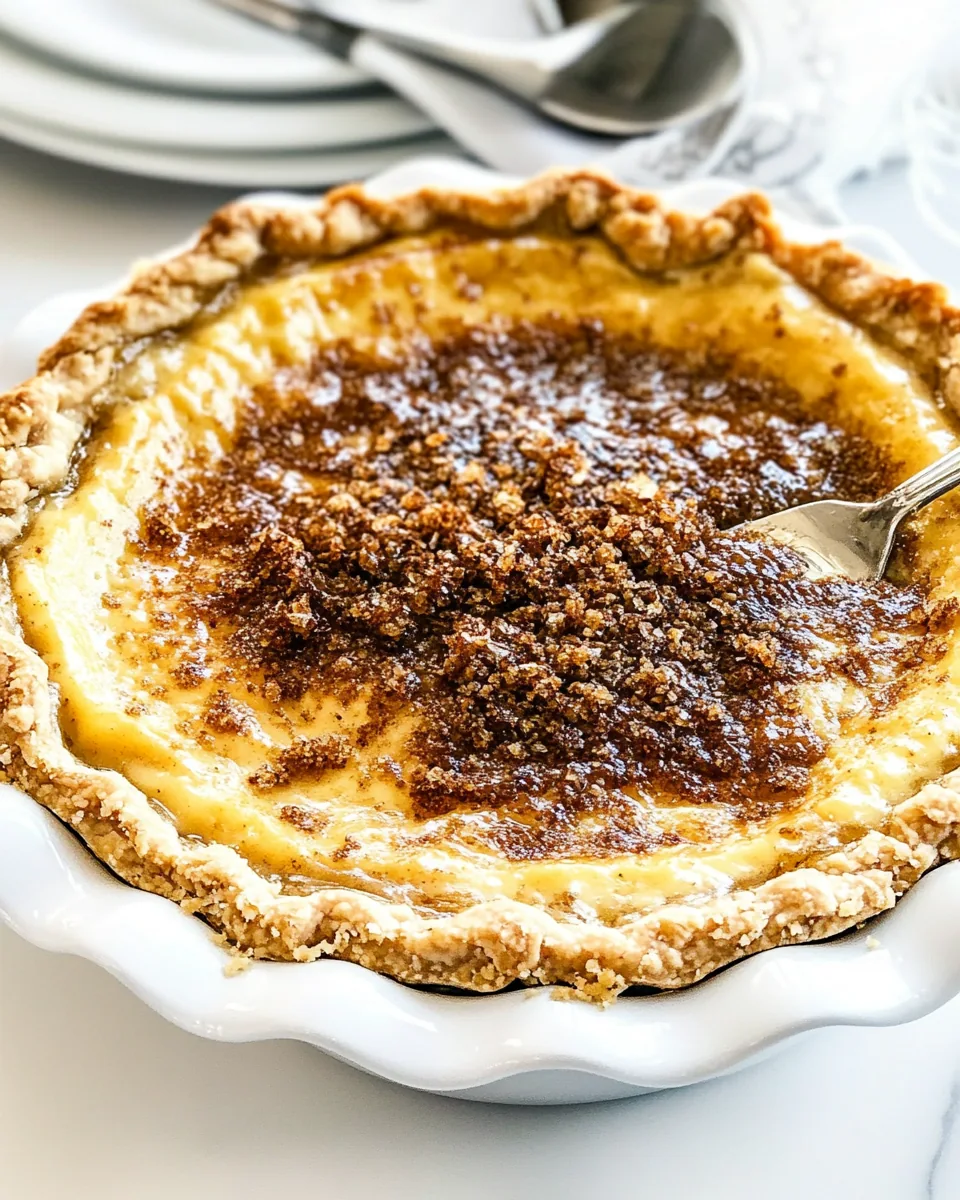
- Strain Custard: To achieve a silky-smooth custard, hold a fine mesh sieve over the warm pie crust and pour the custard filling through it. This will catch any coagulated egg specks that may have formed.
- Bake: Cover the edges of the pie shell with a pie shield or wrap lightly with aluminum foil to prevent over-browning. Bake the pie for forty to fifty-five minutes, starting to check at forty minutes. It’s done when an instant-read thermometer inserted into the center reads between 175 and 180 degrees F, the outer edges are set, but the center remains jiggly. Don’t be alarmed; the filling will continue to set as it cools. A knife inserted into the center should come out clean, but this can also indicate overbaking, so use the thermometer as your primary guide.
- Cool: Once baked, cool the pie on a wire rack for about two hours. Then refrigerate for at least four hours, but overnight is best for optimal flavor and texture.
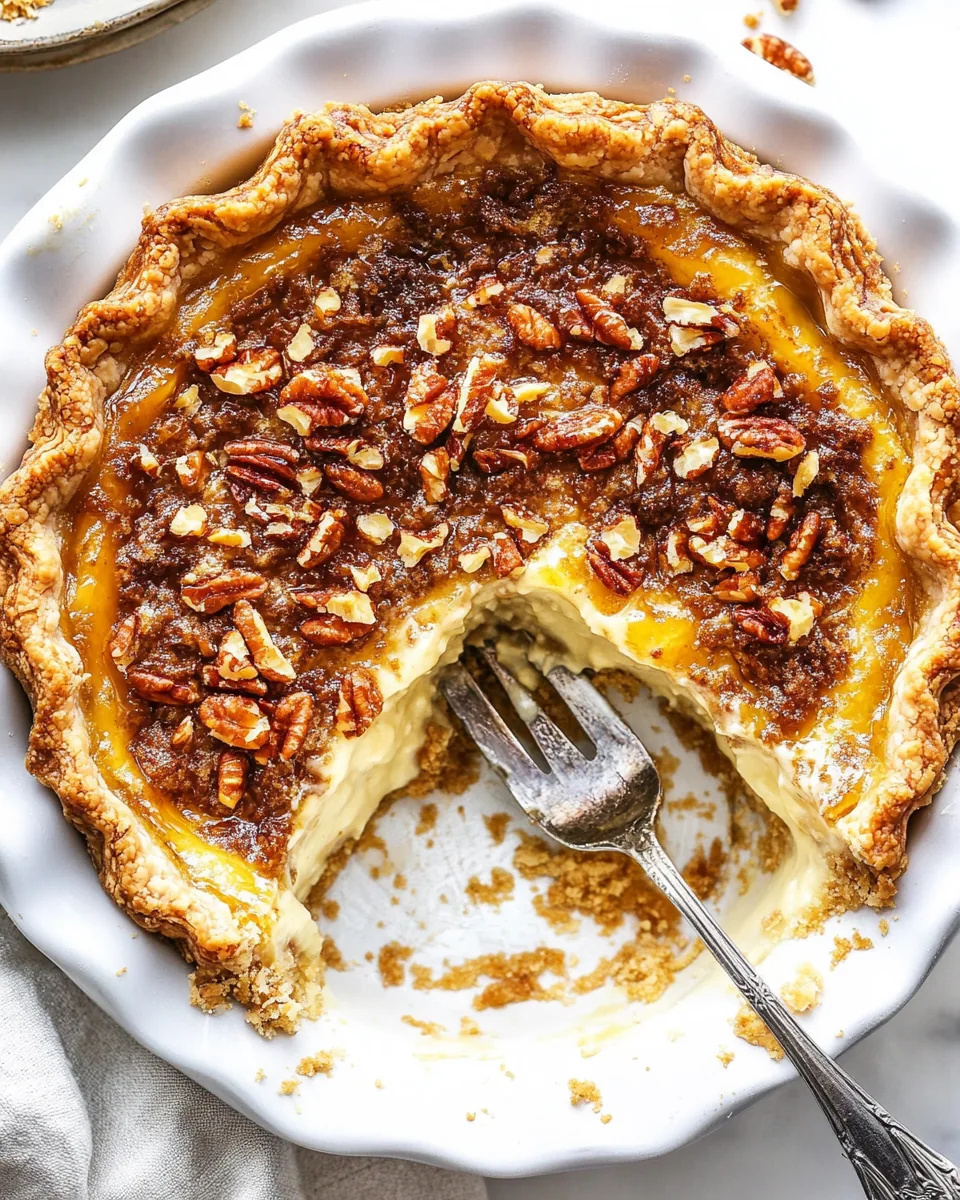
- Cook: To prepare the pecan topping, combine the chopped pecans, brown sugar, corn syrup, butter, salt, and cinnamon in a small saucepan. Cook over medium heat, stirring constantly, until the sugar and butter melt and form a sticky coating. Stir in the heavy cream and the vanilla extract until everything is well combined.
- Cool: After cooking, let the pecan mixture cool for about ten minutes before spreading it over the custard pie. Adjust the seasoning to your liking—feel free to add more salt or cinnamon to taste.
- Top: Finally, transfer the pecan topping to the pie and spread it as desired. Finish by sprinkling with one tablespoon of coarse sugar for that perfect crunch.
Things Worth Knowing
- Importance of Cooling: Always allow the pie to cool completely before refrigerating. This helps the custard to set properly and prevents excess moisture buildup.
- Oven Variations: Be aware that different ovens can yield different baking times. Keep an eye on the pie during the last few minutes to avoid overbaking.
- Using Fresh Ingredients: For the best results, use fresh eggs and high-quality dairy products. They significantly enhance the flavor and texture of the pie.
- Check Doneness: In addition to the thermometer, you can use a toothpick to check doneness. If it comes out clean, the pie is ready!
Substitutions and Tips
When working with the Old Fashioned Custard Pie, here are some helpful tips and substitutions to keep in mind to make the process easier and more flexible.
- Storage: Let the pie cool completely after baking. Once cooled, cover it with plastic wrap pressed against its surface and refrigerate for up to three days. Avoid freezing, as it can negatively affect the texture and flavor. Always bring it back to room temperature before serving for the best taste and consistency.
- Chill the Dough: If you have time, chilling the crust dough overnight can enhance its flavor and texture.
- Spices: Feel free to adjust the spices according to your taste. Adding more or less nutmeg or cinnamon can create a flavor that suits your palate.
- Enhancing Flavor: A splash of citrus zest (like lemon) can brighten the flavor of the custard if you want to add a refreshing twist.
- Pecan Topping Variations: You can substitute walnuts or almonds for the pecans if you prefer different nuts.
What to Pair With Old Fashioned Custard Pie
When it comes to serving the Old Fashioned Custard Pie, there are plenty of delicious pairings and occasions that can enhance your enjoyment:
- Coffee or Tea: A slice of this pie pairs wonderfully with a cup of freshly brewed coffee or tea, making it perfect for an afternoon treat.
- Whipped Cream: Top the pie with a dollop of freshly whipped cream to add an extra layer of creaminess.
- Ice Cream: Serve with a scoop of vanilla or caramel ice cream for a delightful dessert experience.
- Seasonal Fruits: Fresh berries, such as strawberries or raspberries, add a refreshing contrast to the richness of the pie.
- Special Occasions: This pie is a great choice for holiday gatherings, family reunions, or birthday celebrations, as it appeals to all ages.
- Storing Leftovers: If you have leftovers, store them in the refrigerator and enjoy them within three days for the best flavor.
FAQ
Conclusion
The Old Fashioned Custard Pie is truly a timeless classic that brings warmth and comfort to any table. Its rich custard filling and flaky crust make it a delightful treat for all occasions, whether it’s a family gathering or a quiet night at home. I encourage you to try making this pie yourself; it’s a wonderful way to create lasting memories and enjoy a slice of nostalgia with your loved ones.

Old Fashioned Custard Pie
Ingredients
Equipment
Method
- Prep Custard Eggs: Crack four large eggs and one egg yolk into a medium bowl. Let them sit at room temperature while you prepare the pie crust.
- Mix Ingredients: In the bowl of a stand mixer fitted with the paddle attachment, cream the unsalted butter and light brown sugar at medium speed for about two minutes until smooth and fluffy. Add the egg yolk and vanilla extract, mixing to combine. Scrape down the sides of the bowl, then add the all-purpose flour, rolled oats, and salt, mixing on low speed until everything is just combined. Don’t overmix! Add the water and mix again until the dough is smooth and cohesive.
- Form Crust: Lightly spray a standard 9-inch pie plate with nonstick cooking spray, or use a spray that contains flour. Press the dough evenly up the sides and into the bottom of the pie plate. Be careful not to compact the dough too much, or it may become difficult to remove later.
- Chill: Place the crust in the refrigerator and chill it for at least thirty minutes, or even overnight if you have the time. This step is crucial for achieving a flaky crust.
- Par-bake: Preheat your oven to 375 degrees F. As soon as you put the crust in the oven, start making the custard filling to ensure it can be added to a warm crust. Bake the crust without pie weights for about twelve to fifteen minutes, or until it’s lightly golden. A quiche pan will require only eight to ten minutes. Once baked, let the crust cool for about ten minutes.
- Oven: Reduce the oven temperature to 325 degrees F in preparation for baking the pie.
- Scald Milk: In a medium saucepan, combine the heavy cream and whole milk over medium-low heat. Warm it just until you see tiny bubbles forming around the edges, about two to three minutes. Remove from heat; you don’t want it to boil.
- Whisk Eggs and Sugar: While the milk is heating, whisk the eggs and the additional egg yolk in a medium bowl until combined. Gradually whisk in the granulated sugar, vanilla bean paste, and the spices including the ground nutmeg. This mixture should be even and well-distributed, adding the nutmeg at this stage or sprinkling it over the pie before baking, depending on your preference.
- Temper Eggs: To avoid scrambling the eggs, slowly drizzle one ladleful of the hot milk mixture into the egg mixture, whisking constantly. Repeat this process until the milk is fully incorporated, ensuring everything is well combined.
- Strain Custard: To achieve a silky-smooth custard, hold a fine mesh sieve over the warm pie crust and pour the custard filling through it. This will catch any coagulated egg specks that may have formed.
- Bake: Cover the edges of the pie shell with a pie shield or wrap lightly with aluminum foil to prevent over-browning. Bake the pie for forty to fifty-five minutes, starting to check at forty minutes. It’s done when an instant-read thermometer inserted into the center reads between 175 and 180 degrees F, the outer edges are set, but the center remains jiggly. Don’t be alarmed; the filling will continue to set as it cools. A knife inserted into the center should come out clean, but this can also indicate overbaking, so use the thermometer as your primary guide.
- Cool: Once baked, cool the pie on a wire rack for about two hours. Then refrigerate for at least four hours, but overnight is best for optimal flavor and texture.
- Cook: To prepare the pecan topping, combine the chopped pecans, brown sugar, corn syrup, butter, salt, and cinnamon in a small saucepan. Cook over medium heat, stirring constantly, until the sugar and butter melt and form a sticky coating. Stir in the heavy cream and the vanilla extract until everything is well combined.
- Cool: After cooking, let the pecan mixture cool for about ten minutes before spreading it over the custard pie. Adjust the seasoning to your liking—feel free to add more salt or cinnamon to taste.
- Top: Finally, transfer the pecan topping to the pie and spread it as desired. Finish by sprinkling with one tablespoon of coarse sugar for that perfect crunch.
Notes
- Storage: Let the pie cool completely after baking. Once cooled, cover it with plastic wrap pressed against its surface and refrigerate for up to three days. Avoid freezing, as it can negatively affect the texture and flavor. Always bring it back to room temperature before serving for the best taste and consistency.