Buckeye Balls
When I think of sweet treats that bring joy, Buckeye Balls instantly comes to mind. Growing up, my family had a special tradition of making these delightful little snacks during the holidays. The creamy blend of peanut butter and butter, dipped in rich chocolate, creates a nostalgic flavor that transports me back to my childhood kitchen, filled with laughter and the sweet aroma of treats baking. Every bite of these Buckeye Balls is a reminder of the love and warmth of family gatherings. Whether I’m making them for a festive occasion or just to satisfy a sweet craving, these little balls of joy never fail to bring a smile to my face.
Recipe Snapshot
25 mins
25 mins
0 mins
Medium
150 kcal
3 g
Keto, Vegan, Gluten-Free
7 g
Mixing Bowl, Wooden Spoon
What Makes This Buckeye Balls Special
Easy to Make
One of the biggest reasons I adore Buckeye Balls is how simple they are to prepare. You don’t need any fancy equipment or complicated techniques. Just a few basic ingredients and a little love will do the trick. It’s a great recipe for those who may not have much baking experience but want to impress family and friends.
Versatile Variations
Another reason to love this recipe is its versatility. You can customize your Buckeye Balls to fit any occasion. Want a festive touch for a holiday party? You can sprinkle them with colored sugar or drizzle with white chocolate. For a fun summer treat, add some crushed nuts or a pinch of sea salt. The possibilities are endless!
Perfect for Sharing
These little bites are a hit at gatherings. Whether it’s a birthday party, holiday celebration, or a simple get-together, Buckeye Balls are always a crowd-pleaser. They’re easy to serve, and everyone loves the combination of peanut butter and chocolate. I often find myself sharing them with neighbors and friends, and they always ask for the recipe!
Great for Any Season
No matter the time of year, Buckeye Balls fit right in. They are perfect for Christmas, New Year’s, or even a casual summer BBQ. Their rich flavor and delightful texture are always welcomed, making them a year-round favorite.
Child-Friendly Fun
Making Buckeye Balls is a great activity to do with kids. They can help mix the ingredients, scoop the dough, and roll them into balls. Plus, the joy on their faces when they dip the balls in chocolate is priceless! It’s a fun way to create memories while whipping up something delicious together.
Deliciously Addictive
Lastly, I must mention how utterly addictive these treats are. Once you take a bite, it’s hard to stop. The creamy peanut butter center encased in crunchy chocolate is a combination that just can’t be beat. Be careful; you may find yourself going back for seconds!
Ingredients You’ll Need for Buckeye Balls
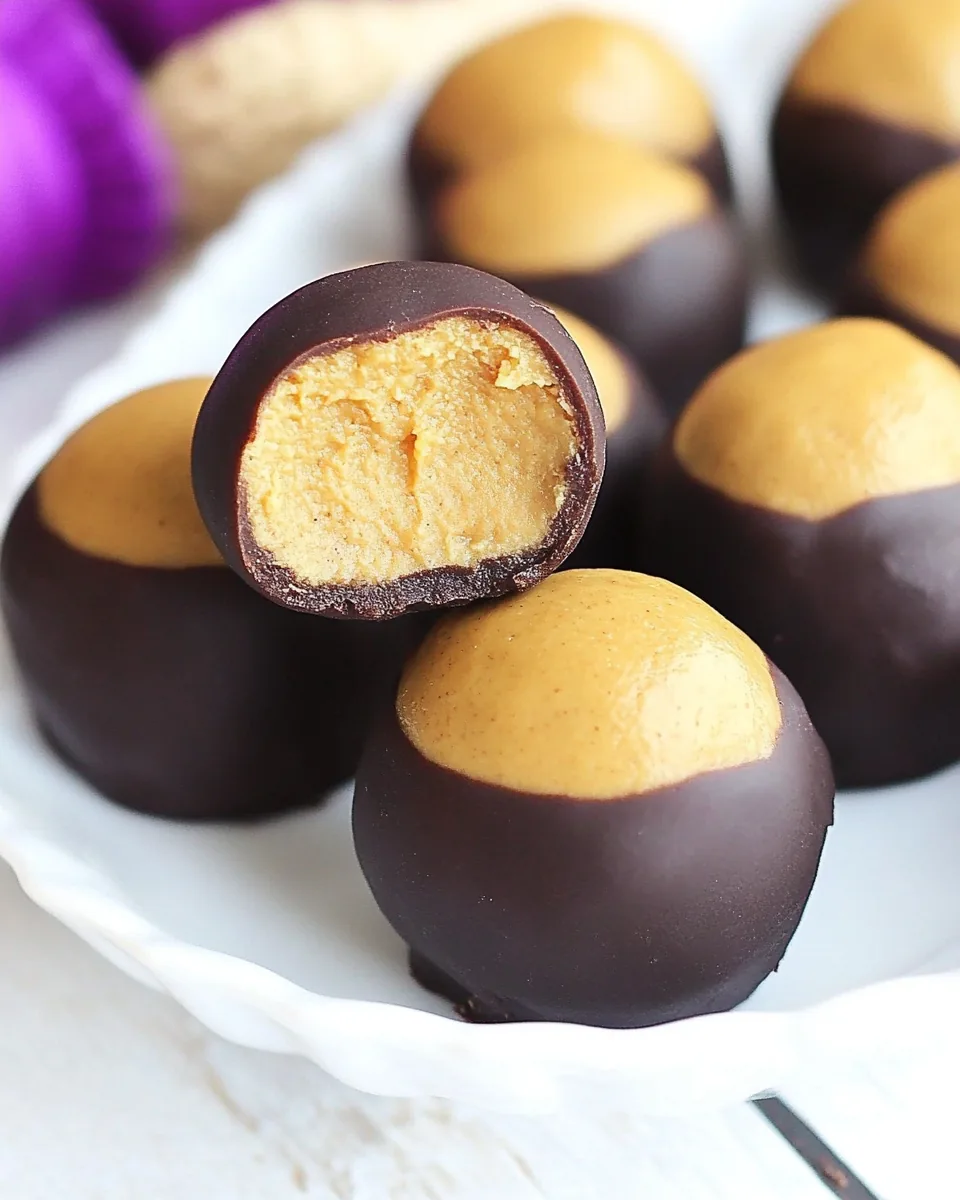
The ingredients for Buckeye Balls are straightforward yet work together perfectly to create an irresistible treat. The star of the show is, of course, the creamy peanut butter, which provides a rich, nutty base. Combined with butter and powdered sugar, you achieve a smooth, sweet filling that pairs beautifully with melted chocolate.
- 1½ cups creamy peanut butter (Jif) – The main ingredient providing that signature flavor and creaminess.
- ½ cup melted butter (equal to 1 stick) – Adds richness and helps bind the filling.
- 2½ cups powdered sugar (more as needed) – Sweetens the mixture and gives it a delightful texture.
- 12 oz. chocolate chips – Used for dipping, melting into a luxurious coating for the balls.
Recipe Steps for Buckeye Balls
Making Buckeye Balls is a delightful and rewarding process. Each step builds anticipation for that first taste of these decadent treats. Let’s dive into the simple steps that will lead you to your very own batch of these delicious bites.
- Start by preparing your workspace. Line a baking sheet with wax paper or parchment paper and set it aside. This will be where your Buckeye Balls will rest and harden after dipping.
- Next, in a medium mixing bowl, combine the creamy peanut butter, melted butter, and powdered sugar. Use a spatula or a hand mixer to blend the ingredients together until they are well combined and smooth. You’re looking for a creamy consistency that holds together but isn’t too sticky.
- Once your mixture is ready, it’s time to scoop. Using a tablespoon portion scoop, take a generous portion of the mixture and use your hands to roll it into a smooth ball. Aim for a uniform size, about 1 inch in diameter, and place these balls onto your prepared baking sheet.
- After forming all your balls, they need to chill. Place the baking sheet in the freezer and let the balls freeze for one hour, or overnight if you prefer. This step is crucial as it helps the filling firm up, making it easier to dip in chocolate.
- While your balls are freezing, prepare the chocolate coating. Place the chocolate chips in a microwave-safe bowl and heat them in the microwave. Start at 50% power for 60 seconds, stirring well after each interval until the chocolate is completely melted and smooth.
- Once the chocolate is melted, take your frozen Buckeye Balls out of the freezer. Line another baking sheet or cutting board with wax paper as well. This will be for the dipped balls.
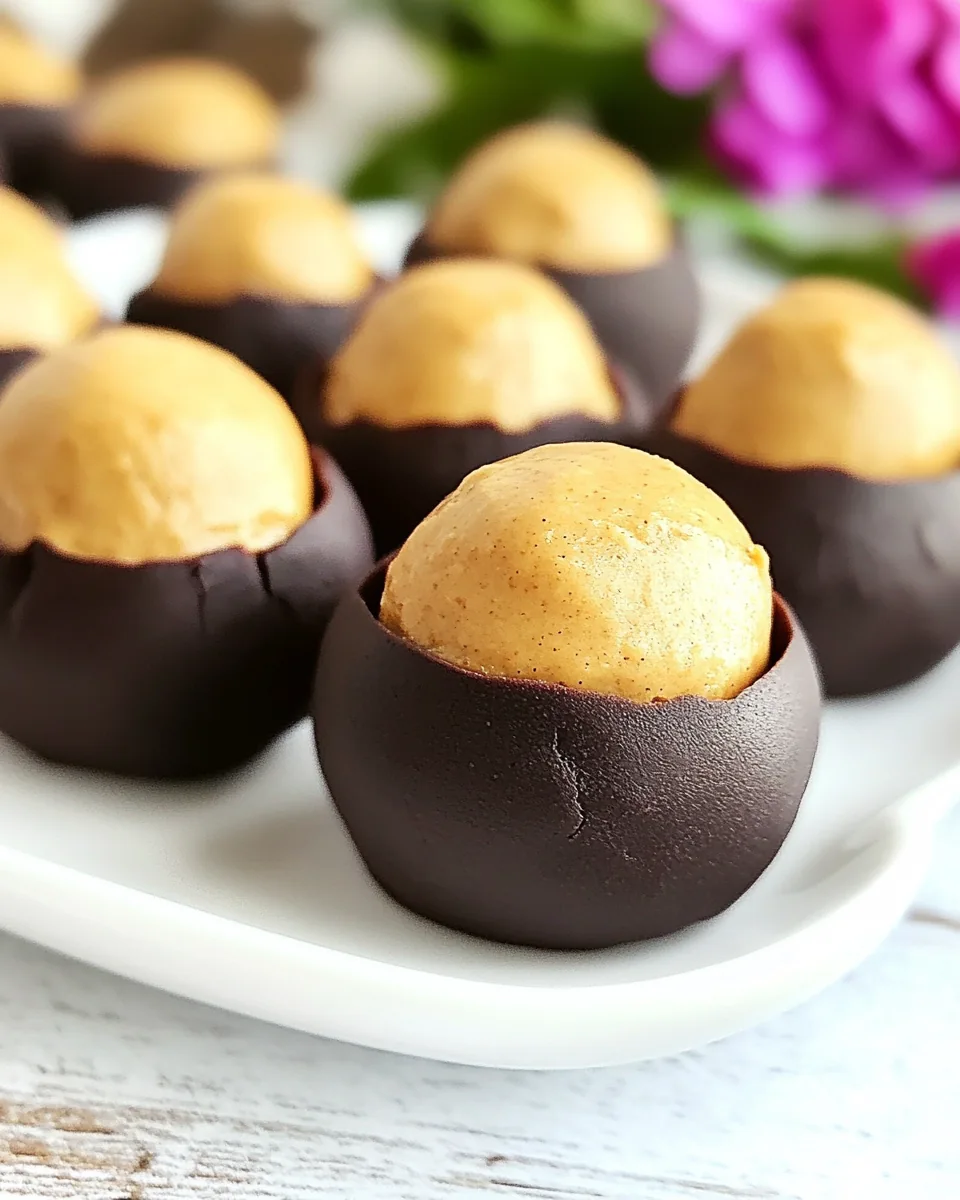
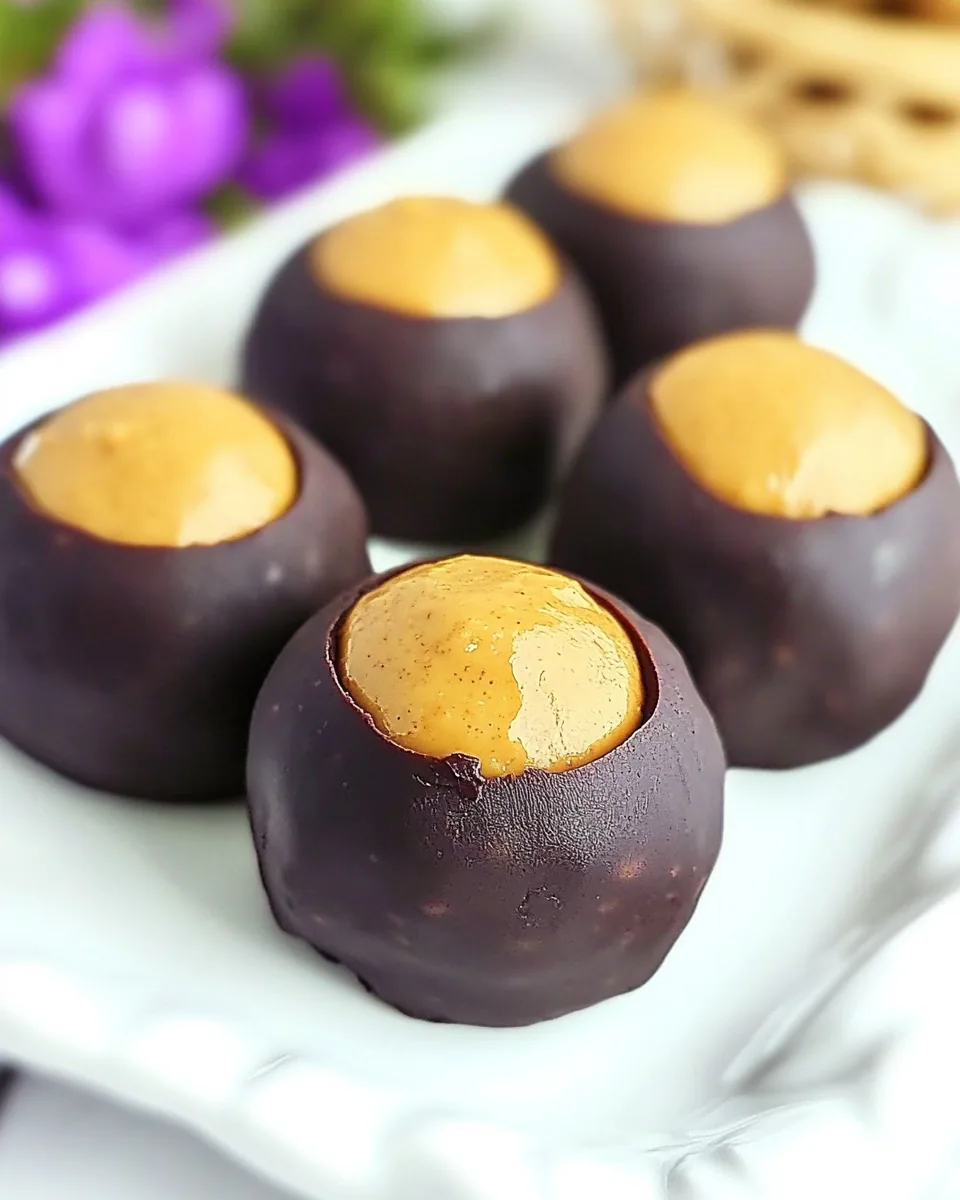
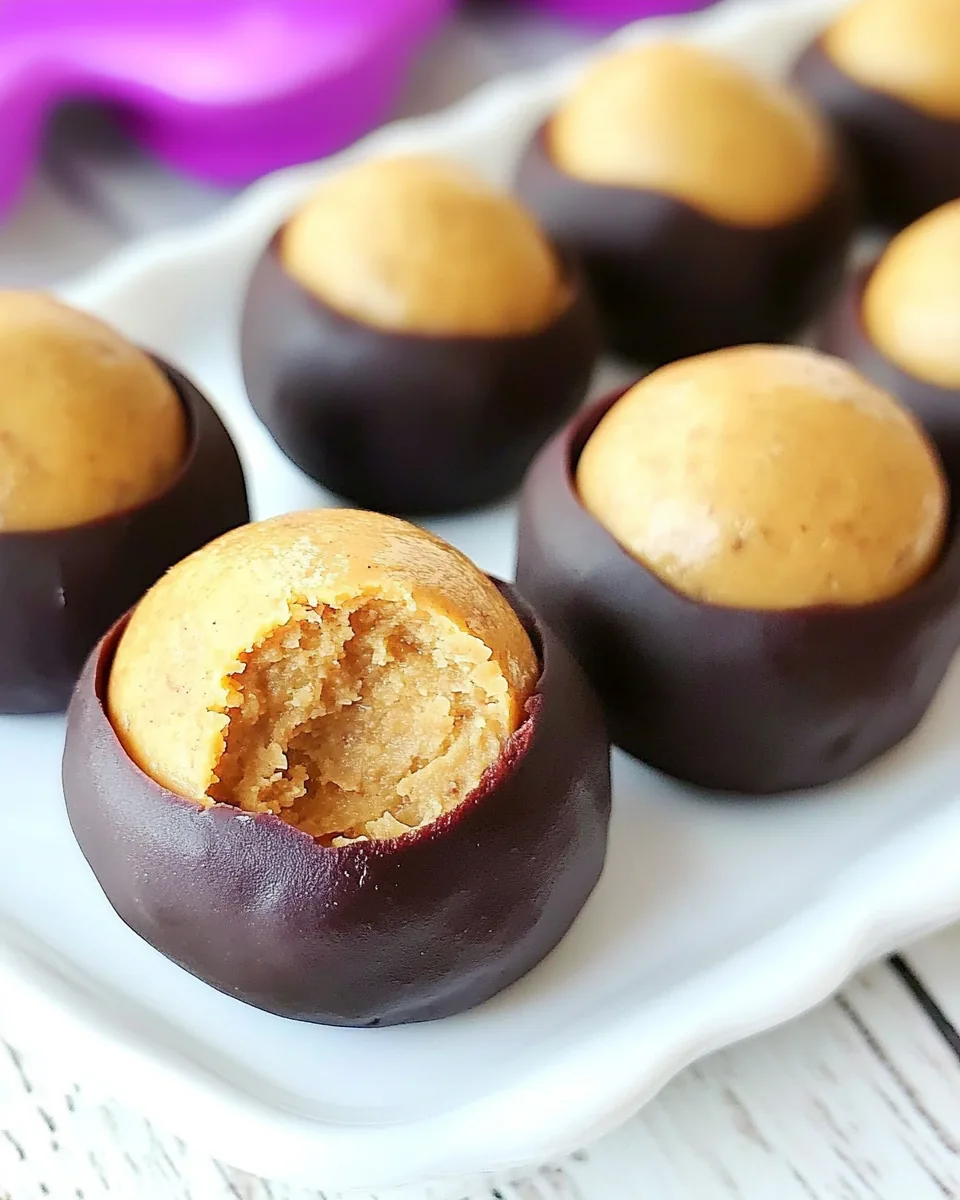
- Now the fun part begins! Using a fork or toothpick, dip each ball into the melted chocolate. Aim to immerse about two-thirds of the ball, letting any excess chocolate drip back into the bowl. This is where skill comes in; you want a nice coating without overwhelming the filling.
- Carefully place your dipped Buckeye Balls onto the prepared baking sheet. Repeat this process until all the balls are coated in chocolate.
- Finally, let the Buckeye Balls sit at room temperature until the chocolate hardens, or you can pop them in the fridge to speed up the process. Once set, they’re ready to enjoy!
- And there you have it, your final product! These Buckeye Balls are not only visually appealing but also taste absolutely divine. Remember, they make approximately 40 balls, depending on how large you decide to roll them.
Things Worth Knowing
- Chilling is Key: Make sure to freeze the balls long enough to maintain their shape during dipping.
- Chocolate Tempering: For a glossy finish, temper the chocolate before dipping.
- Mixing Technique: When combining ingredients, avoid overmixing to keep the texture just right.
- Storage Tips: Store in an airtight container in the fridge for optimal freshness.
Recipe Tips about Buckeye Balls
If you’re ready to create your own Buckeye Balls, here are some helpful tips to ensure your success and enjoyment:
- Storage: These treats can be stored in an airtight container in the refrigerator for up to two weeks. Be sure to separate layers with wax paper to prevent them from sticking together.
- Freezing: Yes, you can freeze Buckeye Balls! Just place them in a single layer on a baking sheet until frozen, then transfer to a freezer-safe container. They can last up to three months in the freezer.
- Pairing: Serve alongside a cold glass of milk or a cup of coffee for a delicious pairing. The creamy texture complements a variety of drinks.
- Variations: Consider rolling the balls in crushed nuts or sprinkles before the chocolate hardens for added flavor and texture.
- Gifting: Buckeye Balls make a perfect homemade gift. Package them in festive boxes for friends and family during the holidays!
- Portion Sizes: For smaller bite-sized versions, you can roll the balls smaller than the standard size. Just reduce the freezing time accordingly.
Serving This Buckeye Balls
- Ideal for Parties: Buckeye Balls are a fantastic addition to parties, potlucks, and gatherings. Their bite-sized nature makes them perfect finger food.
- Seasonal Celebrations: Serve these treats during holiday celebrations like Christmas, Halloween, or even birthdays. They’re sure to delight guests of all ages!
- Presentation: Arrange these balls on decorative platters or in clear jars for beautiful displays. You can even garnish with seasonal toppings for added flair.
- Storage for Later: If you have leftovers, you can store them in the fridge. They actually taste better the next day as the flavors meld together.
- Customization: Experiment with various chocolate coatings or toppings to reflect the season or occasion. Think about using festive sprinkles or drizzles for an added touch.
- Personal Touch: Consider adding a handwritten recipe card when gifting these treats to share the love and joy of making them.
FAQ
Conclusion
In conclusion, Buckeye Balls are a deliciously indulgent treat that combines the rich flavors of peanut butter and chocolate. Their simplicity and versatility make them perfect for any occasion, whether it’s a festive celebration or a cozy night in. I encourage you to try making these delightful snacks and experience the joy they bring to any gathering or personal treat. Once you’ve tasted them, you’ll understand why they’re a favorite in so many households!
Buckeye Balls
Ingredients
Equipment
Method
- Start by preparing your workspace. Line a baking sheet with wax paper or parchment paper and set it aside. This will be where your Buckeye Balls will rest and harden after dipping.
- Next, in a medium mixing bowl, combine the creamy peanut butter, melted butter, and powdered sugar. Use a spatula or a hand mixer to blend the ingredients together until they are well combined and smooth. You’re looking for a creamy consistency that holds together but isn’t too sticky.
- Once your mixture is ready, it’s time to scoop. Using a tablespoon portion scoop, take a generous portion of the mixture and use your hands to roll it into a smooth ball. Aim for a uniform size, about 1 inch in diameter, and place these balls onto your prepared baking sheet.
- After forming all your balls, they need to chill. Place the baking sheet in the freezer and let the balls freeze for one hour, or overnight if you prefer. This step is crucial as it helps the filling firm up, making it easier to dip in chocolate.
- While your balls are freezing, prepare the chocolate coating. Place the chocolate chips in a microwave-safe bowl and heat them in the microwave. Start at 50% power for 60 seconds, stirring well after each interval until the chocolate is completely melted and smooth.
- Once the chocolate is melted, take your frozen Buckeye Balls out of the freezer. Line another baking sheet or cutting board with wax paper as well. This will be for the dipped balls.
- Now the fun part begins! Using a fork or toothpick, dip each ball into the melted chocolate. Aim to immerse about two-thirds of the ball, letting any excess chocolate drip back into the bowl. This is where skill comes in; you want a nice coating without overwhelming the filling.
- Carefully place your dipped Buckeye Balls onto the prepared baking sheet. Repeat this process until all the balls are coated in chocolate.
- Finally, let the Buckeye Balls sit at room temperature until the chocolate hardens, or you can pop them in the fridge to speed up the process. Once set, they’re ready to enjoy!
- And there you have it, your final product! These Buckeye Balls are not only visually appealing but also taste absolutely divine. Remember, they make approximately 40 balls, depending on how large you decide to roll them.
Notes
- Tip 1: Christmas Holiday Party: regular chocolate with red/green sprinkles
- Tip 2: New Years: white chocolate with edible gold sprinkle stars
- Tip 3: Valentine’s Day: white chocolate with pink sprinkles
- Tip 4: Fourth of July: white chocolate with red and blue sprinkles