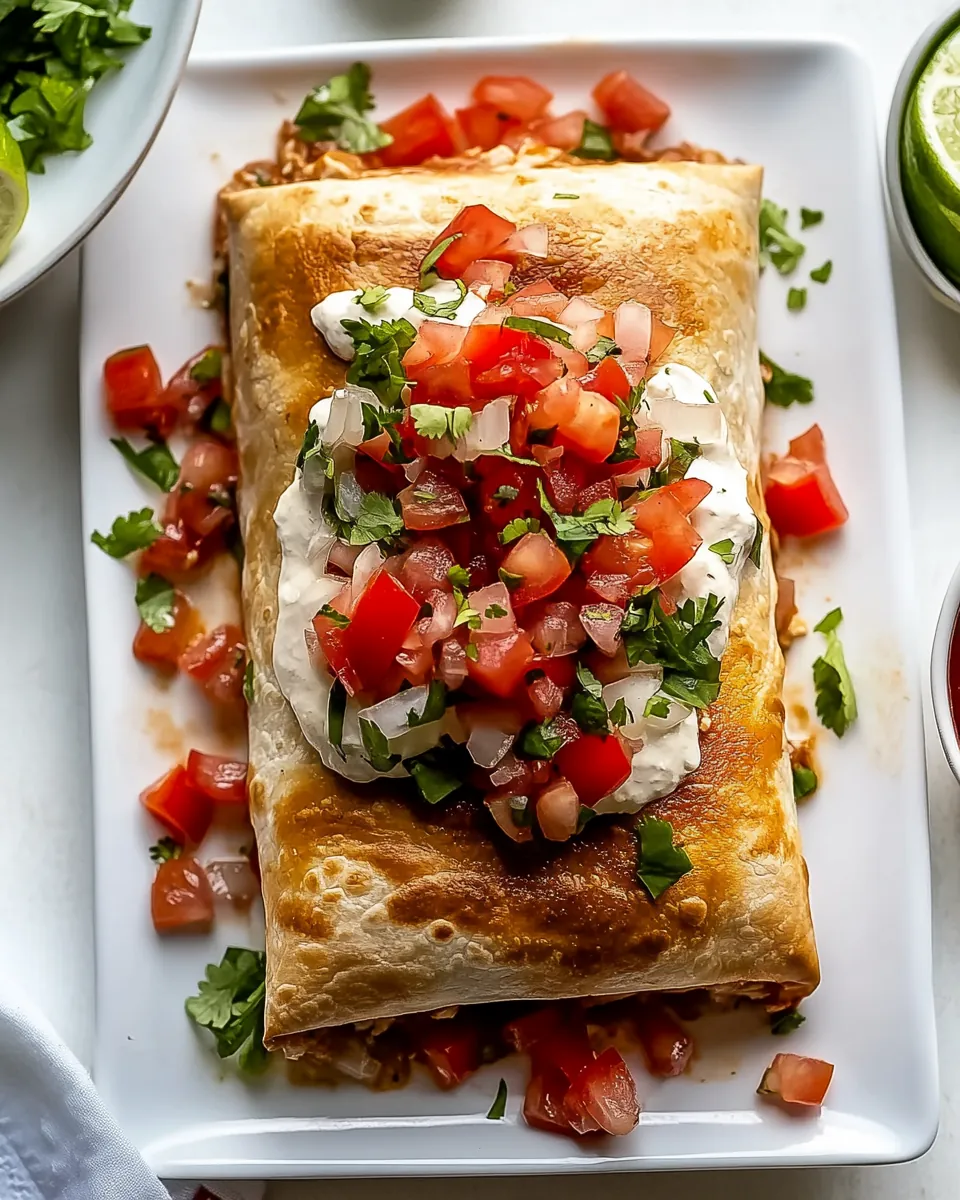
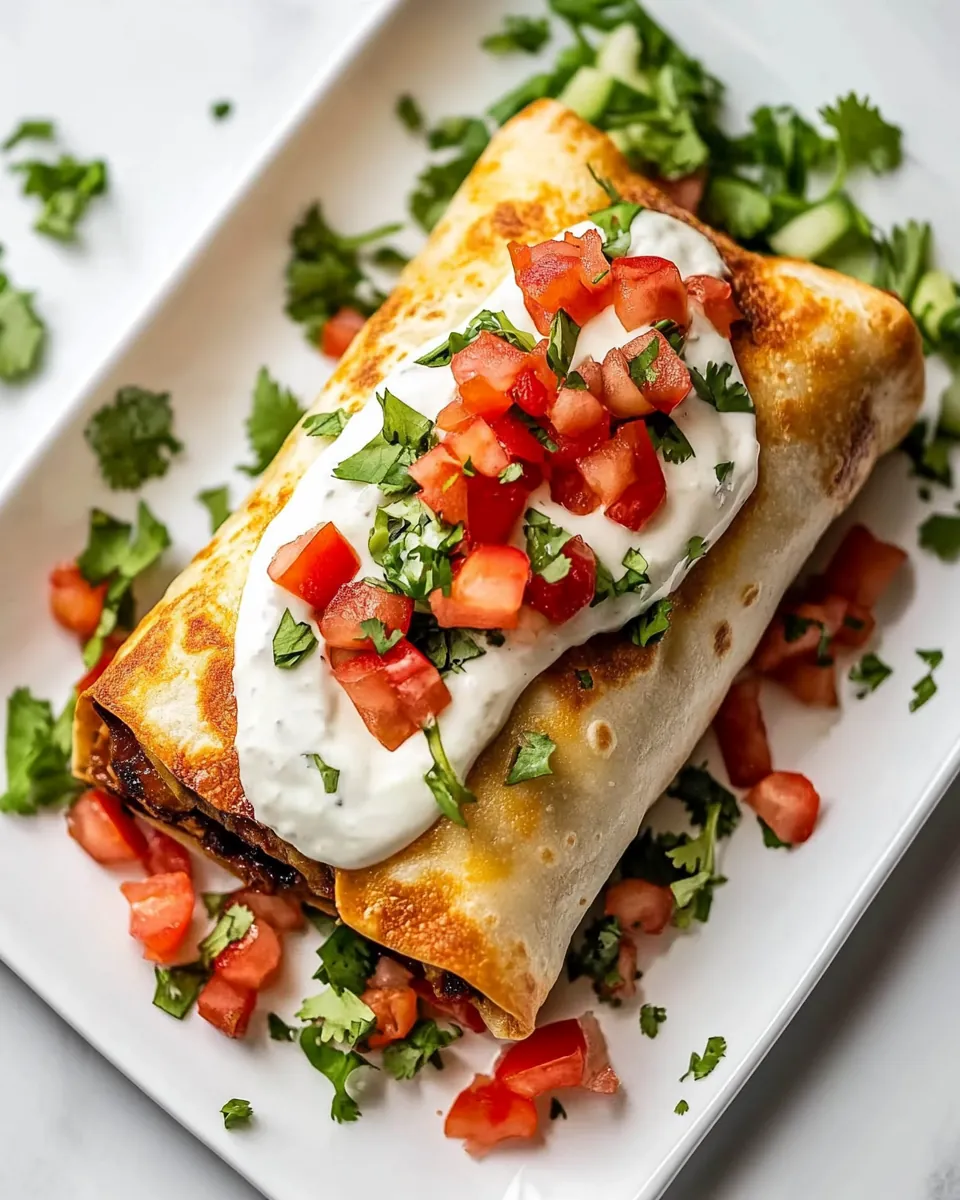
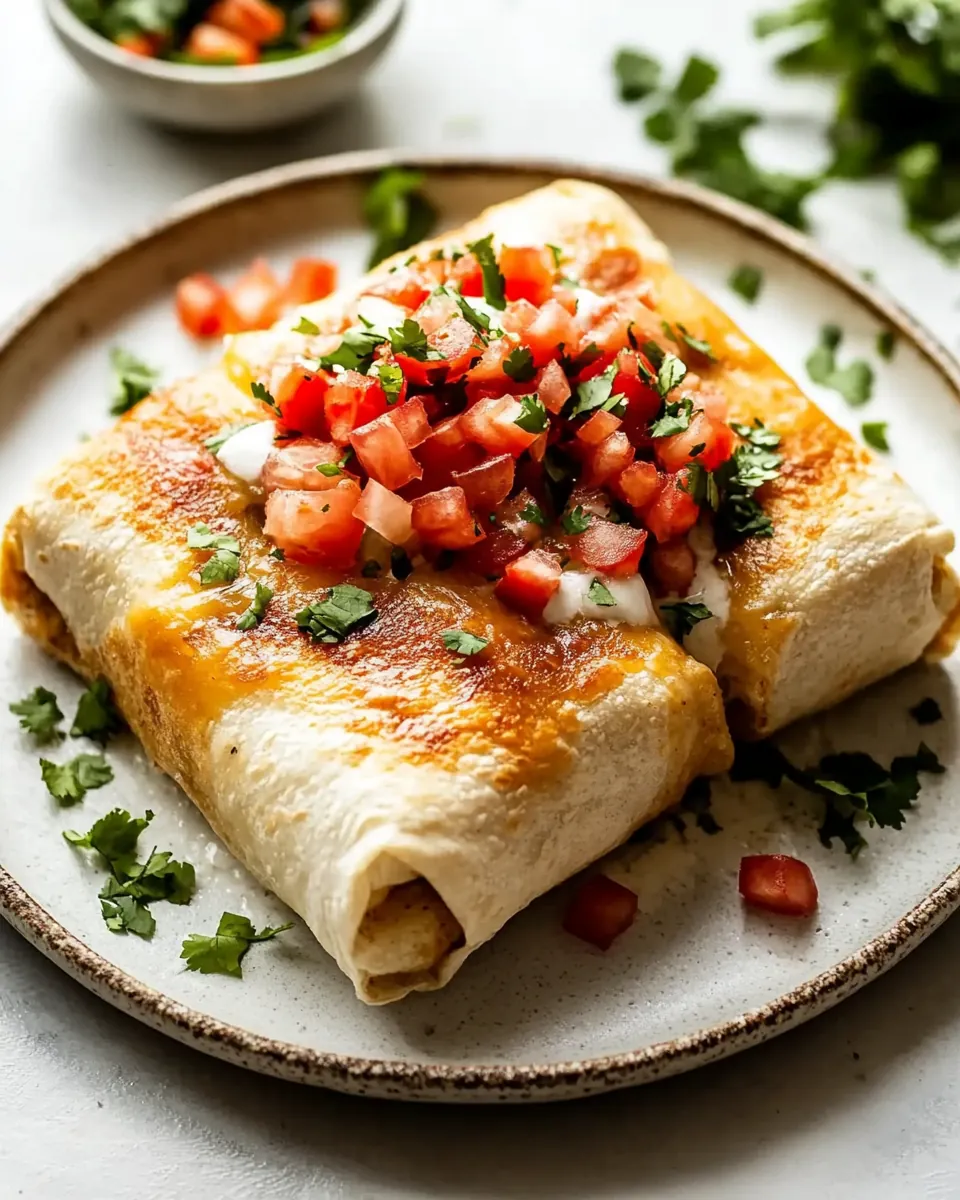
Baked Chicken Chimichangas
When it comes to comfort food, nothing quite beats Baked Chicken Chimichangas. I remember the first time I made these delicious parcels of goodness. It was a cozy weekend, and I had a craving for something crispy and filled with flavor. As I gathered my ingredients, the anticipation built; I could already imagine biting into that crunchy exterior, revealing a warm and savory filling. This dish has become a staple in my home, perfect for family dinners or a gathering with friends. The best part? They’re baked, not fried, making them a lighter option without sacrificing any flavor.
Recipe Snapshot
25 mins
5 mins
20 mins
Medium
350 kcal
20 g
Gluten-Free, Low FODMAP
15 g
Wooden Spoon, Saucepan, Frying Pan, Oven, Mixing Bowl, Chef’s Knife, Baking Sheet
What Makes This Baked Chicken Chimichangas Special
They’re Healthier Than You Think
The beauty of Baked Chicken Chimichangas lies in the baking process itself. Instead of frying, which can add unnecessary grease, baking allows the tortillas to crisp up beautifully while keeping the filling moist and flavorful. You still get that satisfying crunch without the added guilt.
Great for Meal Prep
If you’re someone who likes to plan their meals ahead, these chimichangas are perfect. You can prepare a batch over the weekend, freeze them, and simply bake them when you’re ready to enjoy a hearty meal. They reheat wonderfully, making them an ideal candidate for busy weeknights.
Customizable to Your Taste
One of the reasons I adore this recipe is its versatility. You can easily swap out the ingredients based on what you love or have on hand. Want to add some beans for extra protein? Go for it! Prefer to use a different type of cheese? That works too!
A Crowd-Pleaser
Whenever I serve Baked Chicken Chimichangas, they’re always a hit! Friends and family rave about the delicious flavors, and they often ask for seconds. It’s a fantastic dish to impress your guests, and it doesn’t take a culinary expert to make them.
Perfect for Any Occasion
Whether it’s a cozy family dinner, game day, or even a festive gathering, these chimichangas fit right in. You can serve them with a variety of toppings and sides, making them suitable for any celebration. Plus, they’re easy to eat, which is a bonus for social situations.
They’re Fun to Make
Finally, making Baked Chicken Chimichangas is just plain fun! Wrapping tortillas and stuffing them with all those delicious ingredients is a great way to involve the whole family. Kids love helping out, and it fosters a sense of togetherness in the kitchen.
Ingredient List for Baked Chicken Chimichangas
The ingredients for Baked Chicken Chimichangas come together beautifully, each one playing an important role in the dish. The star is undoubtedly the chicken, which brings protein and heartiness. Combined with salsa, and spices like cumin and oregano, these elements create a flavorful filling that pairs perfectly with the crispy tortillas. The addition of cheese adds a delicious creaminess that ties all the flavors together. Let’s look at these ingredients more closely:
- 1 ½ cups chicken, cooked and shredded – This is the primary protein source, bringing in flavor and texture.
- ⅔ cup salsa – Adds a wonderful zest and moisture to the filling.
- 1 ½ teaspoons ground cumin – Offers warmth and depth of flavor.
- 1 teaspoon dried oregano – A classic herb that complements the other spices.
- 2 tablespoons canola or vegetable oil, divided – Used for brushing the tortillas to achieve that golden-brown finish.
- 1 (5.4-ounce) package Knorr® Fiesta Sides™ – Spanish Rice – Provides additional flavor and substance to the filling.
- 1 ¼ cups colby jack cheese, shredded – Melts perfectly and brings creaminess.
- 4 flour tortillas, burrito sized – The vessel that holds all the deliciousness.
Making Baked Chicken Chimichangas
Ready to create some mouthwatering Baked Chicken Chimichangas? Follow these simple steps, and you’ll have a delicious meal ready to impress. The process is straightforward and allows for some creativity, so let’s dive in!
Preheat your oven to 425°F. This is an essential step for achieving that perfect golden brown exterior. A hot oven ensures the tortillas crisp up nicely while the filling heats through.
In a large bowl, combine the cooked, shredded chicken with the salsa, cumin, and oregano. Mix everything until well combined. You’ll notice the salsa turning the chicken a lovely red hue, and the spices will begin to infuse their flavors.
Prepare your Knorr® Fiesta Sides™ rice according to package directions. Usually, this involves covering and simmering for about 7 minutes. When it’s ready, remove it from the heat. The rice will be fluffy and flavorful, a great addition to the chimichangas.
Once the rice is cooked, stir it into the chicken mixture along with the cheese. The cheese will melt slightly with the warmth from the mixture, creating a creamy filling that binds everything together.
Now, take your flour tortillas and divide the filling evenly among them. Be generous, but make sure you can still fold the tortillas without them bursting. Once filled, wrap them tightly and place them seam-side down on a lined baking sheet.
Brush the tops of the chimichangas with the remaining canola or vegetable oil. This will help them achieve that beautiful golden-brown color as they bake.
Bake in the preheated oven for about 20 minutes or until they are golden brown and crispy. Keep an eye on them; you want a lovely crunch, but you don’t want them to burn!
Once they’re out of the oven, allow them to cool for a few minutes. This will make it easier to handle them without burning your fingers. The aroma will be mouthwatering!
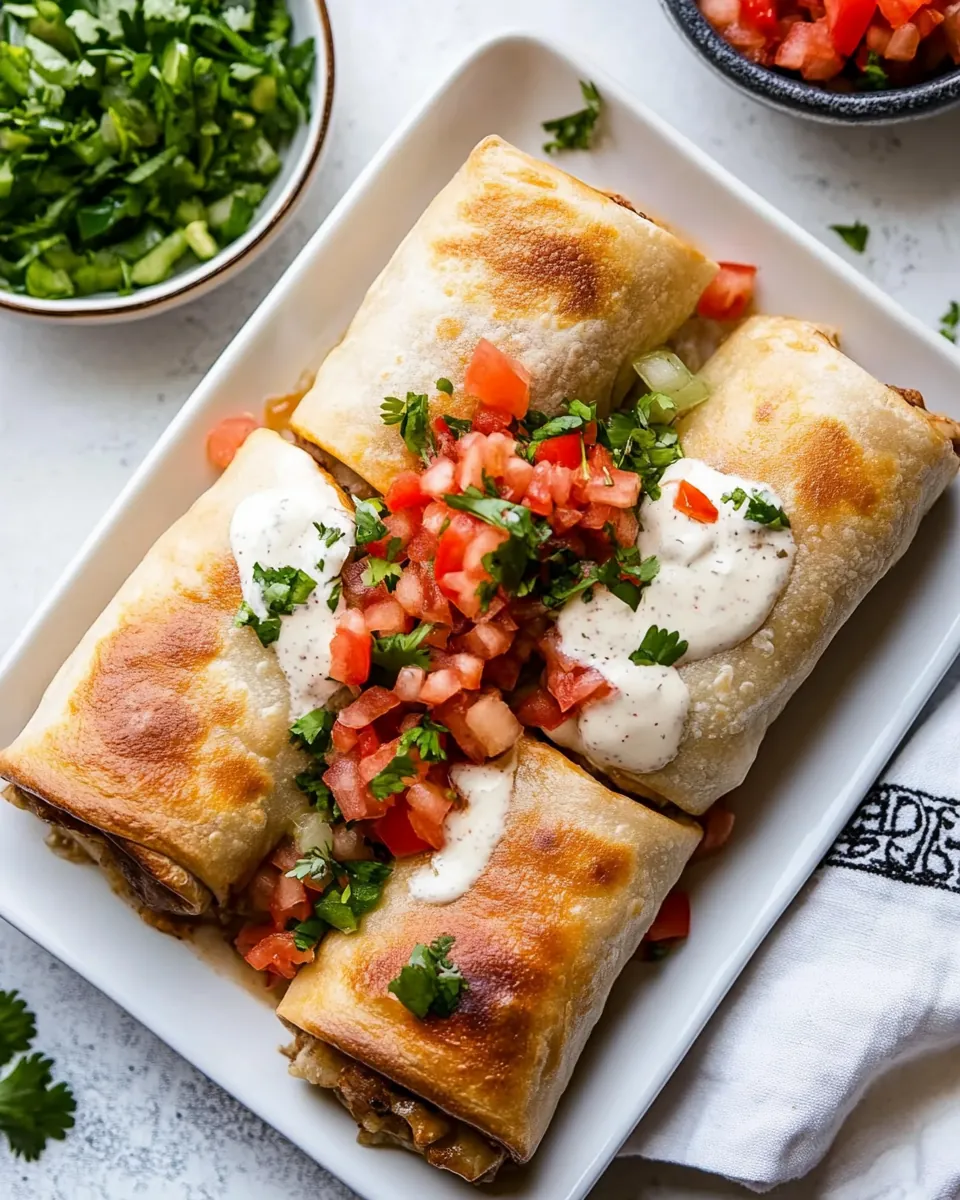
Serve the Baked Chicken Chimichangas with your favorite toppings like shredded cheese, sour cream, chopped tomato, cilantro, green onion, lettuce, salsa, guacamole, and lime wedges. Get ready for a flavor explosion!
Things Worth Knowing
- Finely shred the chicken: This technique allows the chicken to blend seamlessly with the rice and cheese, ensuring a unified flavor in every bite.
- Homemade rice: Instead of using packaged rice, you can easily make your own for a fresher taste. If you have leftover rice, that works perfectly, too!
- Frying option: For those who love a little extra crisp, consider frying the chimichangas in oil after they’ve been assembled. They can be fried at 400°F for about 8 minutes for a delightful crunch.
- Baking from frozen: If you decide to freeze these beauties, bake them at 400°F. Start with foil covering for the first 20 minutes, then uncover and bake for another 10 to 15 minutes until crispy.
- Reheating tips: For the best results when reheating, place them on a rack in the oven. This keeps the chimichangas crispy, rather than soggy.
Ways to Adapt This Recipe
There’s always room to personalize Baked Chicken Chimichangas. Here are some fantastic tips to consider:
- Storage: Store leftovers in an airtight container in the refrigerator for up to 3 days. Reheat in the oven to maintain crispiness.
- Freezing: You can freeze the assembled but unbaked chimichangas. Just wrap them well in plastic wrap and foil. Bake from frozen when you’re ready to enjoy.
- Pairing: These chimichangas go wonderfully with a side of refried beans or a fresh garden salad.
- Vegetarian option: Substitute the chicken with black beans or a mix of grilled vegetables for a delightful meat-free version.
- Spice level: Adjust the heat by using spicy salsa or adding diced jalapeños to the filling.
Pairing Suggestions for Baked Chicken Chimichangas
When it comes to serving Baked Chicken Chimichangas, there are endless possibilities. Here are some ideas to elevate your meal:
- Side dishes: Serve with classic Mexican sides such as refried beans or Mexican rice. Both complement the flavors perfectly.
- Salad: A fresh garden salad drizzled with lime vinaigrette adds a refreshing balance to the rich chimichangas.
- Dips: Don’t forget to offer a variety of dips like sour cream, guacamole, and salsa. They enhance the dish and allow guests to customize their experience.
- Occasions: These chimichangas are perfect for casual dinners, game days, or even festive parties. They’re easy to serve and eat!
- Storage tips: If you have leftovers, keep them in an airtight container in the fridge. They can last for 3 days and still taste fantastic when reheated in the oven.
- Seasonal pairings: In the summer, serve with a refreshing corn salad. During winter, consider a warm tortilla soup as a side.
FAQ
Conclusion
In summary, Baked Chicken Chimichangas are a scrumptious, crispy delight that brings the comfort of Mexican cuisine right to your table. With their easy preparation and customizable nature, they’re perfect for any gathering, big or small. I encourage you to try this recipe tonight; your taste buds will thank you!
Baked Chicken Chimichangas
Ingredients
Equipment
Method
- Preheat your oven to 425°F. This is an essential step for achieving that perfect golden brown exterior. A hot oven ensures the tortillas crisp up nicely while the filling heats through.
- In a large bowl, combine the cooked, shredded chicken with the salsa, cumin, and oregano. Mix everything until well combined. You'll notice the salsa turning the chicken a lovely red hue, and the spices will begin to infuse their flavors.
- Prepare your Knorr® Fiesta Sides™ rice according to package directions. Usually, this involves covering and simmering for about 7 minutes. When it's ready, remove it from the heat. The rice will be fluffy and flavorful, a great addition to the chimichangas.
- Once the rice is cooked, stir it into the chicken mixture along with the cheese. The cheese will melt slightly with the warmth from the mixture, creating a creamy filling that binds everything together.
- Now, take your flour tortillas and divide the filling evenly among them. Be generous, but make sure you can still fold the tortillas without them bursting. Once filled, wrap them tightly and place them seam-side down on a lined baking sheet.
- Brush the tops of the chimichangas with the remaining canola or vegetable oil. This will help them achieve that beautiful golden-brown color as they bake.
- Bake in the preheated oven for about 20 minutes or until they are golden brown and crispy. Keep an eye on them; you want a lovely crunch, but you don’t want them to burn!
- Once they’re out of the oven, allow them to cool for a few minutes. This will make it easier to handle them without burning your fingers. The aroma will be mouthwatering!
- Serve the Baked Chicken Chimichangas with your favorite toppings like shredded cheese, sour cream, chopped tomato, cilantro, green onion, lettuce, salsa, guacamole, and lime wedges. Get ready for a flavor explosion!
Notes
- Finely shred the chicken: This technique allows the chicken to blend seamlessly with the rice and cheese, ensuring a unified flavor in every bite.
- Homemade rice: Instead of using packaged rice, you can easily make your own for a fresher taste. If you have leftover rice, that works perfectly, too!
- Frying option: For those who love a little extra crisp, consider frying the chimichangas in oil after they've been assembled. They can be fried at 400°F for about 8 minutes for a delightful crunch.
- Baking from frozen: If you decide to freeze these beauties, bake them at 400°F. Start with foil covering for the first 20 minutes, then uncover and bake for another 10 to 15 minutes until crispy.
- Reheating tips: For the best results when reheating, place them on a rack in the oven. This keeps the chimichangas crispy, rather than soggy.