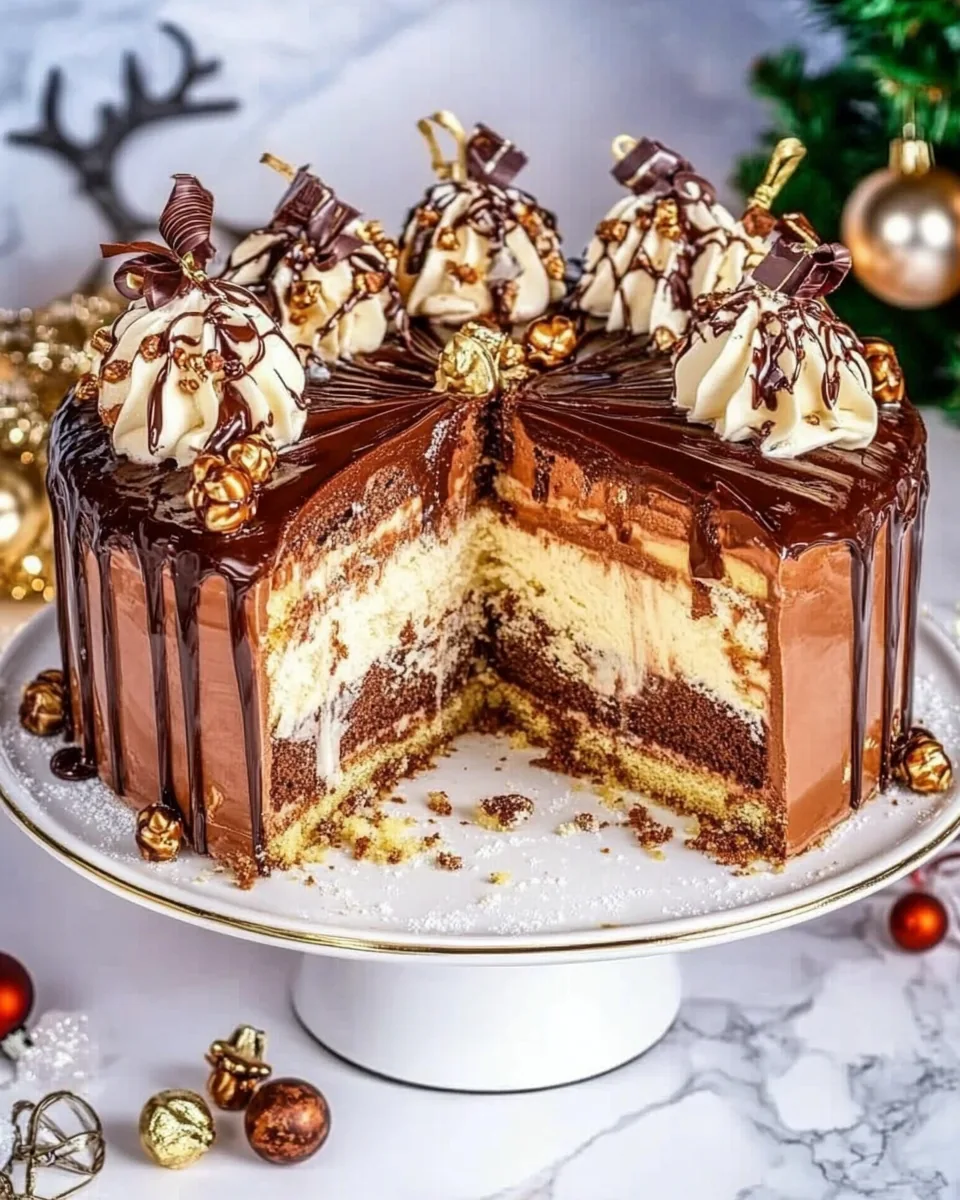
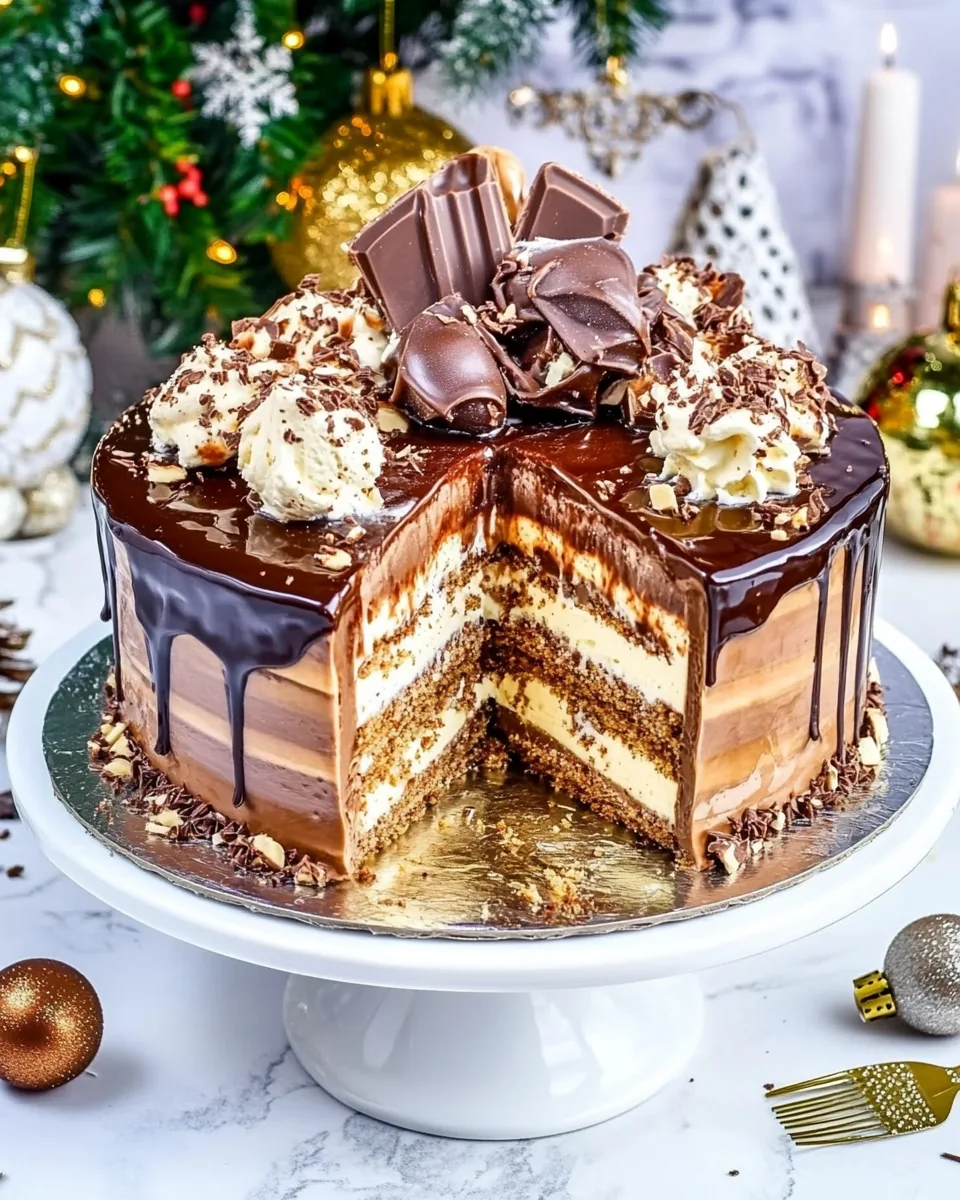
Chocolate Hazelnut Christmas Layered Ice Cream Cake
What could be more festive than indulging in a Chocolate Hazelnut Christmas Layered Ice Cream Cake? This delightful dessert has a way of bringing everyone together during the holiday season. As a child, I remember eagerly waiting for Christmas, not just for the gifts, but for the scrumptious treats that filled our home. Each layer of this cake is brimming with rich flavors, and the combination of chocolate, hazelnut, and the crispness of meringues creates a sensation that’s perfect for celebrating with family and friends. Every forkful is a taste of nostalgia, wrapped in a festive spirit.
As I grew up, my love for desserts only deepened, and it became a tradition to create something special each year. This year, I decided to make the Chocolate Hazelnut Christmas Layered Ice Cream Cake for my family. It’s not just a dessert; it’s an experience that brings joy and warmth to our hearts. The laughter and chatter at the table while sharing this cake, paired with hot cocoa or a warm cup of tea, makes for a perfect winter evening. Plus, the thrill of layering the ice cream, chocolate, and wafers provides a fun activity for everyone involved!
Believe me, once you try this cake, it might just become a staple at your holiday gatherings. The layers are not just delicious, but they also tell a story of love, tradition, and celebration. So, let’s get started on making this unforgettable dessert that will be the highlight of your next family gathering!
Recipe Snapshot
60 mins
0 mins
0 mins
Medium
450 kcal
8 g
Keto, Gluten-Free, Low FODMAP
22 g
Mixing Bowl, Food Processor, Frying Pan
What’s Great About This Chocolate Hazelnut Christmas Layered Ice Cream Cake
Rich Layers of Flavor
The Chocolate Hazelnut Christmas Layered Ice Cream Cake is a masterpiece of layered flavors. With each bite, you get the creamy richness of chocolate ice cream, and the added crunch from Ferrero Rocher chocolates makes you feel like you’re enjoying a luxurious treat. The layers provide a delightful contrast in texture, making each slice an adventure of taste.
A Showstopper Dessert
This cake is not only delicious but also visually stunning. The beautiful layers, drizzled with melted chocolate, create a feast for the eyes. It’s sure to impress your guests and become the centerpiece of your holiday dessert table. Trust me, everyone will be reaching for seconds!
Easy to Make Ahead
One of the best parts about this cake is that you can prepare it in advance. It freezes beautifully, allowing you to spend more time enjoying the festivities and less time in the kitchen on the big day. Just make sure to leave time for it to thaw slightly before serving so that it’s easier to slice.
Family Tradition
Making this cake can become a cherished family tradition. Involving loved ones in the preparation process can lead to memorable bonding moments, whether it’s crushing the meringues or decorating the top with Guylian chocolates. Creating memories while making this cake can be just as special as eating it!
Perfect for Any Celebration
While it’s a highlight for Christmas, this cake can be enjoyed during any occasion. Birthdays, anniversaries, or just a casual family gathering can turn into a celebration with this layered ice cream cake at the center.
Main Ingredients for Chocolate Hazelnut Christmas Layered Ice Cream Cake
The ingredients for the Chocolate Hazelnut Christmas Layered Ice Cream Cake are a delightful mix that perfectly combines flavors and textures. This cake utilizes the richness of chocolate ice cream and vanilla ice cream, complemented by the crunch of Ferrero Rocher chocolates and meringues. Each ingredient plays a crucial role, creating a harmony that ensures every bite is full of joy.
- Ferrero Rocher chocolates – 16 pieces, these hazelnut chocolates add a rich, crunchy flavor to the base of the cake.
- Chocolate Ice Cream – 2 liters, the creamy chocolatey layer provides the perfect foundation.
- Vanilla Ice Cream – 2 liters, this adds a sweet contrast and balances the chocolate richness.
- Mini Pavlova – 3 pieces, crumbled to bring a delightful crunch and airy texture between layers.
- Chocolate coins – 1 bag, these add a fun and festive touch on top of the cake.
- Chocolate block – 1 block (400g), melted for drizzling on top, creating a beautiful finish.
- Guylian chocolates – 6 pieces, for extra decoration, these beautifully crafted chocolates are a treat for both the eyes and taste buds.
- Corinthian’s wafers – 5 pieces, these add another layer of delightful crunch and flavor.
How to Prepare Chocolate Hazelnut Christmas Layered Ice Cream Cake
Getting ready to create the Chocolate Hazelnut Christmas Layered Ice Cream Cake is an exciting adventure! As you prepare to layer and freeze, keep in mind that patience is key. Each step is a building block toward a delicious celebration centerpiece. Let’s dive into the process together!
Start by lining the base of a 20 to 24 cm springform round cake tin with baking paper. This will make it easy to remove the cake once it’s frozen.
Next, take the Ferrero Rocher chocolates and crush them using a food processor until they resemble crumbs. This will form a crunchy base for your cake.
Spread the crushed Ferrero Rocher evenly over the base of the prepared cake tin. Press it down gently to form a solid layer and then chill it in the freezer for a little while.
While the base is chilling, remove the chocolate ice cream from the freezer. Allow it to sit at room temperature for a few minutes until it softens slightly but doesn’t melt.
Once softened, take the chilled base out of the freezer and layer on half of the chocolate ice cream. Use a rubber spatula or the back of a spoon to smooth it out evenly.
Return the cake tin to the freezer for a while to let that layer firm up.
Next, take the vanilla ice cream out to soften. Once it’s ready, crumble the mini pavlova into the softened vanilla ice cream and mix it well.
Layer this vanilla mixture over the chilled chocolate ice cream layer in the cake tin, then top it with some unwrapped chocolate coins for added texture and fun.
Place it back in the freezer again until it’s set.
Once the vanilla layer is firm, add the remaining chocolate ice cream on top. Wrap the tin in cling wrap and freeze the cake. You can do this a few days before you plan to serve it.
On the day of serving, melt half a block of chocolate (I recommend using a rich variety like Whittakers Milk Chocolate with Hazelnuts). Remove the ice cream cake from the freezer and let it sit for a few minutes.
Carefully remove the pan, then pour the melted chocolate over the top of the cake. Drizzle it slowly so it cascades down the sides, creating a beautiful effect as it solidifies quickly against the cold ice cream.
Decorate the top with any remaining chocolate, Guylian chocolates, and Corinthian’s wafers for that final touch of elegance.
Serve immediately or return it to the freezer for a bit longer. It’s best when served fresh after decorating.
Things Worth Knowing
- For a smoother layer: Allow the ice cream to soften at room temperature before layering. This ensures easy spreading and even layers.
- Chill utensils: Keep your spatula and other tools chilled while working with soft ice cream to prevent sticking.
- Layering tips: Use a rubber spatula to smooth out layers; it helps create a perfect finish.
- Chocolate melting: Melting chocolate can be tricky. Make sure to do it slowly to avoid burning, either in the microwave or a double boiler.
Tips and Variations
Creating the perfect Chocolate Hazelnut Christmas Layered Ice Cream Cake is an adventure full of possibilities! Here are some tips to ensure your dessert turns out wonderfully every time.
- Storage: Store leftovers in the original cake tin wrapped in cling film to keep it fresh for up to a week.
- Freezing: You can freeze this cake for several weeks. Just ensure it’s well-wrapped to prevent freezer burn.
- Pairing: Serve with a side of fresh berries or a drizzle of warm chocolate sauce for an extra treat.
- Presentation: Use a hot knife to slice the cake; it helps create cleaner cuts and presents beautifully.
- Flavors: Experiment with different flavors by swapping out the ice cream or adding layers of fruit for a refreshing twist.
- Occasion: This cake is perfect for birthdays, holidays, or any celebration where a special dessert is needed.
Perfect Matches for Chocolate Hazelnut Christmas Layered Ice Cream Cake
Serving the Chocolate Hazelnut Christmas Layered Ice Cream Cake is all about the experience. Here’s how to make the moment even more special:
- Hot Beverages: Pair this cake with a warm cup of coffee or hot chocolate to complement the rich flavors.
- Seasonal Treats: Consider serving this during Christmas dinner or holiday parties alongside other festive desserts.
- Outdoor Events: This cake also works beautifully for picnics or outdoor celebrations. Just keep it stored properly!
- Child-Friendly: This dessert is a hit with kids; consider making mini versions for their birthday parties!
- Storage Tips: If you have leftovers, keep the cake in the freezer but consume within a week for the best flavor.
FAQ
Conclusion
The Chocolate Hazelnut Christmas Layered Ice Cream Cake is truly a showstopper dessert that combines rich flavors and stunning presentation. It’s perfect for holiday celebrations, family gatherings, or whenever you want to indulge in something special. I encourage you to give this recipe a try and create delicious memories with your loved ones. Enjoy every moment, and happy baking!
Chocolate Hazelnut Christmas Layered Ice Cream Cake
Ingredients
Equipment
Method
- Start by lining the base of a 20 to 24 cm springform round cake tin with baking paper. This will make it easy to remove the cake once it’s frozen.
- Next, take the Ferrero Rocher chocolates and crush them using a food processor until they resemble crumbs. This will form a crunchy base for your cake.
- Spread the crushed Ferrero Rocher evenly over the base of the prepared cake tin. Press it down gently to form a solid layer and then chill it in the freezer for a little while.
- While the base is chilling, remove the chocolate ice cream from the freezer. Allow it to sit at room temperature for a few minutes until it softens slightly but doesn’t melt.
- Once softened, take the chilled base out of the freezer and layer on half of the chocolate ice cream. Use a rubber spatula or the back of a spoon to smooth it out evenly.
- Return the cake tin to the freezer for a while to let that layer firm up.
- Next, take the vanilla ice cream out to soften. Once it’s ready, crumble the mini pavlova into the softened vanilla ice cream and mix it well.
- Layer this vanilla mixture over the chilled chocolate ice cream layer in the cake tin, then top it with some unwrapped chocolate coins for added texture and fun.
- Place it back in the freezer again until it’s set.
- Once the vanilla layer is firm, add the remaining chocolate ice cream on top. Wrap the tin in cling wrap and freeze the cake. You can do this a few days before you plan to serve it.
- On the day of serving, melt half a block of chocolate (I recommend using a rich variety like Whittakers Milk Chocolate with Hazelnuts). Remove the ice cream cake from the freezer and let it sit for a few minutes.
- Carefully remove the pan, then pour the melted chocolate over the top of the cake. Drizzle it slowly so it cascades down the sides, creating a beautiful effect as it solidifies quickly against the cold ice cream.
- Decorate the top with any remaining chocolate, Guylian chocolates, and Corinthian's wafers for that final touch of elegance.
- Serve immediately or return it to the freezer for a bit longer. It's best when served fresh after decorating.
Notes
- Storage: Store leftovers in the original cake tin wrapped in cling film to keep it fresh for up to a week.
- Freezing: You can freeze this cake for several weeks. Just ensure it’s well-wrapped to prevent freezer burn.
- Pairing: Serve with a side of fresh berries or a drizzle of warm chocolate sauce for an extra treat.
- Presentation: Use a hot knife to slice the cake; it helps create cleaner cuts and presents beautifully.
- Flavors: Experiment with different flavors by swapping out the ice cream or adding layers of fruit for a refreshing twist.